Hi Everyone! I’m Annette from Tips From a Typical Mom and I am sharing with you one of my all time favorite treat recipes. St. Patrick’s Day Mint Crackle Sandwiches. I’m so excited to share my ideas here with you at The Crafting Chicks as a new contributor.
I was born in March which is why I think it’s my favorite month. I love St. Patrick’s day, Mint and Chocolate, and Shamrocks. I’m pretty sure that’s because at every one of my birthday parties when I was younger, we had Mint Chocolate Chip Ice Cream and the decorations were green and white with shamrocks all over the place. It’s a happy time of year and a great way to start off Spring!

For St. Patrick’s Day at our home now that I’m a mom to 5 kids, it’s just as fun. We always wake up to find treats hidden in our shoes by the naughty leprechauns and we make sure we are wearing green so we don’t get pinched by each other. Let me tell you, my kids pinch hard!
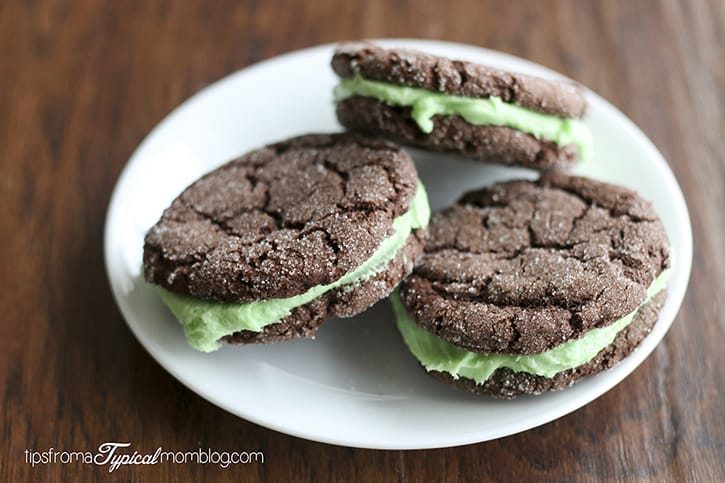
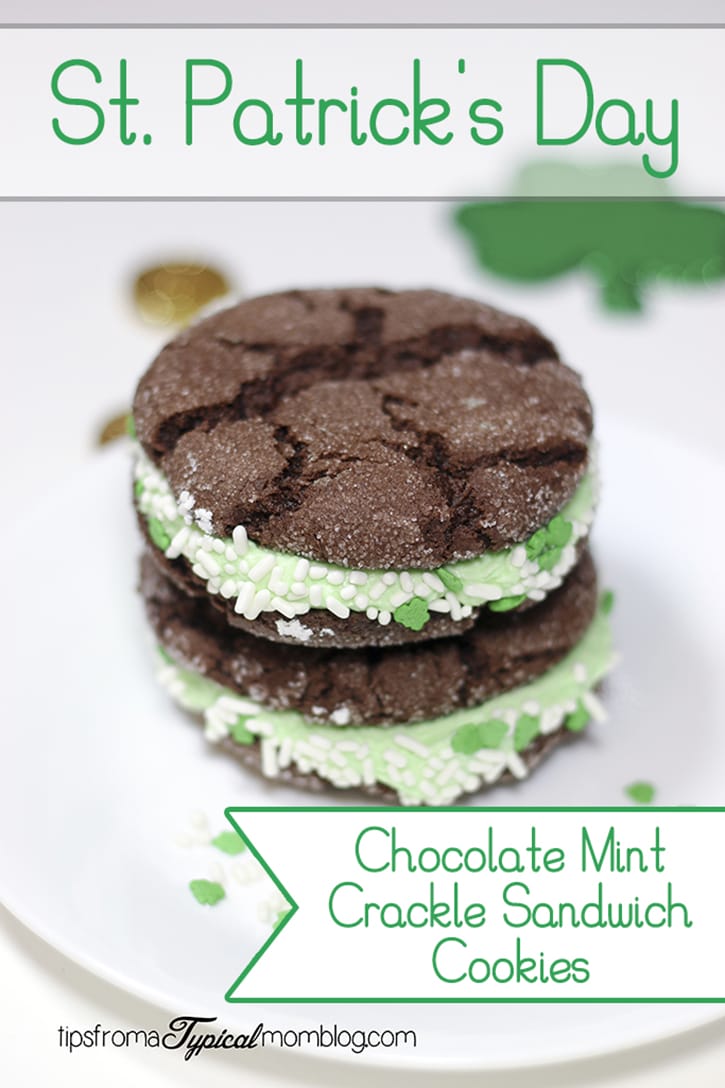
One thing we love to do each year is try a new treat. This year it was these delicious Chocolate Mint Crackle Sandwich Cookies. The sugar on the outside of the cookies gives it a crispy, crackle effect, but they are still soft on the inside. And the mint buttercream frosting, is to die for! Then take it a step further and top them off (or rather roll them in) some fun St. Patrick’s Day sprinkles and you’re done! So cute and simple!
Now on to the recipe!
Chocolate Mint Crinkle Sandwich Cookies
For the cookies:
- 2 cups all-purpose flour
- 1/2 cup unsweetened cocoa
- 1 teaspoon baking soda
- 1/2 teaspoon salt
- 1/2 cup butter, softened
- 1 1/4 cups sugar
- 2 eggs
- 1 teaspoon vanilla
- 1/2 cup sugar for dipping
For the frosting:
- 1/2 cup butter, softened
- 3-4 cups powdered sugar
- 1-2 tablespoons milk
- 1/4 teaspoon peppermint extract or more to taste
- 1/2 teaspoon green food coloring (I used gel)
Cookies: Preheat oven to 350 degrees Fahrenheit. Combine flour, baking soda, cocoa powder, and salt in a medium bowl with a fork. Beat 1/2 cup softened butter with a stand or hand mixer until light in color. Add 1 1/4 cups sugar and mix well. Add the eggs one at a time mixing well before each addition. Beat in the vanilla until well blended. Now add the dry ingredients a little at a time mixing well between each addition.

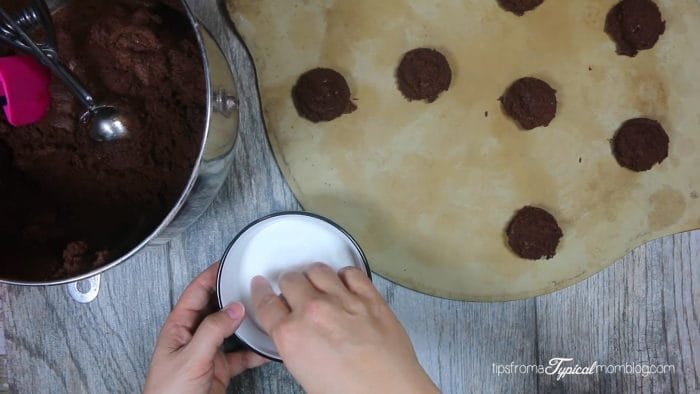
Put the 1/2 cup sugar in a small bowl or on a small plate. Using a 2 tablespoon cookie scoop, make balls out of the dough. Roll the balls in the sugar and place 1 1/2″ apart on a baking stone or cookie sheet.
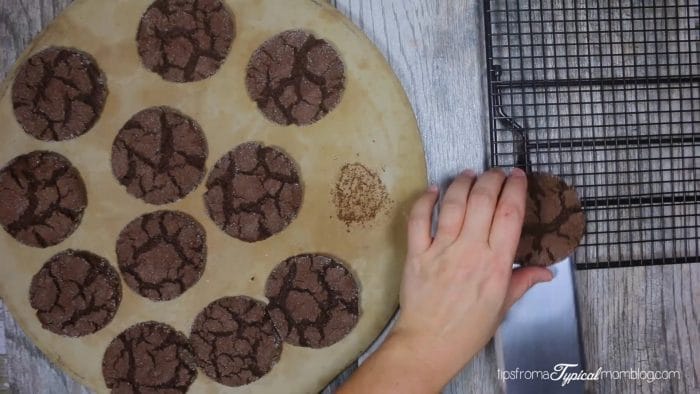
Bake 12 minutes or until the edges of the cookies are set. Do not over bake! Let the cookies cool ON THE BAKING SHEET for 5 minutes before removing to a cooling rack.
Frosting: Start out by beating the butter until smooth with a whisk attachment on your beater or stand mixer. With the mixer still going on medium, add the powdered sugar and whisk until smooth and incorporated. Add the peppermint extract and blend well. If your frosting is too stiff, add one or two tablespoons milk. If it’s too soft, add more powdered sugar until it reaches a spreadable consistency. Add the food coloring until desired color.
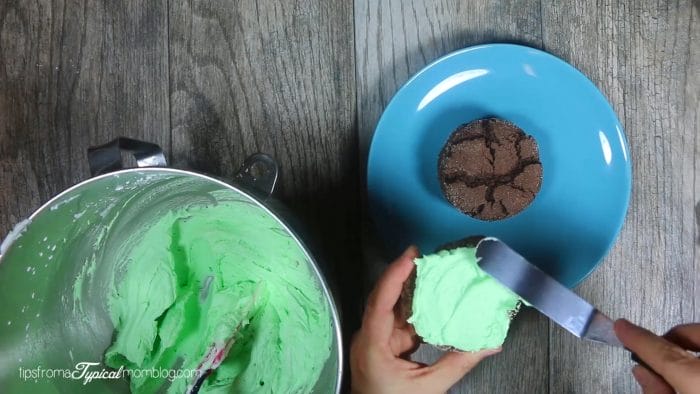
To Assemble: Turn one cookie over and frost the bottom generously with the frosting. I love to use my Off Set Frosting Spatula (affiliate link) to do this job.
Add a cookie on top and press down lightly. Add the sprinkles to a small plate and roll the sides of the sandwiches in the sprinkles pressing lightly to help them stick to the frosting. Then you are done! Store at room temperature in an airtight container for up to one week.
I have created a video tutorial here if you are more of a visual person like me!
Here is a printable recipe for you.

- For the cookies:
- 2 cups all-purpose flour
- ½ cup unsweetened cocoa
- 1 teaspoon baking soda
- ½ teaspoon salt
- ½ cup butter, softened
- 1¼ cups sugar
- 2 eggs
- 1 teaspoon vanilla
- ½ cup sugar for dipping
- For the frosting:
- ½ cup butter, softened
- 3-4 cups powdered sugar
- 1-2 tablespoons milk
- ¼ teaspoon peppermint extract or more to taste
- ½ teaspoon green food coloring (I used gel)
- Cookies: Preheat oven to 350 degrees Fahrenheit. Combine flour, baking soda, cocoa powder, and salt in a medium bowl with a fork. Beat ½ cup softened butter with a stand or hand mixer until light in color. Add 1¼ cups sugar and mix well. Add the eggs one at a time mixing well before each addition. Beat in the vanilla until well blended. Now add the dry ingredients a little at a time mixing well between each addition. Put the ½ cup sugar in a small bowl or on a small plate. Using a 2 tablespoon cookie scoop, make balls out of the dough. Roll the balls in the sugar and place 1½" apart on a baking stone or cookie sheet. Bake 12 minutes or until the edges of the cookies are set. Do not over bake! Let the cookies cool ON THE BAKING SHEET for 5 minutes before removing to a cooling rack.
- Frosting: Start out by beating the butter until smooth with a whisk attachment on your beater or stand mixer. With the mixer still going on medium, add the powdered sugar and whisk until smooth and incorporated. Add the peppermint extract and blend well. If your frosting is too stiff, add one or two tablespoons milk. If it's too soft, add more powdered sugar until it reaches a spreadable consistency. Add the food coloring until desired color.
- To Assemble: Turn one cookie over and frost the bottom generously with the frosting. Add a cookie on top and press down lightly. Add the sprinkles to a small plate and roll the sides of the sandwiches in the sprinkles pressing lightly to help them stick to the frosting. Then you are done! Store at room temperature in an airtight container for up to one week.

What’s your favorite tradition for St. Patrick’s Day?
Meet Annette:
Annette is the mom to 5 kids and wife to a paragliding hard working man. She lives in Utah with her family and loves hiking and camping in the mountains with her family. She writes the blog, Tips From a Typical Mom, where she shares family friendly recipes, free printables, coupons, parenting advice, and cleaning and organizing tips. Visit her blog and follow her on social media by clicking on the buttons below.

More from Tips From a Typical Mom . . .

Oops! I left the wet clothes in the washing machine, NOW WHAT?

How to make an adjustable charm bracelet.


[…] CLICK HERE for the recipe! […]