 Hello all you Crafting Chicks readers! My name is Lara. I blog at Less Cake {more frosting} and I usually answer to: Ellie G.

I am a stay-at-home Mom to 2 little darlins’. I love my family, Diet Coke, Broadway, Mickey Mouse, and anything made from pure sugar {including frosting}.
I couldn’t be more honored to get to hijack the Crafting Chicks blog for the day! I adore this blog! And I love me some Crafting Chicks! I’m still trying to steady my hand as I type. Okay…breathe…I’m ready…
I was so excited to learn that I’d be able to share a “Back-to-School” project today. I’ve actually had this project in mind all summer, and hadn’t gotten around to it. I’d like to show you how to make your very own DIY Scrapbooking Board for school….
But before you wonder “what on earth is a Larry Board,” let me explain.
About 15 years ago, I started scrapbooking. It was with awesome Mrs. Grossmans stickers that were dwarfed by my giant empty pages. I only had tiny markers…or calligraphy ones, and some rather unfortunate paper choices. Remember those days? My Mother came across a little lap desk around Christmas time, and she thought it would make a nice gift for my scrapbooking. My Mom usually stays up most of the night helping Santa with all his gifts. So on Christmas day, you’ll probably find her passed out from sheer exhaustion. She’s been known to do some crazy things on her couple hours of sleep.
One of the best was when we passed out the gifts, and one was tagged: “to Larry”.
Who’s Larry?
No Larry in my family.
My name is “Lara”, close….
We asked my Mom who the gift was for, and she insisted that it was for me, and WOULD NOT believe that she addressed it to “Larry”.
It might have been a “you had to be there” moment.
But the more she protested, the funnier it got.
We had to physically take off the tag and make her read it aloud.
That tag, now 15 years old, is still taped to my lap desk. Now, in our family, ALL lap desks are called “Larry Boards”. And today, we’re gonna help you make a “Larry Board” of your very own.
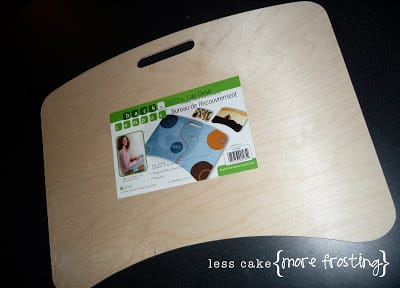
I started with a raw wood lap desk that I found at Hobby Lobby. I bet you could find something similar, and you definitely could cut one. (if you have fancy tools like that)
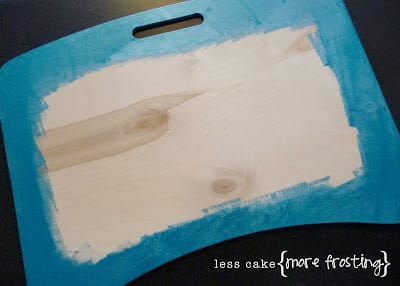
After a light sanding on the edges, I painted the entire front and about 2 inches of the back. This was my first try with “metallic” paint. (my son picked it out) And I might be in love. It looks AWESOME!!
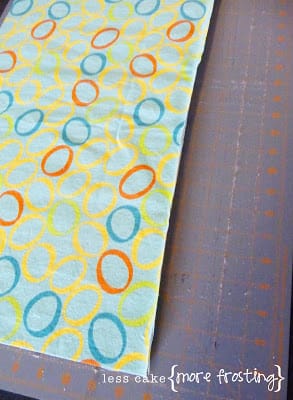
I used a piece of upholstery fabric that I had for the pillow back. I measured the wood from top to bottom, and side to side. Then I added an extra 1 1/2″.
Next, I used an inexpensive staple gun to staple the top of my fabric (wrong side up) to the bottom of the board. And I stapled around the corners. Then I flipped up the material, so that the right side was showing. And now the bottom is attached with an invisible seam.
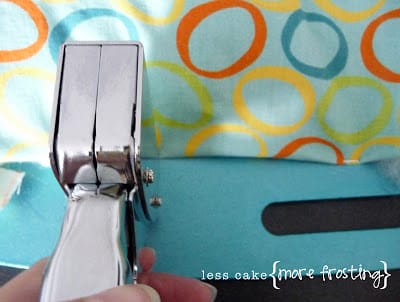
Then I stretched the material up and stapled one staple at the top. It has to be on top of the fabric. But when we finish, you’ll cover it up.
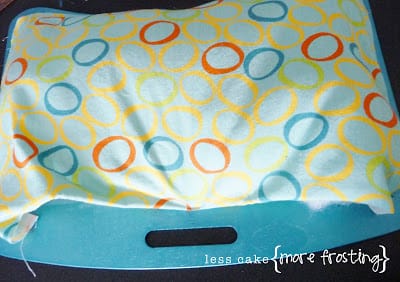
Next, lightly stuff your “pillow”. I made sure that it was stuffed well in the bottom corners, and then evenly throughout the rest.
When it’s all stuffed, you’ll run a line of hot glue about 1/4″ from the edge, and glue down the open edges. (hiding the raw edge underneath) As you’re gluing, cover up the exposed staple(s) on the top edge.
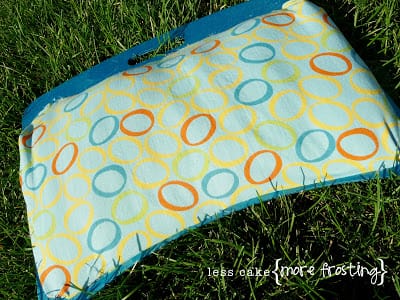
You’ll end up with a cushy little pillow to rest on your lap.
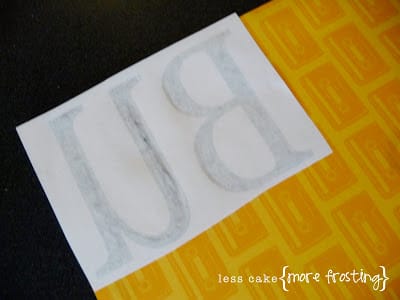
Now, the fun part….DECORATING! This “Larry Board” is for my son, so I wanted to put his nick-name across the front. Unfortunately, I don’t have a fancy cutter. (but will accept any donations toward getting me one.)
I like to print out letters on my printer, and put glue on the letters. Then I paste them to the BACK of my paper. (backwards) Then, when you cut, they don’t move and you get perfect letters every time.
(still needing a digital cutter….are you grasping how much?)
I used my beloved Mod Podge to stick down my decorations. And then I gave the whole top 2 coats of the magic Podge.
(see, Mod Podge and I are such besties that I just refer to it as “Podge”.)
**I do realize that by putting down the paper across the top, that it hinders a flat writing surface. But sometimes, cuteness comes before function. Wait, cuteness ALWAYS comes before function.**
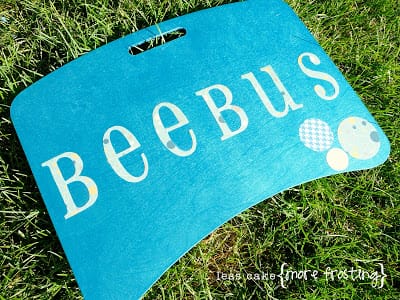
I am positive that decorating one for a little girl would be easier (and possibly more pink) but I have a little boy. I wanted it simple, and clean.
But the great thing about this project is….possibilities are ENDLESS!
So go forth!
Start off school with a bang!
And get your very own “Larry Board”.
*PS…there is no obligation to call it a “Larry Board”. Obviously, explaining that to your friends and family would be lengthy and weird.
Feel free to call it whatever you wish*

LOVE it!
I think I’ll call mine a “Larry Board”…my family would appreciate the humor 🙂
Thanks for guest posting on our blog!:) Fabulous post!!!:)
I think I might just have to make myself one…I tend to do a lot of writing/list making in bed or on the couch and never have something to write on. ESPECIALLY on the couch. I end up using our coffee table books and then get mad at myself when I notice pen indents in them. hmm…cute idea!
Great tutorial, and I loved your story! A Larry board just might be in my future.
Thanks!
suzy
Ellie g-this is great! Thank you so much for sharing on the crafting chicks:)
Love this so much. I even think I could handle this project. Great guest post all together!!
Wow, this is awesome! I have a purchased “Larry Board” that I love. But this is definitely better and more appealing. Thanks for sharing!
Wow! Thanks everyone. I can’t believe you’d all humor my dorky story. If I give out cyber gold stars to all of you….will that count? I LOVED getting to be a Crafting Chick for a day. Is it weird that I want matching t-shirts now? (and a membership card)
Thanks so much for the opportunity gals! And for all the nice comments. I adore this blog!
This completely rocks! I love ellie – Lara!!
{via Mod Podge Rocks} Thanks for the great tutorial.
I also wanted to tell you that you have about my favorite blog name ever! I have been known to eat other people’s frosting and give them my cake.
lol. I see myself totally in your mother; staying up till all hours and getting a little goofy in the process. Bless Her Heart. Do fathers ever do this? Love the project, especially for a young child. I made something similar for my teen son out of a discarded kitchen door sample (sans cute decorations). Alas teen boys do not appreciate things mom make. Now I use it and love my “Larry Board.” I used an old pillow for the cushiony bottom. I think I would consider moving the decorations up to the top edge to leave a smooth writing surface in the center.