Personalized Family Message Board
Today I wanted to share with you my latest sort of “trash to treasure” project. I took a thrift store frame, some paint, and a photoshopped design and turned it into a very useful (and cute I might add) personalized family message board!

I’ve been wanting to make a big family message board for a long time and it took me forever to decide exactly what I wanted. I knew I wanted it to be:
- not super expensive
- unique and personalized with our names and/or photos–something I could design in Photoshop
- large and in charge 🙂
- cute to look at with fun colors and design
- not necessarily a traditional calendar
- changeable if I wanted to update it later on
So I’m pretty happy with the outcome, it basically meets all of my criteria!
It’s the same idea that Kirsten used awhile back with her “Count Your Blessings” board: Grab a frame, add something inside the glass that is pretty, hang it on your wall, write stuff on it. 🙂
I grabbed a large frame at the DI (Utah thrift store) for about 8 bucks–it had seen better days. 🙂 Plus the print inside simply did not fit in with my other decor! I had something more useful in mind for this frame and could see its potential.

I primed and then painted the frame my latest favorite color: Blue Ocean Breeze spray paint by Krylon. There, there, much better. Look at the pretty details in the frame. I only did a few light coats because I still wanted a little bit of the wood grain to show through and I didn’t really want to glaze or stain or sand. Call me lazy.

I created my large photo insert in Photoshop–we’re talking 24×30 inches baby! (I made the chevron zigzag and quatrefoil patterned papers myself and the rest is from Digital Scrapbook Memories kit called “Celebrate”–check out those adorable pennants and scalloped border! Swoon!)
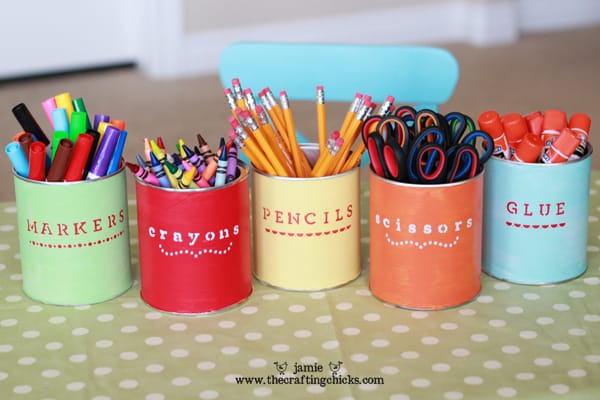
I didn’t want a calendar because I already have one, so I decided to make sections for each member of our family with a little framed photo and room to jot down our schedules or things to remember for the upcoming week or so, or even write each other love notes. 🙂 It’s hard to tell how big it really is. . . each person’s section is like 6 inches across and 12 inches down! I think I’m also going to use this for our Family Home Evening assignments, jotting down each week who gets to say the prayer, pick the song, do the lesson, etc.


Then I included a large space on the bottom half (about 12x3o inches) for writing lists or notes or quotes or scriptures, whatever we are working on at the moment in our family.I printed the whole thing at Costco (20X30 are only $8.99).

Bytheway, like Kirsten I definitely recommend using BISTRO CHALK MARKERS to write on your message boards. They are opaque and much easier to read and use than the regular dry erase markers, plus they don’t smudge when dry. I used a dry erase marker above with the scripture reference, and it just doesn’t read as well as the bistro markers do.
If you don’t have Photoshop or don’t want to mess with trying to create your own background or insert, you can also use scrapbook paper, or even wrapping paper. As another alternative you could find some fun fabric to stick behind the glass or you can use vinyl to create a calendar overlay, or you can even omit the insert and use your own wall as the background under the glass. Lots of possibilities with this project. You can make it on a smaller scale to fit your needs as well. It would be a great gift idea.

Here it is hanging on our wall in a high traffic area of our home! I’m hoping it’ll get a lot of use and keep us on track and organized with all of our schedules! 🙂 I love our new personalized family message board!
***Bytheway if you are interested in learning how to use Photoshop for digital scrapbooking (us Chicks love digiscrapping!) or other hybrid projects such as this one, I have to let you know about a retreat organized and hosted by a local Utah company Digital Scrapbook Memories coming up THIS WEEKEND in Park City, UT! I am actually teaching a few classes at it and there are still some spots available if you are interested. I’d love to meet any of our readers! You can still purchase tickets up until the 14th which is this Thursday. 2 1/2 days chock full of awesome info about digital scrapbooking and Photoshop and FUN people. Oh, there’s also a photography class all day Thursday you can purchase too. Woo!

Here is more info about the class schedule and everything, including beginner and intermediate classes, prizes, swag and more. This is the 4th year I’ve taught at this retreat and it is a total blast.
I am totally loving this – the personalization is something I need to try! And the Spring colour scheme you choose is so fresh! Thanks for the inspiration!
Thank you so much! It is so cold and snowy here in in Utah that I just craved fun spring colors. 🙂
Love it! Thanks so much for sharing! I think I’ll do slightly smaller versions for my childrens rooms (they love to write and doodle on white surfaces *grin*) and a larger one for our kitchen!
Thanks!! That is a great idea for kids’ rooms!
LOVE it brookie!
So creative!! I love the color you painted the frame. I will definitely be making this!
I LOVE this idea Brooke. I am so excited to see what you do at the retreat! You really are an inspiration. 😀
Thanks Amy! I am excited for this weekend!!!! Woo hoo!!
I used the same color to make a bulletin board for my office last week. I used some cork board I had laying around and wrapped it in fabric and tahdah! L.O.V.E the color. I really like the message board idea. I may just have to try this one for my laundry room! 🙂
Yes, everything in my house better watch out because I want to paint everything that color, lol! And I love the fabric covered cork board thing, I actually have one waiting for me to do the same thing! I just need to decide which cute fabric to use….decisions, decisions!! Thanks for stopping by Jenette!
Hey! I LOVE this! I’m making one for our house to surprise my mom! 🙂 What Photoshop software do you use?
Great information 🙂