• Skip to primary navigation
  • Skip to main content
  • Skip to primary sidebar
  • Skip to footer

The Crafting Chicks

Ideas and Inspiration to Create Your Life.

  • Home
  • Meet the Chicks
  • Advertising/PR
  • Contact
  • Blog
  • Printables
  • Recipes
  • Holidays
  • Life
  • Sewing
  • More

gift ideas, Organizing

3-Tiered Stand $6 + spray paint!

by Kirsten · on May 18, 2011 · 81 Comments ·

37499 shares
  • Share
  • Tweet

Hey friends. I shared this tutorial last week with Taylor over at Mary Jane and Galoshes, go and check out her blog, it’s really fresh and creative! Thanks Taylor :).

Today for you I have a thrift store remake. I have wanted to make something similar to THIS for a long time. I can’t stomach the $69 price tag from Pottery Barn. I just barely told my husband that even if we had all the money in the world, I couldn’t spend $69 on something I could remake, NO WAY, I hope you would say the same. So I spend $6 at the local Utah thrift store (the DI) and got these beauties, $6 TOTAL.

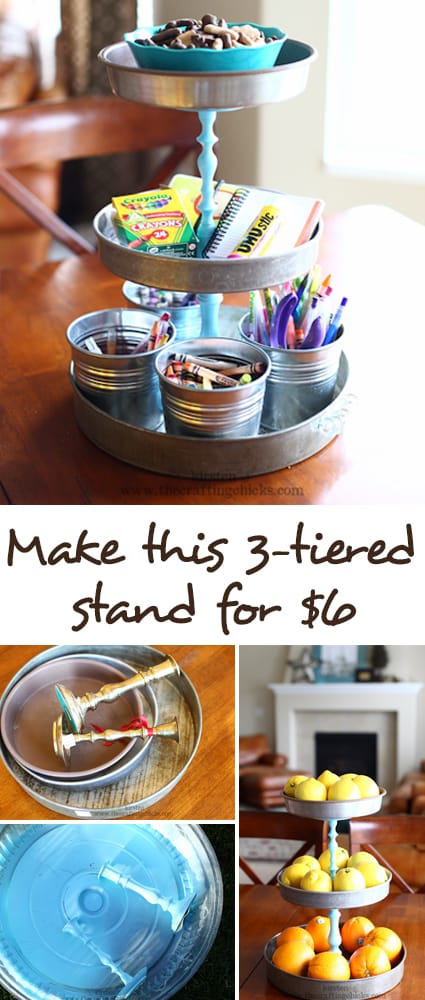
So I purchased Rust-Oleum 2x spray paint, the same color used on this side table, I literally went on a painting rampage that day. I used the lid of a sandwich tray to keep those suckers contained. Rolling the candlesticks around and spraying seemed to work pretty well. One coat worked well especially since I didn’t mind if the gold shined through, even though it didn’t. I am so into yellow/gold lately.


After the paint dried, I used E6000 glue, which is the only glue for metal and glass, to adhere the candlesticks to the old cake pans. I love that these pans are weathered and even rusted in areas because I plan to use this for packaged treats and other supplies.

I glued one candlestick upside down to make it match and not look so much like 2 candlesticks. When looking for pans to use for this, make sure that the bottoms of the pans are flat and not bend, otherwise this would turn out to be a hot mess and they wouldn’t look right. I let the glue dry overnight.

School supplies and a snack. Perfect. Total cost:  $6 and some leftover spray paint :).

These are fun because you can load them up with just about anything.

What have you found at the thrift stores that YOU would like to make something with??

xoxo,

Kirsten

3-Tiered Stand Thrifted

About Kirsten

is the author of this post. Wanna know more about the Chicks? Click here. :)

Comments

  1. stephanie says

    May 18, 2011 at 5:51 am

    Love love this idea. I would love to make something like this for my kitchen for our fruit. Thanks for the idea!

    Reply
    • Joan says

      April 19, 2015 at 2:55 pm

      I wouldn’t use it for edibles unless there is something between the fruit & the painted tins. (Like a bowl, saucer or something else.) I would be concerned about the fruit absorbing the chemicals from the paint.

      Reply
      • teena says

        February 21, 2017 at 12:29 pm

        Use some petty contact paper and put inside the cake pans 🙂

        Reply
        • teena says

          February 21, 2017 at 12:29 pm

          I meant Pretty LOL

          Reply
  2. jessica says

    May 18, 2011 at 6:55 am

    That’s beautiful! I really like it! Would love to make one just like it.. but kind of running out of places to put things in my little apartment! haha 🙂

    Reply
  3. Ashley says

    May 18, 2011 at 6:59 am

    I am making something similar to this for my sister’s bridal shower next month! I can’t wait to share it!

    Reply
  4. Candice says

    May 18, 2011 at 9:05 am

    So very cute! I love the color of spraypaint you used! Great job!

    Reply
  5. Christine says

    May 18, 2011 at 10:31 am

    What a neat idea..cannot imagine paying $69 for that! Thanks for sharing

    Reply
  6. Ruthie says

    May 18, 2011 at 11:36 am

    If I could just figure out where I’d store it when it’s not in use!

    Reply
    • Rebecca Schroeder says

      March 17, 2022 at 9:43 pm

      I would think about putting it on my makeup vanity when not using in an eating area. It would be a great way to corral nailpishes, perfumes, creams, etc.

      Reply
  7. Peggy C. says

    May 18, 2011 at 11:55 am

    Since I don’t really like the idea of leaving the pans unpainted, I would paint those too, and then use the whole thing for tea parties or cupcake parties and either fill the pans with cupcakes or tea sandwiches and small desserts.

    Reply
  8. Carin says

    May 18, 2011 at 12:07 pm

    Clever idea! Thanks for sharing.

    Reply
  9. HeatherM says

    May 18, 2011 at 12:26 pm

    PERFECT! I have been trying to think of something to use as a fruit bowl. This is just the thing.

    Reply
  10. Leticia says

    May 18, 2011 at 1:17 pm

    Cute! Where did you find the cake pans? What color is the paint?

    Reply
    • Brooke says

      May 18, 2011 at 3:41 pm

      Kirsten found the cake pans at our local thrift store called the DI. 🙂

      Reply
  11. Candace says

    May 18, 2011 at 3:39 pm

    Where did you find these classy candlesticks?

    Reply
    • Brooke says

      May 18, 2011 at 3:42 pm

      She grabbed them at a local Utah thrift store called the DI for cheap cheap cheap! 🙂

      Reply
  12. Eleanor says

    May 18, 2011 at 4:48 pm

    Are the candlesticks brass or a metal?

    Reply
    • Kirsten WRIGHT says

      May 20, 2011 at 8:18 am

      They are brass!

      Reply
  13. Shabby Miss Jenn says

    May 18, 2011 at 4:48 pm

    OMG! I LOOOOOOOOOOOOOOOOOOOOOOOOVE THIS! How totally cuuute!!!!!

    Reply
  14. Sora says

    May 18, 2011 at 5:35 pm

    I just wanted to tell you I just started to read your blog and was looking at all of your furniture transformations like the bar-stools, the china cabinet and the tiered stand… they are all absolutely gorgeous! I wish I had something to transform in my house and the skill to do it. Amazing!!

    Reply
  15. Lissa (Bellenza) says

    May 19, 2011 at 1:52 am

    You are SO creative and resourceful! Such a cute finished product–and totally usable for home or party!

    Reply
  16. Carrie says

    May 20, 2011 at 11:34 am

    So cute! What color is the paint?

    Reply
  17. Jean @ Quilted Cupcake says

    May 21, 2011 at 1:02 pm

    Love this! I especially like the natural color of the metal. The photo with the lemons is awesome! I pinned it to my Pinterest board.

    Reply
  18. Kate @ LittleOffNorth says

    May 22, 2011 at 7:36 pm

    Oh..I love those pans!! I made something similar a little bit ago, and have been enjoying it since…take a look~
    http://littleoffnorth.blogspot.com/2011/05/spring-project.html

    Reply
  19. Hannah S says

    May 22, 2011 at 10:21 pm

    Darling! I love it.
    My thrift store (or craft) hunting involves small candlesticks and small wood plates/circles to make mini cupcake stands. I saw one at Macy’s this last weekend that are part of Martha Stewart’s cake/ceramic collection but I can’t find them online to link to it. They are white, about 5″ tall and ceramic. Adorable but at a pricetag of $29. I wanted to make my own. I was hoping to find a set of two small wood candlesticks that I could paint and glue to a small round piece of wood to create the same look. But then I worry about food safety and spray paint. Would a final coat of clear protect it?

    Reply
  20. Hannah S says

    May 22, 2011 at 10:23 pm

    Oh, and where did you get those cute metal pails? That’s a clever idea for school supplies. I wanted to put mine in glass kitchen jars but I was afraid my children would be too rough on them. I like this idea.

    Reply
  21. danielle says

    May 25, 2011 at 9:08 pm

    i love this!!! wow. great job!

    Reply
  22. Allison says

    May 26, 2011 at 10:03 pm

    I love this! I shared it with some friends and we all are making one. I found the cake tins and just have to find some candlesticks this weekend at a yard sale. 🙂

    Thanks for the great idea!!

    Reply
  23. Lori says

    May 27, 2011 at 8:11 am

    Were throwing my sister a 50 yr. Old party next week, I’m definitely making this, painting it black and white I think. I already have some candle sticks like that, shoot, if I didn’t send them to the DI

    Reply
  24. Amy says

    September 19, 2011 at 3:14 pm

    You inspired me to make my own! I gave you proper credit, of course 🙂 http://themombot.com/crafting/2011/09/18/2-tiered-diy-stand-question

    Reply
  25. Danielle says

    October 5, 2011 at 9:46 pm

    This looks fantastic!

    Reply
  26. beth says

    February 4, 2012 at 8:04 pm

    Thanks for this idea, it’s wonderful. I love that you did not color the trays as well, I like the look much better with the different finishes.

    Reply
  27. Kathy says

    March 16, 2012 at 8:44 pm

    Found this on Pinterest. It’s just what I’ve been trying to find. And for the record, your $6 version is much cuter than the one from PB. Thanks!

    Reply
  28. Embroidery Fashions Boutique says

    May 12, 2012 at 4:05 am

    What a unique idea. I have been saving some old cake pans which belonged to my mother and grandmother. Now I can reuse them.

    Reply
  29. Delores LeBoeuf says

    May 28, 2012 at 10:02 pm

    YES, it is easy enough that I could accomplish, super idea, thnx for sharing. Love&Blessings, Lady Delores.

    Reply
  30. Debi says

    May 29, 2012 at 5:08 pm

    I love it I love it I love it I love it I love it

    This is next on my list for my dining room. Awesome. It’s probably a good thing I didn’t see this before I went to the thrift store today! I have a couple other projects ahead….oh but this one will be so simple!

    Thank you!!

    Reply
  31. Michelle says

    December 6, 2012 at 2:06 pm

    Question: When I do this, I would want to spray paint the pans too (give them like a bronzier color); how food-safe is that though, and do you know if it’s safe to wash…?

    Reply
  32. Sandi says

    January 8, 2013 at 11:06 am

    What an adorable idea! you are so clever! Thank you for sharing your awesome ideas. For those worried about the metal pans…put a cute paper doily on the bottom. Personally…I love this just as it is and wouldn’t change a thing.

    Reply
  33. Kirsten says

    April 17, 2013 at 1:52 am

    Thanks for the How-To info Kirsten. I have the pans and even the same color of spray paint! All I needed was the type of glue, and how to put it together. Thanks!

    Reply
  34. Goose says

    November 1, 2014 at 4:32 am

    This is adorable! I clicked over from Pinterest – I love the look of galvanized metal and your knock off is spot on!

    I just wanted to comment that E6000 is NOT food safe – if people making this want to use their stands for unpackaged foods, they should find another method of attaching the pans together – perhaps w a small holes and a dowel going through the pans. While I love E6000 for craft use, the stuff smells AWFUL! You can smell the toxicity – it needs to be used in a very well ventilated area and still smells for days after application.

    Reply
  35. Gaby says

    September 20, 2018 at 6:25 am

    What glue did you use please?

    Reply

Trackbacks

  1. » From Junk to Gem-Galvanized Tiered Tray says:
    June 7, 2011 at 6:30 am

    […] heights.  I think it adds interest to a table and helps to draw your eye in.  When I saw this tutorial for a Pottery Barn 3-tiered tray knockoff I knew it would be the perfect addition to my show […]

    Reply
  2. Pinterest Wedding Links for a Gorgeous Friday! | Weddingbee says:
    September 30, 2011 at 3:45 pm

    […] via Kirsten of The Crafting Chicks / On […]

    Reply
  3. Day 16 – Repurpose items into décor says:
    October 16, 2011 at 10:43 pm

    […] pie pans or plates make a beautiful 3 –tiered stand perfect for organizing in your craft room or for serving food at your next […]

    Reply
  4. Three Tiered Stand | Creativity Collective says:
    February 9, 2012 at 10:04 pm

    […] Crafting Chicks shared a wonderful three tiered stand made from old cake pans and candle stick holders. What a practical and appealing way to display […]

    Reply
  5. Day 13 – Fruit-tastic! « 100 Days says:
    February 18, 2012 at 4:45 pm

    […] front and center! The pin for this idea came from here, but the actual tutorial I used came from The Crafting Chicks. Today was my first visit to that blog, but I have it bookmarked now because if this idea is any […]

    Reply
  6. DIY tutorials cupcake stands or towers | Make Create Do says:
    July 31, 2012 at 2:44 am

    […] Candle Sticks + Old Cake Pans = 3 Tier Cupcake Stand […]

    Reply
  7. Day 13 – Fruit-tastic! « His Wife, Their Mom, and Me Somewhere in Between says:
    October 3, 2012 at 3:05 pm

    […] front and center! The pin for this idea came from here, but the actual tutorial I used came from The Crafting Chicks. Today was my first visit to that blog, but I have it bookmarked now because if this idea is any […]

    Reply
  8. DIY Fruit Stand/ Cupcake Stand/ WhateverYouWant Stand says:
    February 5, 2013 at 9:43 pm

    […] I could do the same for a fruit bowl. I did a little Pinteresting for inspiration and came across this picture, and from there it was a go. And I must say, I love the finished product! I bought two […]

    Reply
  9. 40 Back to School Organization Ideas - Becoming Martha says:
    August 5, 2013 at 6:02 am

    […] 3 Tired School Supply Stand – The Crafting Chicks […]

    Reply
  10. 21 Pottery Barn Inspired DIYs | OHGet - Part 1 says:
    August 20, 2013 at 5:44 pm

    […] Instructions here. […]

    Reply
  11. 21 Pottery Barn Inspired DIYs | シ最愛遲到.! says:
    August 20, 2013 at 6:04 pm

    […] Instructions here. […]

    Reply
  12. Revisiting Some Favorite Projects {and another visit to Studio 5} says:
    September 16, 2013 at 10:32 am

    […] Kirsten’s 3 Tiered Stand […]

    Reply
  13. Repurpose Cake Pans into Tiered Stand says:
    October 16, 2013 at 6:02 am

    […] TONS of uses for tiered trays. However, in my book that still doesn’t merit a monster price tag. Kirsten of The Crafting Chicks shows how you can turn a few items from the thrift store into your own stylish tiered stand. […]

    Reply
  14. DIY 3-Tiered Stand | oh crafty mama says:
    February 25, 2014 at 10:09 pm

    […] I searched for easy tutorials and have found this blog has a post about making one. So […]

    Reply
  15. Storage Solutions: 8 DIY Ideas for Getting Organized | paintersupplies.co.uk says:
    April 20, 2014 at 10:26 pm

    […] is another organizing solution that can serve kids or adults. The Crafting Chicks were inspired by the tiered cake stands at […]

    Reply
  16. DIY 3-Tiered Stand | Home and Heart DIY says:
    July 10, 2014 at 5:31 pm

    […] 3 Tiered Stand by The Crafting Chicks is a great idea! I feel a lot of the 3 tiered stands I see in the store just don’t fit my […]

    Reply
  17. Creative Home Storage Solutions says:
    November 9, 2014 at 11:46 pm

    […] image via: thecraftingchicks […]

    Reply
  18. ETCETERAS: A Round Up of Amazing Knock Off Projects | homework: creative inspiration for home and life says:
    December 9, 2014 at 12:16 am

    […] Tiered Stand | The Crafting Chicks FIBER & […]

    Reply
  19. 21 Pottery Barn Inspired DIYs | Health Awareness Review says:
    January 18, 2015 at 12:57 am

    […] thecraftingchicks.com […]

    Reply
  20. 21 Pottery Barn-Inspired DIYsThe NEW N!FYmag says:
    February 12, 2015 at 11:22 pm

    […] thecraftingchicks.com […]

    Reply
  21. 21 Pottery Barn Inspired DIYs | Sing Viral says:
    March 14, 2015 at 6:03 am

    […] thecraftingchicks.com […]

    Reply
  22. 21 Genius DIY Pottery Barn Knock-Offs -Design Bump says:
    June 22, 2015 at 8:08 pm

    […] thecraftingchicks.com […]

    Reply
  23. 30 Budget Friendly DIY Pottery Barn Hacks - Noted List says:
    June 28, 2015 at 7:11 pm

    […] source […]

    Reply
  24. Amazing Interior Design 15 Ingenious Pottery Barn Inspired DIY Project Ideas says:
    August 2, 2015 at 6:08 am

    […] Source to the tutorial  here. […]

    Reply
  25. Genius Ways To Reuse Your Old Stuff says:
    November 4, 2015 at 10:40 am

    […] Cake Pan Tower […]

    Reply
  26. Torteras para decorar - Blog La Caleñita says:
    December 16, 2015 at 2:27 pm

    […] LaFigurina.com, BeautyAndBedLam.com, TheCraftingChicks.com, […]

    Reply
  27. 31 Pottery Barn Inspired DIY Projects That Cost a Fraction of the Real Thing | Blended says:
    January 27, 2016 at 7:56 pm

    […] perfect project for entertainers and kitchen mavens, this three tiered stand hack by The Crafting Chicks is adorable. Here’s Pottery Barn’s […]

    Reply
  28. 24 Ways You Can Transform Old Junk Into Things You’ll Love. | Funazz – Fun Viral Stories! says:
    February 10, 2016 at 1:51 pm

    […] thecraftingchicks […]

    Reply
  29. 24 Ways You Can Transform Old Junk Into Things You’ll Love. – Babelque – News For Your Mind says:
    February 10, 2016 at 4:11 pm

    […] thecraftingchicks […]

    Reply
  30. Viral Stories » Viral Stories » 24 Ways You Can Transform Old Junk Into Things You’ll Love. says:
    February 10, 2016 at 6:45 pm

    […] thecraftingchicks […]

    Reply
  31. 24 Ways You Can Transform Old Junk Into Things You’ll Love. – Viral Nero says:
    February 11, 2016 at 12:45 am

    […] thecraftingchicks […]

    Reply
  32. 3 Tier Cupcake Cake Desserts Yellow Stand Set Of 4 says:
    March 2, 2016 at 1:50 pm

    […] Source File: thecraftingchicks.com » DOWNLOAD « […]

    Reply
  33. 3 Tier Cupcake Cake Desserts Yellow Stand Set Of 2 says:
    April 4, 2016 at 2:34 pm

    […] Source File: thecraftingchicks.com » DOWNLOAD « […]

    Reply
  34. 40 DIY Spray Paint Projects That Restore Old Items | DIY Guide says:
    May 29, 2016 at 2:08 am

    […] By CraftingChicas.com […]

    Reply
  35. 20 Pottery Barn Inspired Projects - Craft-O-Maniac says:
    July 13, 2016 at 9:01 am

    […] Crafting Chicks | 3 Tiered Stand […]

    Reply
  36. 37 Spray Painting Tips From The Pros - DIY Joy says:
    March 31, 2017 at 8:58 am

    […] thecraftingchicks […]

    Reply
  37. Pottery Barn Hacks DIY Projects Craft Ideas & How To’s for Home Decor with Videos says:
    July 10, 2017 at 10:52 am

    […] image via The Crafting Chicks […]

    Reply
  38. 15 Chic DIY Projects Inspired By Pottery Barn That Cost Way Less – Home Decor says:
    September 15, 2017 at 12:34 pm

    […] Tutorial […]

    Reply
  39. 45 Dollar Store Craft Room Organization Ideas - Prudent Penny Pincher says:
    January 29, 2021 at 2:47 pm

    […] $6 Tiered School Supply Stand from The Crafting Chicks […]

    Reply

Leave a Reply Cancel reply

Your email address will not be published. Required fields are marked *

This site uses Akismet to reduce spam. Learn how your comment data is processed.

Recent

Ham and Spinach Stromboli

Yarn Wrapped Pumpkins

Spinach Tortellini Salad

Sunday Roll Recipe

Pesto Turkey Wraps

Tile Fire Art

Get access to our free crafting guide

We are a participant in the Amazon Services LLC Associates Program, an affiliate advertising program designed to provide a means for us to earn fees by linking to Amazon.com and affiliated sites.

© 2023 The Crafting Chicks. Website by WP Barista. Privacy Policy

37499 shares