• Skip to primary navigation
  • Skip to main content
  • Skip to primary sidebar
  • Skip to footer

The Crafting Chicks

Ideas and Inspiration to Create Your Life.

  • Home
  • Meet the Chicks
  • Advertising/PR
  • Contact
  • Blog
  • Printables
  • Recipes
  • Holidays
  • Life
  • Sewing
  • More

Christmas, Deck the Halls, digital scrapbooking

{Sassy Juice Top Photo Ornaments}

by Jamie · on November 30, 2010 · 75 Comments ·

54989 shares
  • Share
  • Tweet

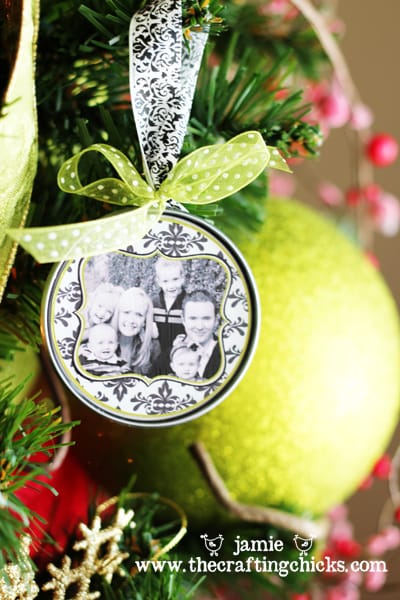
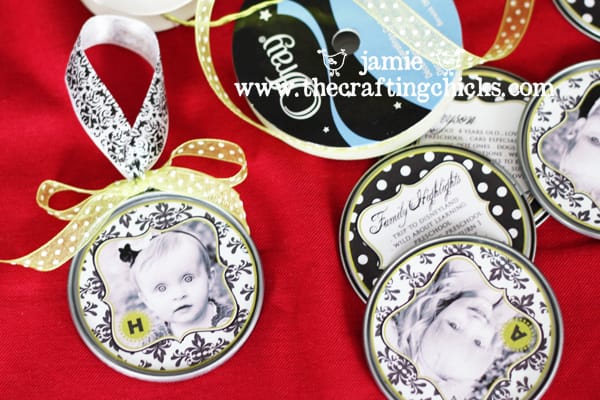
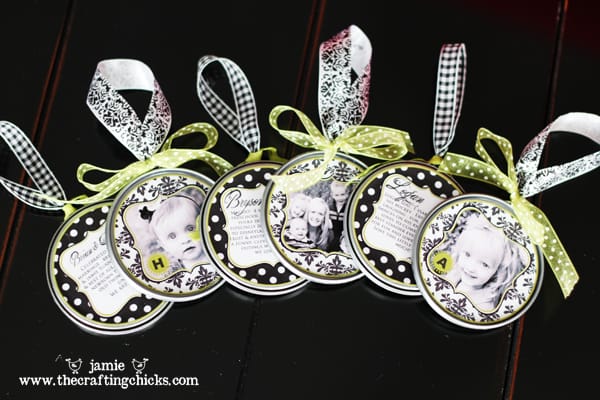
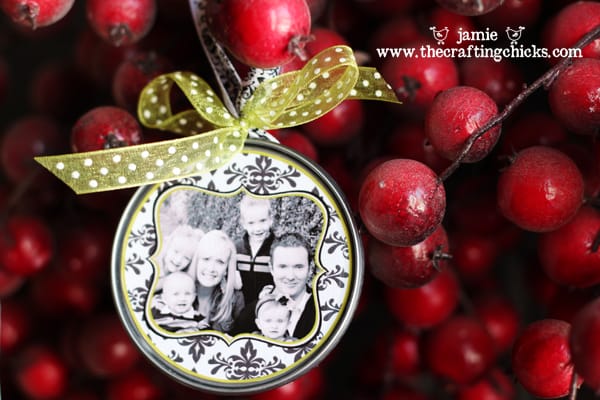
A couple of years ago, I began the tradition of making homemade ornaments every year. Last year I posted my Homemade Block Ornaments. This year…I used metal juice can tops to make our ornaments. On the front of each ornament is a photo and on the back is a little something about that person. For our family ornament, I added our 2010 highlights of the year. These will be so fun to read each Christmas in the future. I love how they turned out. DIY Photo Christmas Ornaments

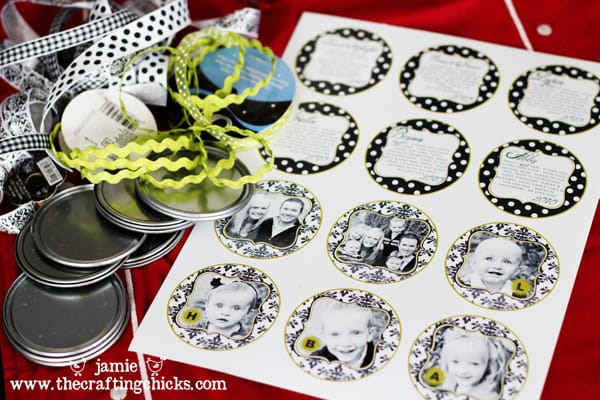
What you’ll need to make Juice Top ornaments:

-metal juice can tops (2 per ornament)

-designed circle with photos for front and back {I digi scrapped my photos and once again used Crystal Wilkerson’s ADORABLE Artisan Labels}

-hot glue gun

-mod podge

-fun, sassy ribbonDIY Photo Christmas Ornaments

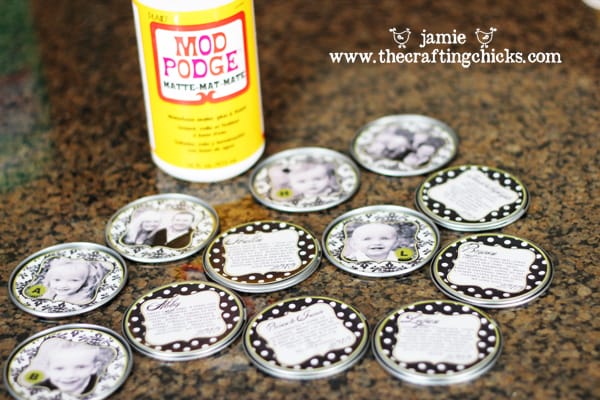
To get started, cut out your circle photo, front and back. Then I used mod podge to glue the photo on to the juice top. I also applied a thin coat of modpodge over the photos to create a seal. The photo should be placed on one side of a juice top, and the back photo/wording should be glued on the back of the juice top. That way they will fit correctly when it is time to glue them together. Before gluing, figure out how to make them fit and which sides to glue photos and backs on. DIY Photo Christmas Ornaments

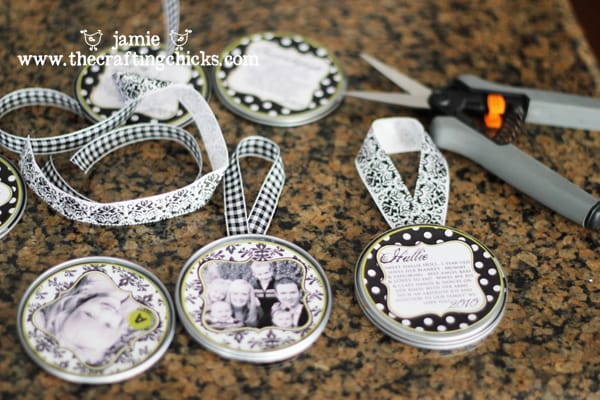
Let them dry for a couple of hours. While they are drying you can cut your ribbon. You will need 4 inch or so strips to create a loop for the ornament to hang.

While the ribbon is in a loop (just how you want it), glue the ribbon on one of the insides of the juice top. Next, cover one juice top inside with hot glue and then put the two juice tops together, the front and the back. Squeeze tightly to glue it together well.

DIY Photo Christmas Ornaments

To finish these off, I added some polka dot ribbon and ric-rac to the ribbon loop. DIY Photo Christmas Ornaments

And there you have some very cute photo ornaments with photos of your favorite people in the world!DIY Photo Christmas Ornaments

DIY Photo Christmas Ornaments

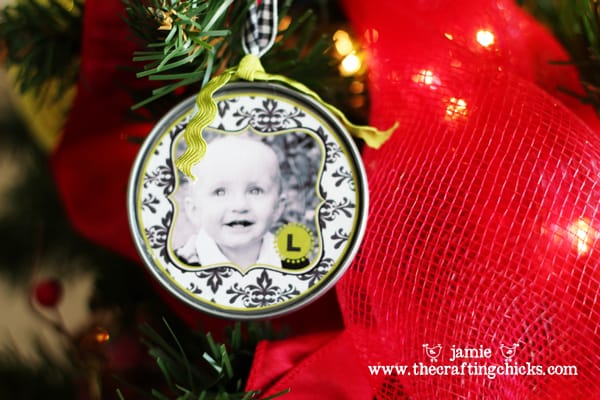
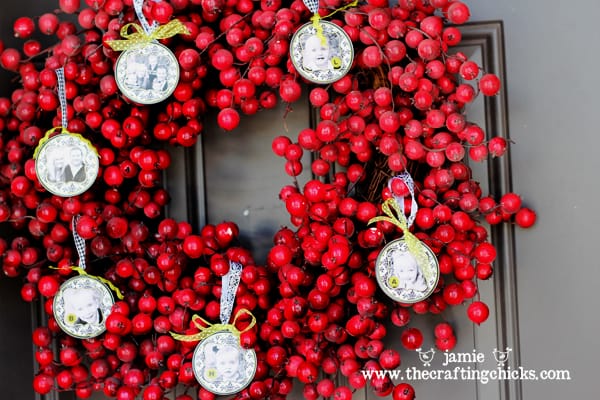
My kiddos and I couldn’t wait to hang them on our tree…but first we had to experiment and see where else they would look cute…

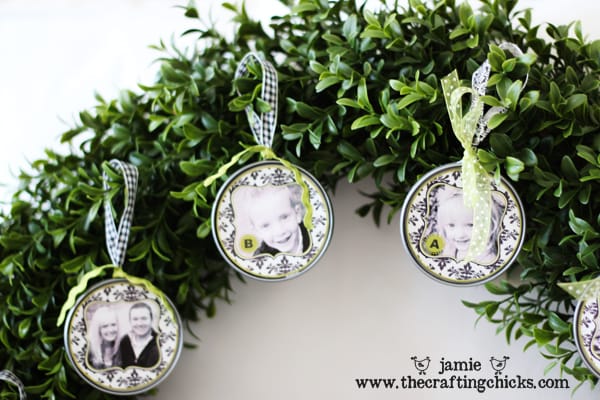
How about a berry wreath?DIY Photo Christmas Ornaments

DIY Photo Christmas Ornaments

Or some green garland?DIY Photo Christmas Ornaments

What are some Homemade ornaments you have made? We would love to see yours too!

And if you like these ornaments, how about these juice top magnets. Wouldn’t they make a cute gift?

xoxo Jamie

Save

About Jamie

is the author of this post. Wanna know more about the Chicks? Click here. :)

Comments

  1. Jessica says

    November 30, 2010 at 6:31 am

    OH MY GOODNESS! These are ADORABLE! I save all my juice lids and I have a TON! I was planning on using the lids for ornaments.. Love yours to death! Now I REALLY have to make some! 😀

    Reply
    • Jan van Staveren says

      December 2, 2017 at 10:04 am

      Are the lids from frozen juice? Xo

      Reply
      • Nikkala says

        December 4, 2017 at 8:57 am

        They are!

        Reply
  2. Brandy says

    November 30, 2010 at 7:16 am

    Oh my gosh! I have no words for how cute these are.

    Reply
  3. Ashley says

    November 30, 2010 at 7:38 am

    LOVE these ornaments — they are so cute!

    Reply
  4. Ucreate says

    November 30, 2010 at 8:18 am

    Jamie, I LOVE these ornaments! Simple and DARLING!!

    Reply
  5. Janice says

    November 30, 2010 at 9:00 am

    These are perfect – I’ve been saving my juice lids for a project! Thanks for sharing. Any chance you could share a file that has the circles laid out? Just the size of the circles would be fabulous and save a lot of time. I don’t need the effects.

    Reply
  6. Jackie says

    November 30, 2010 at 9:24 am

    Oh these are fantastic! I really love the colors and such! Here is a link to my homemade ornaments: http://mamajackiesscraps.blogspot.com/2010/11/my-hybrid-chick-post.html

    Reply
  7. Brooke says

    November 30, 2010 at 9:42 am

    Jamie, these turned out fabulously. I absolutely love this idea and have been saving a juice lid or two and just might make some for our tree. 🙂 Thanks for the cute ideas!! xoxo

    Reply
  8. Katie Dean says

    November 30, 2010 at 10:06 am

    Are these from the canisters of juice concentrate that you add water to? I’m a little confused.

    They are adorable!!!

    Reply
  9. Katie says

    November 30, 2010 at 10:08 am

    Doh! Found it on the magnet blog you linked to.
    Thank you!

    Reply
  10. Darcy says

    November 30, 2010 at 11:37 am

    So glad that I am not the only crazy one that saves juice lids! Thanks for taking these utilitarian objects and making them look so elegant! Great tutorial.

    Reply
  11. Mary says

    November 30, 2010 at 9:15 pm

    Super love these. Can you tell us what Digital kit you used for the paper. Love the frames, but wanted the paper as well!

    Thanks!

    Reply
  12. Rachel says

    December 1, 2010 at 2:14 pm

    Those came out so cute! What a great idea. Thanks so much for sharing, I’ll be linking.

    Reply
  13. Maureen says

    December 1, 2010 at 4:18 pm

    Hi Jamie! Luv the ornaments. I was hoping you could point me in the right way for directions on how to actually digiscrap them. I have PSE and am not real familiar with it but would love to learn more. I can’t figure out how to digiscrap the circle. (i’m sure it’s probably really easy)! Any help would be very much appreciated 🙂 Thanks

    Reply
    • Mary says

      November 26, 2011 at 5:32 am

      I am also wondering how to digiscrap the circles. I downloaded the Artisan Label Templates but am having trouble with the circles. Thank you.

      Reply
  14. Lorie says

    December 1, 2010 at 7:37 pm

    Those are so cute! I am going to feature them tomorrow!

    Reply
  15. Megan says

    December 2, 2010 at 5:40 am

    I work in an elementary art classroom and we had these (provided by the other art teacher or I’d totally take some and use ’em to make these photo ornaments!) and we allowed the kids some freedom to make whatever they wanted. Kids come up with some great ideas! One kid made the juice top the belly of a Santa and made the Santa with colored paper and accessories (including an acorn for part of his hat). Some of our students used them as the floor and glued a pinecone “tree” on top then put paper around the bottom for a tree skirt and decorated with glitter, markers, etc. I don’t have pics, but I’ll try to get some by next week!

    Reply
  16. Ginger says

    December 2, 2010 at 10:10 am

    LOVE IT!! I have a preschool & have been SEARCHING for something for the kids to make their parents for Christmas! This is it!! Can you give me tips on where to find the template? I have never done any digital scrapbooking, so I have no idea where to start. Thanks for sharing your talent! 🙂

    Reply
  17. Ashly says

    December 5, 2010 at 12:54 pm

    These are the cutest things!! Like those above, I am wondering if you would share the size of the circles (or a template) and what kit(s) you used for the polka dot paper? Thank you so much for this great idea!

    Reply
  18. Peggy says

    December 5, 2010 at 9:06 pm

    These are such fun things. They don’t even look those old simple homemade things from years past. They are great for using digi scrap supplies, as well as paper supplies on hand.

    Reply
  19. Kira @ Kissing the Joy says

    December 10, 2010 at 8:49 pm

    I cannot tell you how in love with these I am. SO CLEVER!!! We don’t drink juice so I’m going to have to figure out an alternative for the lids, but I just love the use of hybrid scrapping on these. Love the highlights for each person and the Crystal Wilkerson templates. Just love it all. Thanks so much for sharing!

    Reply
  20. Marie says

    December 13, 2010 at 11:39 am

    Ok I’m new to this so I have a question about the “digi scrapped?” How exactly do you do that? Thanks!

    Oh and those are SUPER adorable so I want to make some of my own!! 🙂

    Reply
  21. Korinne says

    December 27, 2010 at 9:28 am

    All I can say is WOW, I love your ornaments, I loved them so much I HAD to make a set for my Mom on Christmas Eve (http://www.crafterella.com/2010/12/holiday-photo-ornaments.html) Thanks sooooo much for the instructions and the inspiration!

    Reply
  22. melle says

    January 14, 2011 at 9:02 am

    They’re beautiful. i’ve never seen tops like this in the UK, otherwise I’d def have a go ready for next Christmas.

    Reply
  23. Cheri says

    August 31, 2011 at 3:37 am

    These are adorable!!! I’ve been saving lids and looking for ideas on how to use them!! Time to get busy and make as many as i can for our troops this year!!! We only need about 15,000 ornaments!!!!

    Reply
  24. The Scrapbooking Housewife says

    September 14, 2011 at 12:57 pm

    These are absoultely gorgeous!! LOVE them and what a great idea to recycle those juice lids!! Will definitely be giving these a try!

    I like to make mini scrapbook star albums with photos of the kids/family and hang them on the Christmas tree.

    Reply
  25. Heather says

    September 24, 2011 at 6:12 pm

    What a fun project; thanks for sharing : )

    Reply
  26. Angel says

    September 25, 2011 at 8:18 am

    I LOVE these! I was wondering how you kept the edges of the lids from being sharp?

    Reply
  27. Summer says

    October 7, 2011 at 7:13 pm

    I just purchased the templates that you listed t make these… I have NO idea how to use them like you did. Can you let me know what type of label you bought and what you did to get the picture inside the frame? I thought they were different. I wouldn’t have bought them had I known no instructions would accompany the download.
    Thanks

    Reply
    • Jackie says

      November 10, 2011 at 1:14 pm

      I have the same problem as Summer.

      Reply
      • Mary says

        November 26, 2011 at 5:39 am

        I am also having the same problem.

        Reply
    • Jeri says

      December 20, 2012 at 5:21 pm

      same problem too. guess i should have read all the comments before purchasing the templates. would you please tell me how i can use these? i really wanted to make ornaments for my kids as a christmas present!

      Reply
      • Becky says

        December 20, 2012 at 9:02 pm

        Hi Jeri,
        You will need to pull the tags into a program like Photoshop, they might even work in Word. Pull the image in a program and then you can add the words that you want. I’m not sure you can add the pictures when you are in Word, but you could try. These are so fun and if you do get Photoshop get Photoshop Elements. Cheaper and more user friendly.

        Reply
  28. Lindsay says

    November 6, 2011 at 6:19 pm

    I love thee! I am going to design and make my own for my family. What size will the circles have to be though? Do I just print until I have the right circles if I am not going off the website you gave?

    Reply
  29. Ginny @ Organizing Homelife says

    November 19, 2011 at 9:04 pm

    These are so cute! I featured them on my blog: http://www.organizinghomelife.com/archives/1023 Thanks for sharing!

    Reply
  30. Salina Holland says

    November 24, 2011 at 3:35 pm

    Hi! I LOVE this idea and I’m so excited about making these for Christmas this year. I have a question though…..how did you create the circle to fit exactly into the lid? I use photoshop elements for my digi scrappin. Thanks!

    Reply
  31. Paper Doll says

    December 4, 2011 at 6:57 am

    Very nice idea. So original too. The lids are really sturdy and I have always thought it was such a waste to throw away (even if you recycle).
    Thanks for sharing!
    PaperDoll

    Reply
  32. Becca says

    December 4, 2011 at 7:19 am

    Jamie, I LOVE these! It’s tradition in our family that we make ornaments and give out with our gifts each year. I want to make these this year but have no clue what you mean by digiscrap. I have purchased the template but don’t know how to make them cute like yours. HELP!

    Reply
  33. Kate says

    December 6, 2011 at 8:44 am

    Love these! I featured them on “Top 10 Ornaments to Make” @ http://www.cheapcraftymama.com! Feel free to stop by and grab a button to show that you are featured!

    Reply
  34. Fiona says

    December 18, 2011 at 7:52 pm

    I love these ornaments! I am also wondering if you could explain the digital scrap booking portion…I have photoshop but can’t seem to figure out how to start. Thanks!

    Reply
  35. Ashley S says

    September 25, 2012 at 6:03 pm

    wow that is so smart & cute & it looks flawless! love these!

    Reply
  36. Sue says

    November 18, 2012 at 8:45 pm

    What a great idea! I love the borders you put around the photos. Looking forward to creating some of these! Thanks!

    Reply
  37. Amy says

    December 4, 2012 at 5:01 pm

    These are so cute! What a great use of products!

    Reply
  38. Nancy says

    December 5, 2012 at 8:15 am

    What adorable and creative ornaments!! I love them! Awesome way to use juice lids… wow!

    Reply
  39. Kristen says

    December 11, 2012 at 11:16 pm

    Could you share how you made the circles & digiscrapped the frames? Adorable but can’t figure out how to get the circles sized. Thanks!

    Reply
  40. RHONDA GOLDEN says

    November 7, 2014 at 1:36 pm

    I’m late to the part! A) I’m a retire Redesign Decorator, but I’m going to set mason jar lids, SPRAY paint!! ( yes I have your pointers, add some glitter while wet, now, all I have to figure out is how to put borders around….thinking I may, for this year anyway, use hot glue and put lace,artificial. Snow, something! Ideas for a newbie? Chri is close!!

    Reply
    • Beth says

      November 30, 2014 at 8:15 pm

      I am also going to use mason jar lids………but I am going to use the circle sticker templates from Avery to do it.

      Reply
  41. gerry says

    November 13, 2015 at 9:44 pm

    I really like your picture ornaments, but I wish you would have demonstrated each step instead of just showing your pictures and talking.Please don’t take offence but some of us have to be showed each step or we don’t get it. Thanks!

    Reply
  42. Fun Livin' says

    March 2, 2022 at 2:56 am

    Love the ornaments and a fantastic look. Thanks for sharing.

    Reply

Trackbacks

  1. Tweets that mention {Sassy Juice Top Photo Ornaments} -- Topsy.com says:
    November 30, 2010 at 8:08 am

    […] This post was mentioned on Twitter by Michelle Bukowski and lola, The Crafting Chicks. The Crafting Chicks said: Make these personalized Christmas ornaments by reusing juice tops! http://fb.me/NsT42jWE […]

    Reply
  2. {Sassy Juice Top Photo Ornaments} says:
    November 30, 2010 at 10:23 pm

    […] Read more here: {Sassy Juice Top Photo Ornaments} […]

    Reply
  3. DIY nativity scene for children {from the crafting chicks} says:
    September 13, 2011 at 8:59 am

    […] For another simple and unbreakable gift idea, check out Jamie’s Sassy Juice Top Photo Ornaments! […]

    Reply
  4. 101 Handmade Christmas Ornaments says:
    October 3, 2011 at 12:30 pm

    […] Sassy Juice Top Photo Ornaments – The Crafting Chicks […]

    Reply
  5. | Organizing Home Life says:
    November 19, 2011 at 8:49 pm

    […] This is a super-cute one using a juice can lid from Jamie at The Crafting Chicks […]

    Reply
  6. DIY Christmas Ornaments, Make Handmade Christmas Ornaments | Diva Entertains Blog says:
    November 30, 2011 at 11:07 pm

    […] From the Crafty Chicks, a VERY affordable, but gorgeous DIY Christmas crafts idea.  These are made from juice top lids.  Yes, you read that right!  Juice Top Lid Glam Ornaments: […]

    Reply
  7. Juice Top Ornament | Marla's Art Page Blog says:
    December 3, 2011 at 11:54 am

    […] and photos make a cute tree decoration or add to a wrapped gift as an extra present.  Thank you Crafting Chicks for your wonderful idea. Rate this: Like this:LikeBe the first to like this […]

    Reply
  8. Making Memories: Sassy Juice Top Photo Ornaments | Homestyle Blogging says:
    December 11, 2011 at 10:14 pm

    […] Today’s is another fun photo ornament from The Crafting Chicks! […]

    Reply
  9. {Handmade Photo Ornaments-Fancy Bangle Style} says:
    December 12, 2011 at 10:55 am

    […] Jamie’s 2010 ornament–Sassy Juice Top Photo Ornaments. […]

    Reply
  10. Christmas is 2 months away. Hey! Don’t shoot the messenger! | Flashinghands says:
    October 27, 2012 at 1:41 am

    […] How about this? Ornaments from juice can tops, a recyclers dream! https://thecraftingchicks.com/2010/11/christmas-countdown-and-festive-idea-cards.html […]

    Reply
  11. Juice Top Photo Ornaments — Totally Green Crafts says:
    November 21, 2012 at 5:01 am

    […] be throwing those suckers away!  Just look at what you can create with them!  Jamie from The Crafting Chicks shows us the step-by-step process to create these photo ornaments.  Check out her tutorial and be […]

    Reply
  12. Inspiration Wednesday: DIY Ornament Ideas « perpetuallydaydreaming says:
    November 21, 2012 at 9:09 am

    […] Aloha and Happy Wednesday! This week I’m posting from Hawaii! We’re here for a friend’s wedding this week, but before we left we put up our tree! I love digging through our boxes of ornaments and finding all our old treasures. My mom and I have a tradition where we pick out our ornament at the Hallmark store the day after Christmas every year. I love this tradition because I get to add to my collection every year, but this year I want to add some homemade ornaments to my tree. I have a couple ideas involving pictures and some other ideas for gifts for friends that I’ll hopefully be sharing in a few weeks. Until then, I’ve rounded up several DIY ornament ideas for your perusal. Enjoy and have a Happy Thanksgiving!! Source […]

    Reply
  13. {Homemade Photo Ornaments 2012} says:
    November 26, 2012 at 8:47 am

    […] Sassy Juice Can Lid Ornaments […]

    Reply
  14. Mod Podge DIY ornament roundup. - Mod Podge Rocks says:
    December 16, 2012 at 6:02 pm

    […] Juice lid photo ornament at The Crafting Chicks […]

    Reply
  15. 22 Creative, Fun and Easy DIY Christmas Decor Projects | Style Motivation says:
    December 1, 2013 at 3:02 am

    […] Source […]

    Reply
  16. Trendy Tuesday: Incorporating Photos :: Paper Crafter's Library says:
    December 3, 2013 at 6:00 am

    […] Wreath by Jamie image courtesy of The Crafting Chicks […]

    Reply
  17. Snowflake Photo Ornaments says:
    December 6, 2013 at 11:12 pm

    […] Sassy Juice Can Lid Ornaments […]

    Reply
  18. 6 Upcycled Holiday Ornaments You Can Make | Change Your State says:
    December 10, 2013 at 2:05 am

    […] Who knew a jar lid could turn into a photo frame ornament? […]

    Reply
  19. Sustainablog | Jeff McIntire-Strasburg has been blogging a greener world via sustainablog since 2003! says:
    December 9, 2014 at 8:12 am

    […] Photo Juice Top Ornaments: Reuse disregarded metal juice tops to make a photo ornament to capture your family’s smiles. Besides photos, you’ll also need ribbon, glue and labels to make this adorable trinket for the special people in your life. […]

    Reply
  20. Homemade Christmas Ornaments - Darice Crafts says:
    December 12, 2014 at 1:41 pm

    […] Can Top Photo Ornaments from Crafting Chicks.  […]

    Reply
  21. Upcycled Christmas Decorations All About Christmas says:
    April 27, 2016 at 2:35 am

    […] SOURCE […]

    Reply
  22. Decorating Your Flat On a Budget | Lettingweb Blog says:
    December 2, 2016 at 8:50 am

    […] Christmas decorations are expensive, especially seeing as though you only use them for a few weeks a year.  Don’t despair as there are plenty of useful life hacks that can make decking the halls a bit more affordable, such as lightbulb snowmen and turning old juice lids into picture frame ornaments. […]

    Reply
  23. DIY Photo Magnets - The Crafting Chicks says:
    May 10, 2017 at 7:59 am

    […] save these juice can tops, and use them instead of the chipboard squares in my photo memory game. I used lids to create my Juice Top Christmas Ornaments too! Tweet Share1 Pin1K Yum […]

    Reply
  24. 20 Gorgeous Homemade Christmas Ornaments That Cost Almost Nothing says:
    December 12, 2017 at 10:02 am

    […] Get the Tutorial » […]

    Reply
  25. Turn Everyday Items Into Adorable Christmas Decor says:
    December 6, 2019 at 12:03 pm

    […] the instructions on this blog here to learn how to make […]

    Reply

Leave a Reply Cancel reply

Your email address will not be published. Required fields are marked *

This site uses Akismet to reduce spam. Learn how your comment data is processed.

Recent

14 Acts of Kindness Printable

Halloween I Spy

Halloween Nail Gift Tag Printables

Best Homemade Playdough Recipe

All About My Mom Free Printable

Creative Easter Egg Decorating

Get access to our free crafting guide

We are a participant in the Amazon Services LLC Associates Program, an affiliate advertising program designed to provide a means for us to earn fees by linking to Amazon.com and affiliated sites.

© 2023 The Crafting Chicks. Website by WP Barista. Privacy Policy

54989 shares