• Skip to primary navigation
  • Skip to main content
  • Skip to primary sidebar
  • Skip to footer

The Crafting Chicks

Ideas and Inspiration to Create Your Life.

  • Home
  • Meet the Chicks
  • Advertising/PR
  • Contact
  • Blog
  • Printables
  • Recipes
  • Holidays
  • Life
  • Sewing
  • More

digital scrapbooking, Halloween, Home Decor

DIY Halloween “BOO” Blocks

by Jamie · on October 4, 2010 · 27 Comments ·

2359 shares
  • Share
  • Tweet

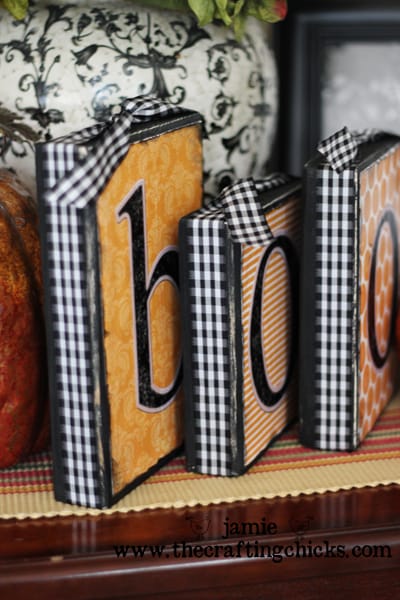
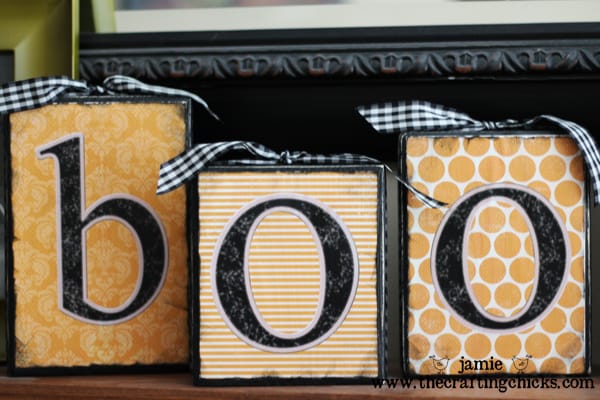
I made similar blocks for Valentine’s day last year that say LOVE. Since they were so easy and turned out cute, I decided to make some for Halloween. Here are the DIY Halloween “BOO” Blocks!

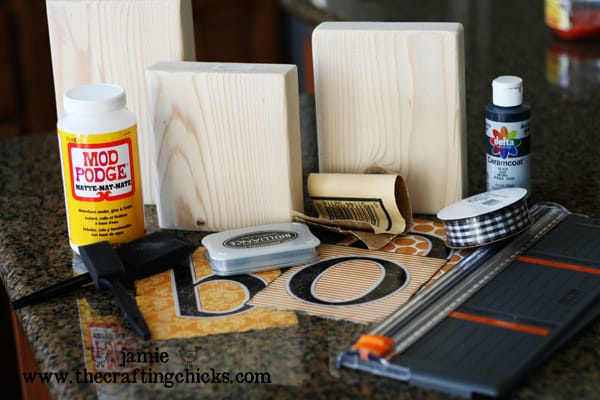
Supplies you need for the wooden BOO blocks:

– a 2×6 wood strip cut into heights:  6 inches, 7 inches and 8 inches

-Black paint & paint brush

-Sand paper

-Black ink pad

-Ribbon

-“BOO” letters

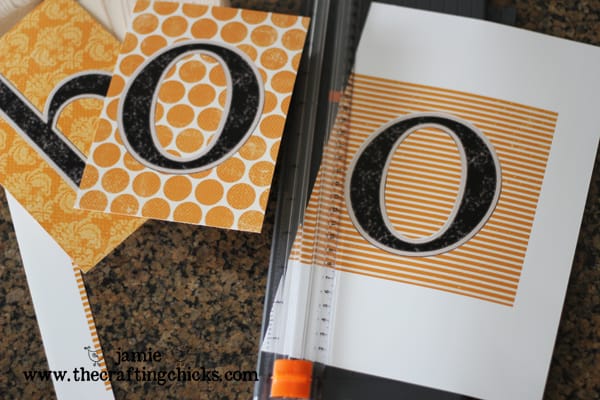
I made my letters in Photoshop using the talented Crystal Wilkerson’s Spooky papers over at Jessica Sprague.com. I then added black digi letters on top of the orange digi paper. I then printed the .jpeg image the size of my block.

You could use festive scrapbook paper and letters from the craft store instead of using Photoshop.

Step 1:  Get your letters ready. After I had cut them out, I inked around the edges and let them dry.

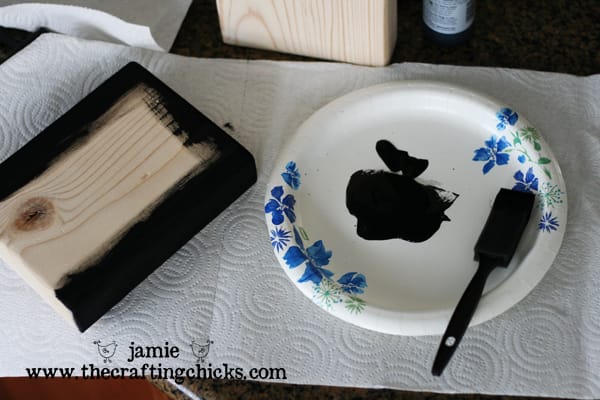
Step 2:  Paint the back, edges and an inch in on the front of your wood blocks. Let dry. Then sand around the edges to give it a rustic finish.

Step 3:  Use Modpodge to glue on your image. Paint over the letter with Modpodge to give it a sealed finish. (I prefer matte Modpodge)

Step 4: Tie Ribbon around the blocks.

Happy Spooky Crafting!

xoxo Jamie
About Jamie

is the author of this post. Wanna know more about the Chicks? Click here. :)

Comments

  1. Monika Wright says

    October 4, 2010 at 7:56 am

    You gals amaze me! So fun to see what new twist you wow us with.

    Reply
  2. Spark*Amy says

    October 4, 2010 at 12:10 pm

    These are adorable! I just found your blog a few days ago and have bookmarked almost everything!
    Are these printed on regular paper or photo paper?
    Thanks for making my home more festive!

    Reply
  3. Leslie says

    October 4, 2010 at 12:20 pm

    I LOVE these. I just found your site and I am SO glad I did! You guys makes some awesome stuff!

    Leslie
    http://www.thechicuniquery.blogpsot.com
    stiop by if you get a chance!

    Reply
  4. Malinda says

    October 4, 2010 at 2:43 pm

    I love these! What font did you use for the letters? I know it doesn’t really matter, but I want mine to look just like yours.
    Thanks! 🙂

    Reply
  5. Brittany says

    October 5, 2010 at 6:26 pm

    Hi! LOVE these!! I’m featuring them on my blog this week. little-inspirations.blogspot.com. Thanks for sharing!

    Reply
  6. Regina says

    October 6, 2010 at 12:25 pm

    I’d love to know about the digi letters too! Where did you get them and what font are they?

    Reply
  7. Marisa says

    October 7, 2010 at 2:58 pm

    Cute! I already have wood blocks cut for some vintage Halloween prints, but I think orange and black “boo” on the other side would be great! I’ll definitely be trying this (and sharing your link)! Thanks!

    Reply
  8. Michelle says

    October 27, 2010 at 3:49 pm

    Where did you buy your wood blocks? I have searched both our local craft stores and neither have anything like this.

    Reply
  9. Kendra-littlekbopeepboutique says

    September 25, 2011 at 3:39 pm

    I think I will make these with an extra block that has an exclamation point. Then on the other side of the blocks I could spell out “NOEL” for an interchangeable holiday decoration!! Thanks for the idea!! (Even if I am a yr behind!! SOOO glad y’all leave them up so we can get ideas year after year! I’m finding so many great ideas!

    Reply
  10. Monica Montoya says

    October 14, 2011 at 4:28 pm

    I’am a fairly new follower and these are way cute. I haven’t got a lot of decorations but now with going on to your ladies blog I have learned sooo many different fun and easy crafts to do for Halloween. Thank-You.

    Reply
  11. danielle says

    March 10, 2012 at 4:37 pm

    i have a question about creating letters with word instead of photoshop. Are the same features available to print letters the size of the blocks?

    Reply
  12. Maria B says

    October 13, 2013 at 5:58 pm

    These are adorable! I wanted to let you know that this project has been featured in my Halloween Crafts Round-up over at Krafty Cards etc. I would love for you to stop by and check out some of the other features. http://kraftycardsetc.com/2013/10/20-spooky-halloween-crafts.html
    Thanks so much for the inspiration!
    Maria

    Reply
  13. Momprojects says

    October 16, 2013 at 9:15 pm

    These are really adorable….I am going to pin them! Great pinspiration crafty chics!

    Reply
  14. Newbie says

    October 30, 2013 at 8:50 pm

    I love these. But I’m wondering how you got the design on the letters. Are they vinyl? If so, how did you get the scrolled look on them?

    Reply
    • Becky says

      October 31, 2013 at 8:51 am

      Jamie made each of the letters and the backgrounds using Photoshop so there is no vinyl involved. It’s all just paper and Mod Podge.

      Reply

Trackbacks

  1. Tweets that mention {DIY- Halloween “BOO” Blocks} -- Topsy.com says:
    October 5, 2010 at 10:46 am

    […] This post was mentioned on Twitter by The Learning Tower, The Crafting Chicks. The Crafting Chicks said: We're not done with Halloween ideas yet! BOO-ya! http://fb.me/z02LEWDz […]

    Reply
  2. 10-10-10 « Paper Glue Etc. says:
    October 10, 2010 at 3:34 pm

    […] (picture borrowed from The Crafting Chicks) […]

    Reply
  3. 13 Days of Halloween (Part 3) – Halloween Hybrid Tutorial: Design House Digital says:
    October 19, 2010 at 10:40 am

    […] 2, 1 and of course Halloween day. Day 4: will be these super cute BOO blocks. I must give credit to The Crafting Chicks for this super cute […]

    Reply
  4. B-O-O Blocks « Tinystitches's Blog says:
    October 9, 2011 at 11:34 pm

    […] year I discovered this project for BOO Blocks.  My Halloween decor needed updating and this project fit the bill.  I had the […]

    Reply
  5. 55+ of the BEST Halloween Crafts! says:
    September 25, 2012 at 9:49 am

    […] Boo Halloween Blocks […]

    Reply
  6. Fall Decor | Plucky's Second Thought says:
    October 14, 2012 at 4:37 pm

    […] Boo “Boxes”/Blocks […]

    Reply
  7. 20+ Spooky Halloween Crafts : Krafty Cards etc says:
    October 13, 2013 at 12:44 pm

    […] DIY Halloween BOO Blocks from Jamie @ The Crafting Chicks […]

    Reply
  8. Halloween Boo Boxes craft idea says:
    October 1, 2014 at 10:16 am

    […] source: https://thecraftingchicks.com/2010/10/diy-halloween-boo-blocks.html […]

    Reply
  9. Fall Sign craft idea says:
    October 8, 2014 at 9:48 am

    […] source: https://thecraftingchicks.com/2010/10/diy-halloween-boo-blocks.html […]

    Reply
  10. Christmas Crafts For Top Mens Christmas Gifts 2010 | All Crafts says:
    January 31, 2015 at 9:15 am

    […] source: […]

    Reply
  11. Wood Crafts Diy | All Crafts says:
    February 9, 2015 at 9:15 am

    […] source: […]

    Reply
  12. Diy Wooden Name Blocks | The Woodworking Blog says:
    December 29, 2015 at 11:38 pm

    […] DIY Halloween “BOO” Blocks […]

    Reply

Leave a Reply Cancel reply

Your email address will not be published. Required fields are marked *

This site uses Akismet to reduce spam. Learn how your comment data is processed.

Recent

All About My Mom Free Printable

Creative Easter Egg Decorating

Valentine Candy Taste Off

Gift Guide for Girls Age 7-12

Gift Guide for Boys Age 7-12

Gift Ideas for Her

Get access to our free crafting guide

We are a participant in the Amazon Services LLC Associates Program, an affiliate advertising program designed to provide a means for us to earn fees by linking to Amazon.com and affiliated sites.

© 2022 The Crafting Chicks. Website by WP Barista. Privacy Policy

2359 shares