DIY Freezer Paper Screen Printing
I found solid colored long sleeved tees on the clearance rack at Old Navy for 74¢ and figured this was a good opportunity to practice!
Freezer paper screen-printing won out for this simple design. And worked out awesomely for my nephew’s “5” shirt.

A green (his favorite color) 5 on a gray shirt.
So awesomely, that I was mad I didn’t take any photos, we made a “4” shirt for my son. After it was all done I decided I didn’t like this font. And he decided he didn’t like the color so it turned out to be a flop. But here’s the process anyway:

Try out a bunch of fonts to find the one you like best. The 5 is Agent Orange and our 4 is Idolwild. Then size it however big you want and print it out.
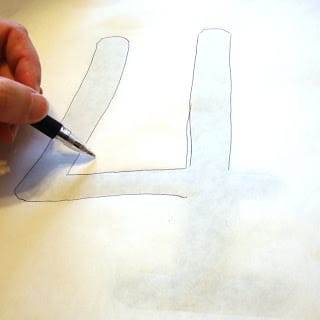
Trace the number onto freezer paper–shiny side down. Freezer paper is wonderful because when ironed the shiny side will actually melt into the fabric creating a great surface to work with. It is also used with certain quilt patterns and peels off easily when finished.
I read that you can cut freezer paper to 8.5″x11″ and run it through your ink jet printer. Some say you should cover the shiny side to protect your printer, and others didn’t seem to care. I found it to be very easy to trace the old fashioned way, but if you had a more detailed image you could try it.
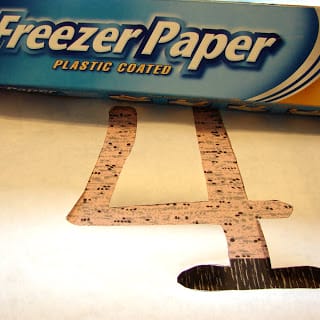
Then cut out your number and iron in place on the shirt.
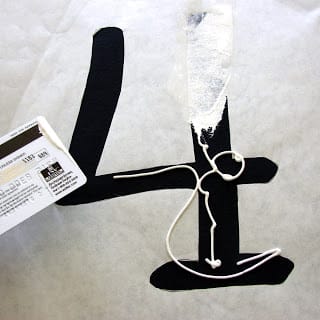
Be sure to place a piece of cardboard in the shirt to protect the backside of the shirt. Squeeze your screen-print paint right onto the shirt. I used an old credit card to scrape across as my squeegee. If you hold the card at a low angle it will leave a thicker amount of paint and cover nicely.
After the shirt is screened let it set for 24 hours before removing the freezer paper. Iron (with an ironing cloth) to set the paint. Or follow the instruction on your paint bottle.
The only place I was able to find screen-printing paint (besides the internet) was Hobby Lobby. Michael’s sells Yudu supplies and I think the Yudu paint would work just as well.
Even though this “4” isn’t green I’m not out much, and I learned a few things on a 74¢ shirt!

So cute, Nik…I have wanted to do this forever and I even have shirts to paint on. Thanks again for the idea!
That is such a fun idea. I’m gonna try it for sure!
you are so clever nikkala!
Like Kirsten, I’ve always wanted to try this and your tutorial makes it seem very do-able! 🙂 Great post!
Do you think any kind of fabric paint would work? Or does it have to be the screen printing paint? Just wondering.
You could try fabric paint, I haven’t used it but imagine it would be just fine.
Great information. Wow! Thanks for making me conscious about this latest expertise. It is overwhelming.
You are the most talented group of chicks EVER! I love your stuff. Thank you for sharing! I hope I win something…anything! I love your stuff!
I wish I had as much talent as you chicks. What a fun group of friends!
so…do you think that if I keep following your BLOG that a little of your creativeness and talents might rub off on me?!
I’ve already shared this on facebook and become a fan. Your button is on my BLOG and I post something to my friends weekly! I love your site.
This makes me wish I had a Cricut or something like that so I could make all sorts of cute shirts for my kids! I may just have to justify getting me one this year for Christmas! 🙂 (I wish)