• Skip to primary navigation
  • Skip to main content
  • Skip to primary sidebar
  • Skip to footer

The Crafting Chicks

Ideas and Inspiration to Create Your Life.

  • Home
  • Meet the Chicks
  • Advertising/PR
  • Contact
  • Blog
  • Printables
  • Recipes
  • Holidays
  • Life
  • Sewing
  • More

gift ideas, Sewing

Rick Rack Rosettes

by Nikkala · on March 16, 2011 · 171 Comments ·

44321 shares
  • Share
  • Tweet

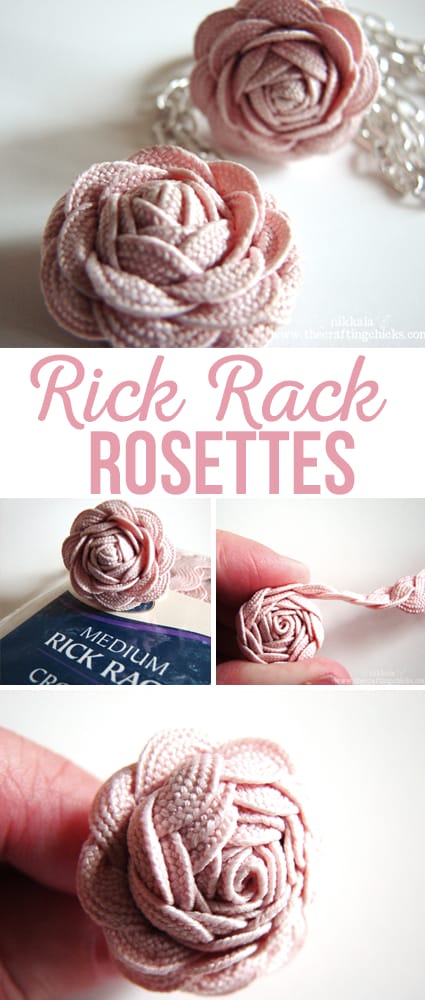
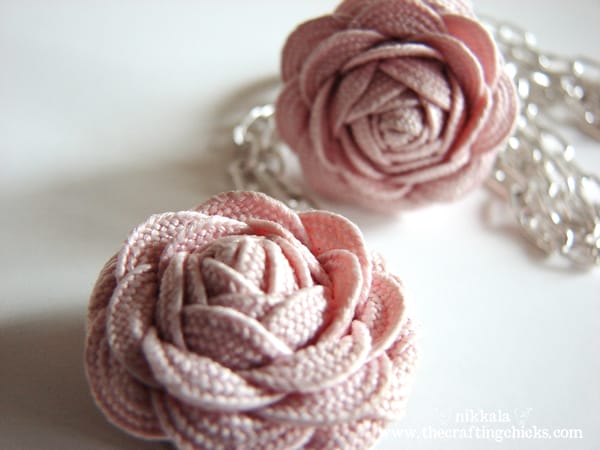
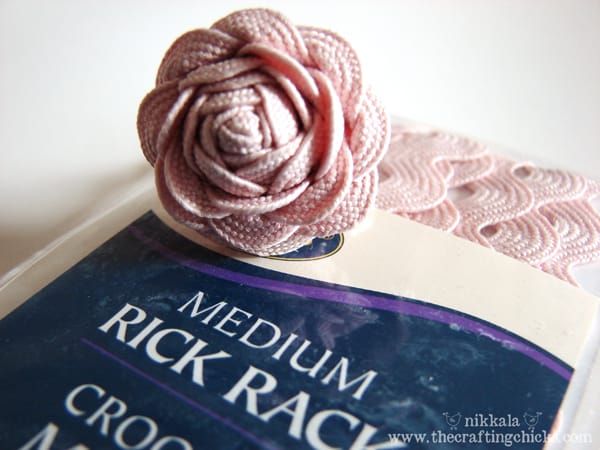
A friend gave me this flower ring and necklace, when she handed them to me I thought they were porcelain–there’s a very vintage feel to them. From a distance you really can’t tell that they’re made out of rick rack! Yes, rick rack!

She shared how to make them with me, and now I’m sharing with all of you readers! The wow of the rosette comes from a few simple steps! She found this tutorial, in Portuguese I believe.

First, cut 2 strips of rick rack. She said that the medium sized rick rack works the best–so that’s what I’ve used. No need to find out for myself, I’m taking her word for it. I cut the rick rack 10-12″, depending on how big of a flower I want to end up with.
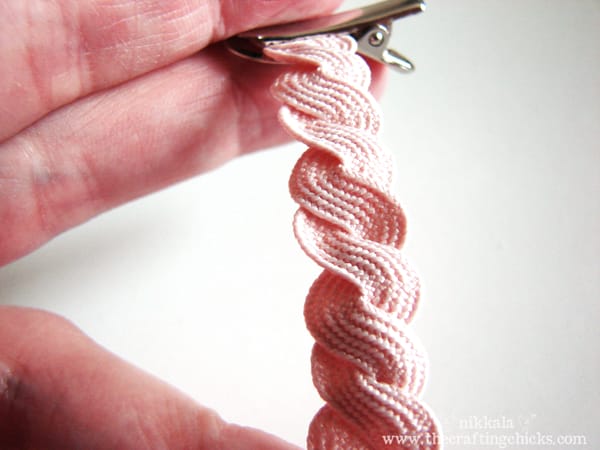
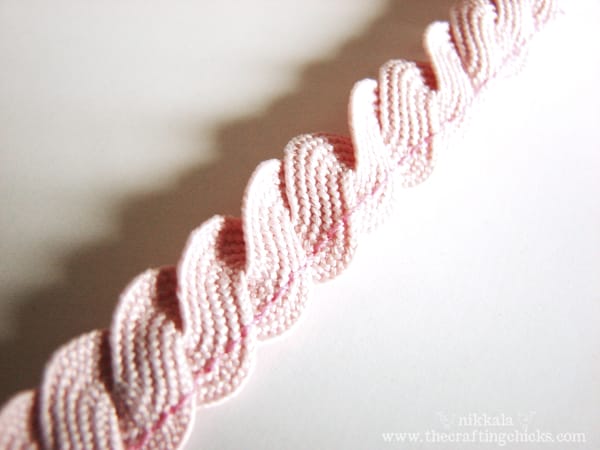
Then twist the two pieces of rick rack together, like this.

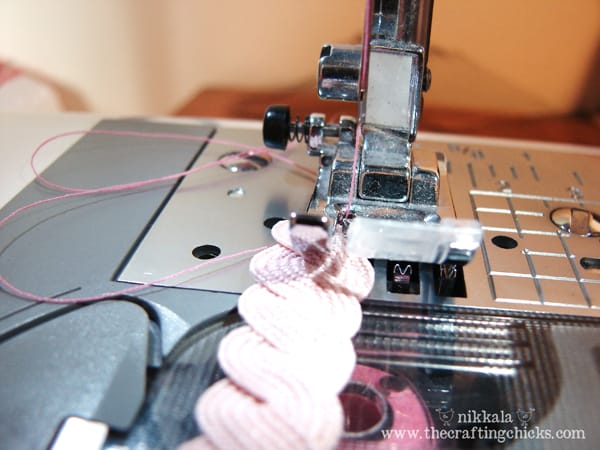
And then run a stitch down one side to hold it all together.

Like so.

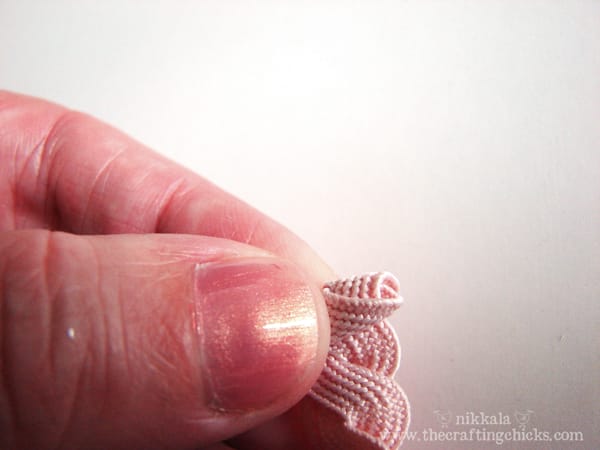
And to make the flower, you just start from one end and roll it up. I add small dots of hot glue, just to keep it all together.

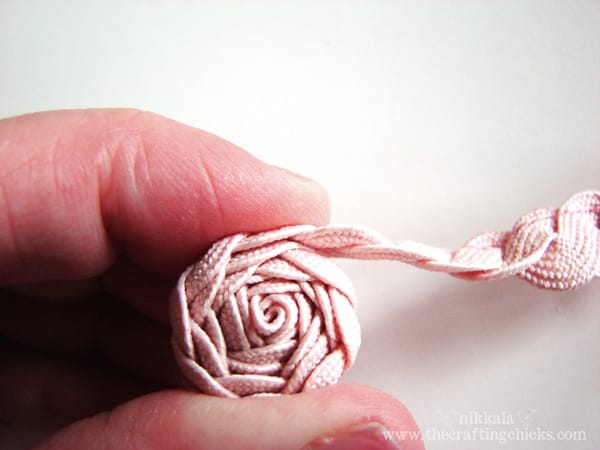
Keep rolling.

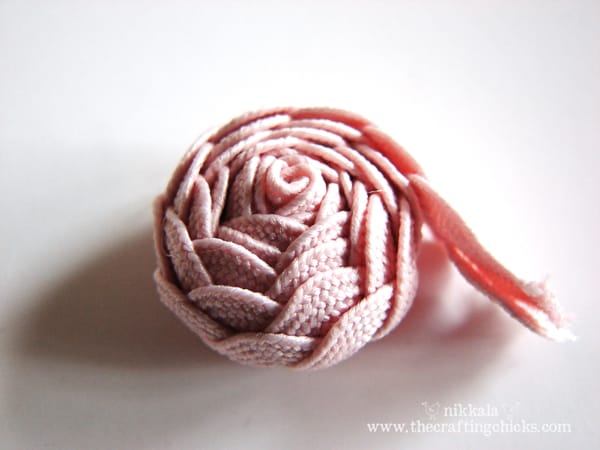
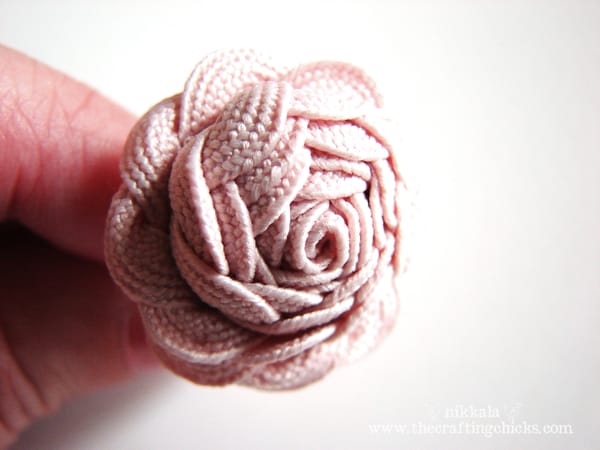
Until you have this–and then tuck the little tail under and hot glue it down. I also glue a small circle of felt or fleece on the back, just to finish it off. To make your flower wearable glue it on a ring blank, a necklace, or on clips for little girl’s hair. Can you think of other fun places to put these rosettes?

You’ll notice all of the petals are closed, so to open them up you just peel them back one by one. Until it looks like a flower. As you wear it, the petals tend to close up, so re-opening it will be necessary. Unless you prefer it closed of course.

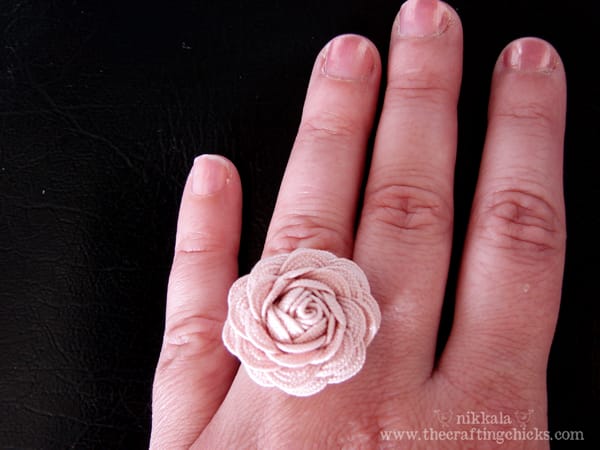
And here it is on my finger. A totally crafty cocktail ring.

Awesome.

Rick Rack Rosettes


About Nikkala

is the author of this post. Want to know more about the Chicks? Click here. :)

Comments

  1. Chelsea says

    March 16, 2011 at 5:48 am

    This is the cutest thing ever. My husband just bought me my first sewing machine and I think this might be one of my first projects. Thank you for sharing the tutorial! 🙂

    Reply
  2. Valerie says

    March 16, 2011 at 6:40 am

    There are so many flower tutorials out there, and this is a great one! Ric rac, who would have guessed? Thanks for the tutorial!!

    Reply
  3. Jenn says

    March 16, 2011 at 7:56 am

    Just ANOTHER reason why I need a sewing machine! LOL! I love it!

    Reply
    • Nikkala says

      March 16, 2011 at 3:30 pm

      You could hand stitch it…but if it is the final push to get a sewing machine forget I ever mentioned it!

      Reply
  4. Brooke says

    March 16, 2011 at 7:59 am

    Nikkala! That is the coolest thing ever! I totally love it and want to buy ric rac in every color now. Great tutorial!

    Reply
  5. Renee says

    March 16, 2011 at 8:03 am

    This is so cool!! Thanks for the great idea!

    Reply
  6. Ami w/AliLilly says

    March 16, 2011 at 8:45 am

    WHOA!! These are fantastic!!! 🙂

    Reply
  7. Kirsten says

    March 16, 2011 at 8:51 am

    OH MY WORD ALIVE. So cute Nik, you are one naughty crafty cat!! Love it!!

    Reply
  8. Jamie says

    March 16, 2011 at 9:10 am

    Nikkala! This takes the CAKE!

    Reply
  9. Sumo says

    March 16, 2011 at 9:27 am

    LOVE this! How unique and fun! I’ll be featuring it on my blog at the end of the month – all credit linked back here!

    http://sumossweetstuff.blogspot.com

    Thanks!
    Sumo:)

    Reply
  10. Sylvia/LittleTreasures says

    March 16, 2011 at 10:00 am

    Thank you so much for these directions. I saw these made up someplace and purchased my ric rac yesterday wondering if I’d get it together right. Well thanks to you I can practice correctly.

    Reply
  11. marissa says

    March 16, 2011 at 10:48 am

    this is SO cool I can’t wait to try it out

    Reply
  12. Darcy says

    March 16, 2011 at 10:49 am

    Love this! Can’t wait to make some cute hair barrettes for my daughter using this method. They would make a great bouquet if you could wire them up in some way? Maybe hold the wire in the center before you start twisting? I am thinking cute Mother’s Day rosette bouquet!

    Reply
    • Nikkala says

      March 16, 2011 at 3:29 pm

      A bouquet would be so cute…I’ll have to play around with that idea!

      Reply
  13. Kristin says

    March 16, 2011 at 11:36 am

    LOVE this! Bookmarking for future reference 🙂

    Reply
  14. Amanda Dale says

    March 16, 2011 at 12:03 pm

    These are fantastic! Thanks so much for sharing the tutorial!

    Reply
  15. Rey says

    March 16, 2011 at 12:09 pm

    LOVE THIS! Thank you so much for sharing the tutorial!

    Reply
  16. haley davis says

    March 16, 2011 at 12:19 pm

    Oh my!! Totally lovin’ it!

    Reply
  17. SarahJ says

    March 16, 2011 at 2:05 pm

    So very cute! I am going to have to try these with my bags of ric rac… I inherited my granny’s collection and have tons of it!

    Reply
    • Nikkala says

      March 16, 2011 at 3:28 pm

      Lucky! You can make roses for everyone you know!

      Reply
  18. Heidi says

    March 16, 2011 at 2:08 pm

    This is sooo creative and fun. May have to try it out for myself!!

    thanks for sharing
    chickhardware.blogspot.com

    Reply
  19. jenna says

    March 16, 2011 at 2:27 pm

    OMG thoes are awesome!!! Thank you so much!

    Reply
  20. jenna says

    March 16, 2011 at 2:27 pm

    OMG those are awesome!!! Thank you so much!

    Reply
  21. whit says

    March 16, 2011 at 4:41 pm

    those are fun! i like the idea of a bouquet for mother’s day…totally going to try it!

    Reply
  22. Hydi says

    March 16, 2011 at 5:24 pm

    Awesome idea! I love it! I was just wondering how you made it into the ring. What you used on the back to be able to wear it. Thanks!

    Reply
    • Nikkala says

      March 26, 2011 at 9:08 am

      Hydi, I found ring blanks in the jewelry section at Hobby Lobby. The official name is ‘ring with pad’. It’s a ring with a flat round disc on top.

      Reply
  23. erin says

    March 16, 2011 at 5:30 pm

    So awesome, seriously creative!

    Reply
  24. Amy @ Positively Splendid says

    March 16, 2011 at 7:38 pm

    Oh my word – love everything about these! Talk about a great gift idea!

    Reply
  25. Karisa says

    March 16, 2011 at 8:01 pm

    rockin’ tutorial! I need to give these a go.

    Reply
  26. colette says

    March 16, 2011 at 9:24 pm

    so cute, I must try this. I’d really like to see a better picture of the necklace though.

    Reply
  27. melinda ke says

    March 17, 2011 at 3:52 pm

    These are so cool, thank you for the great idea!

    Reply
  28. Jessica says

    March 20, 2011 at 7:28 pm

    Love this idea! However where did you find your blank rings to mount them on?

    Reply
    • Nikkala says

      March 21, 2011 at 2:29 pm

      I found them in the jewelry section at Hobby Lobby. It’s called a “ring with pad”. Hope that helps!

      Reply
  29. TL says

    March 21, 2011 at 3:09 am

    simply beautiful! Thanks for sharing will make one for sure

    Reply
  30. Debbie Fredette says

    March 22, 2011 at 11:20 am

    This is so cute! Can’t wait to try to make one too.

    Reply
  31. jimmye wolfe says

    March 23, 2011 at 3:01 am

    preciouse little idea! rick rack – to top it off!! thanks so much for sharing.

    Reply
  32. Quynh says

    March 23, 2011 at 5:03 pm

    That looks like a very quick and easy way to make frog closures as well!

    Reply
  33. xade boreal says

    March 24, 2011 at 5:13 pm

    so cuteeeeeeeeeeeeee

    Reply
  34. amanda says

    March 25, 2011 at 1:25 pm

    wow really cool! you could starch it to keep it open forever, and i would try using two different shades of red. brilliant little ring.

    Reply
  35. phoebe says

    March 25, 2011 at 6:28 pm

    too stinkin’ cute!!! will be making MANY of these:)

    Reply
  36. taylor kate says

    March 25, 2011 at 6:37 pm

    thanks for the tutorial! 🙂

    ps- your hand modeling looks great! (your comment reminded me of my mom and i though which made me giggle!)

    Reply
    • Nikkala says

      March 26, 2011 at 9:09 am

      Thanks!

      Reply
  37. Lisa says

    March 26, 2011 at 4:27 am

    So cute! And so simple to make too. Thanks for sharing

    Reply
  38. creativejewishmom/sara says

    March 26, 2011 at 3:08 pm

    Love your rick rack flowers, was about to make some myself and didn’t know about the trick of combining two strips together for a totally different look!
    Thanks so much for sharing and would love to see on at my international crafty linking party, Craft Schooling Sunday, which opens Saturday (night for me, day maybe for you) and is open atleast until Wednesday. Hope to see you there!

    Reply
  39. martha-caknitter says

    March 26, 2011 at 3:20 pm

    what a great idea!! thanks for sharing. 🙂

    Reply
  40. Jennifer says

    March 28, 2011 at 7:23 pm

    Gals,
    I have seen many, MANY flower tutorials using fabric scraps, t-shirts, etc…but these are simple and beautiful! Wonderful ideas..thanks so much for the clear instructions and the lovely little flowers. I’m going to run out and buy rick rack..

    Reply
  41. Lois says

    March 29, 2011 at 12:06 am

    Thank you so much for the great tutorial! I just featured it on my blog http://www.auntielolocrafts.blogspot.com

    Reply
  42. Diane says

    March 29, 2011 at 1:17 pm

    This is adorable!!! Just love it!!! Thank you!

    Reply
  43. Yuliya says

    March 29, 2011 at 11:54 pm

    very cool idea, thank you!

    Reply
  44. Tauni says

    March 31, 2011 at 12:25 pm

    Wow. These are awesome! Thank you for sharing!!!

    Reply
  45. mama of a mini diva says

    April 1, 2011 at 10:07 am

    I can not wait to try this out. Thanks for a great tut.

    Reply
  46. Joey Ramone says

    April 2, 2011 at 8:51 am

    These are gorgeous and look so easy to make!! I love things like that, simple but just beautiful. I can’t wait to make my own, I have lots of rick rack!! 😀
    Thank you!
    Best wishes
    Joey

    Reply
  47. Jeanee says

    April 3, 2011 at 12:20 pm

    I hate rick rack… but I LOVE this!

    I featured your DIY on my blog.

    http://blog.shopdirtylaundry.com/posts/2011/4/1/13-the-dirty.html

    Thanks for making me see rick rack in a different way.

    Reply
    • Andrea says

      August 19, 2011 at 8:52 pm

      I agree! I have always HATED ric rac. This is the first time I’ve seen it used and it hasn’t made me want to run away!

      Reply
  48. Jami J says

    April 3, 2011 at 9:53 pm

    These are wonderful!!! So cute! 😀 Thanks for sharing the idea!

    Reply
  49. Karen Hess says

    April 5, 2011 at 10:04 pm

    Awesome!!! I can’t wait to make one! Thanks, Nikkala!!

    Reply
  50. Tania says

    April 6, 2011 at 5:10 am

    this is so beautiful, thanks for sharing, found your link on: justsomethingImade.com

    Reply
  51. Amie says

    April 6, 2011 at 9:43 am

    I just discovered this project from a link on Twitter – I am in love with that ring, I can’t wait to try this on my own. Thank you for sharing!

    Reply
  52. Jenn Lucas says

    April 6, 2011 at 9:44 am

    Thanks for this tutorial – it is so cute! I know how to make all kinds of rolled flowers – ribbon, fabric, etc., etc., etc., but I have to admit, this is the first time I’ve seen this one.

    Reply
  53. K{IR}STEN says

    April 6, 2011 at 11:19 pm

    How lovely! My mother had a pearl necklace many yrs ago with similar roses on it. Immediatley, I thought of this necklace when I came across your post. What a neat idea…..and to think with rick rack! Awesome!

    Reply
  54. Debra says

    April 7, 2011 at 9:02 pm

    I have seen a lot of flower tuts, but I really like this one. I may have to make a few and make some sort of hair accessory for myself. Really pretty outcome!

    Reply
  55. Laura Rhodes says

    April 10, 2011 at 11:31 pm

    Oh how lovely and simple! I would have never thought of it! Thanks for sharing and may the Lord bless your week! Laura Rhodes
    http://rhodesembroiderycreations.webs.com/
    http://rhodescreations.blogspot.com

    Reply
  56. darla says

    April 15, 2011 at 2:30 am

    love the rose you make i use make rose;s out of ribbions i take my stuff to the hospital when i had i have to 9to 13 days most times so i make lots of crafts the hospital and would give them away . this lady siister wasin the hospital and she was very sick she knock on my door andask tocomei said ok she said i hear your makeing flowers out ribbions i yesi am she said mayi buy one from you see my sister very sister and havingto moved to aother hospital she i just wanted give her asmall gift i wasso happy come and asked i happy togive her and her sister
    to play with crafts not only help you passthe time away but we can put smile on others faces with our crafts . i am learing jewerly madeing i enjoy just shareing with others and i want say thank you for share with allof us . i try rember to dropin to vist here love yyour blog . god bless all

    Reply
  57. Carmen says

    April 17, 2011 at 4:14 pm

    buenisimo, me encanto!!!

    Reply
  58. ...love Maegan says

    April 21, 2011 at 2:48 pm

    adorable!

    Reply
  59. Alexandra says

    April 21, 2011 at 9:09 pm

    I think your hands are great!

    Reply
  60. maize hutton says

    April 24, 2011 at 12:06 pm

    Reminds me of my rick rack ring tutorial.
    http://maizehutton.blogspot.com/2011/02/rick-rack-rings-diy.html

    Reply
  61. Angela says

    April 27, 2011 at 2:40 pm

    These would be great in different spring colors on a wreath mixed with other fabric flowers. Great tutorial!!!

    Reply
  62. Leslie says

    May 1, 2011 at 9:03 am

    Thank you for sharing this tut! I am going to make these and glue them to my ugly hair clips. They are the only things that hold my hair, but ewwww, very ugly! I know this will dress them right up! I am glad I found you!

    Reply
  63. Chelsea says

    May 1, 2011 at 10:46 am

    What a cute idea! I can’t wait to try this. I think I’m going to make some and sew them on throw pillows or maybe stitch to a knitted scarf.

    http://www.sothisisarmylife.blogspot.com

    Reply
  64. Diane says

    May 6, 2011 at 7:08 am

    Thanks so much for the GREAT tutorial. It’s so easy to follow. I can’t wait to make some of these for myself.

    Reply
  65. Beverly @ Flamingotoes.com says

    May 6, 2011 at 11:02 am

    I love these!! They are so pretty! I used them on a throw pillow I made for spring! (I linked to you too. 😉 Here’s the link if you want to check them out! http://www.flamingotoes.com/2011/05/spring-zig-zag-ric-rac-pillows/

    Reply
    • Nikkala says

      May 6, 2011 at 12:11 pm

      Beverly, your pillows are so stinking cute! Thanks for linking back. I went ahead and shared them on Facebook and Twitter. Love them!

      Reply
  66. Falaxy says

    May 14, 2011 at 5:31 pm

    brilliant idea! thanks so much for sharing it! : )

    Reply
  67. La Pie Kikou says

    May 15, 2011 at 4:06 am

    c’est une très bonne idée, j’aime beaucoup,
    bonne journée, Jocelyne

    Reply
  68. Beverly says

    May 18, 2011 at 8:04 pm

    These roses are the cutest and sweetest things I have seen! Thanks for sharing!

    Reply
  69. Monique says

    May 22, 2011 at 7:00 am

    Merci pour le tuto de ces superbes roses. Amitiés Monique

    Reply
  70. Rachael says

    May 27, 2011 at 5:46 am

    These are absolutely fabulous, I love them and can’t wait to have a try at making them.

    I have put a link on my blog because they are the my favourite thing I’ve come across this week!

    Rachael

    Reply
  71. RebekahSue says

    June 13, 2011 at 8:35 pm

    I love this! Although it uses a sewing machine and I am not lucky enough to have one. Any suggestions on how to do it without one? Love these though!

    Reply
  72. malox qui bidouille says

    June 14, 2011 at 1:29 am

    hi!!
    thank you for your tutorial …
    Your hands are beautiful ;o)
    friendly

    Reply
  73. Laura says

    June 14, 2011 at 3:39 am

    Es precioso !!!!!

    Muchas gracias y un besito desde Barcelona !

    Reply
  74. Andrea says

    June 15, 2011 at 6:12 am

    obrigada pela florzinha, amei. vou tentar fazer
    beijos e ate mais

    Reply
  75. jen says

    June 20, 2011 at 3:46 pm

    cute idea! think hot glue or glue dots would work instead?

    Reply
  76. Annica says

    June 26, 2011 at 1:55 pm

    I am normally the farthest thing from a fan of rickrack, but you may just have made a believer of me with this tutorial. I think I might have to bend my will and (gasp) go out and buy some rickrack, just for these! Thanks for the rickrack conversion! 🙂

    Reply
  77. Susan Ayers says

    July 6, 2011 at 6:32 am

    Ok I officially love this but I have a question… What can I use or how can I wrap this to make it stay semi open, such as on your ring? I am planning on a few of these as decorations on a display but I don’t want to have to continually reopen them?

    Reply
  78. Valerie says

    July 7, 2011 at 8:34 pm

    This is so cute! I just made this and hot glued it to a ring I had. The only problem I had was that the finished product was really bulky and kind of heavy. But that’s a small price to pay for something so cute.

    Reply
  79. Panz says

    July 12, 2011 at 7:17 pm

    Your hands look like your model was wasted money!! Thank you for such a great idea. I just love this and will begin testing it immediately. I detest those natty mini roses from WalMart. These will work much, much better. I think a twist of green on each side will make leaves.

    Reply
  80. donna mikasa says

    July 12, 2011 at 11:37 pm

    These are gorgeous! Thanks for sharing such a clear tutorial!

    Reply
  81. Alicia @ Sweet Ava Kate says

    July 14, 2011 at 1:25 pm

    I adore this! Thanks for sharing the tutorial! I have some rick rack in my craft room, think I’ll try this when the kids go down for a nap! 🙂

    Reply
  82. Mary Kathryn says

    August 4, 2011 at 7:22 pm

    I have extra ric rac and am going to try attaching it to a bobby pin and making a clip for my daughters!! Love it, thanks!

    Reply
  83. Jill Young says

    August 7, 2011 at 4:26 pm

    Isn’t there a product that is kinda like Mod Podge but makes fabric flowers look like porcelain when dipped in the product? I wonder how these would look like that?
    I think that they would look great on a headband too.

    Reply
    • Nikkala says

      January 9, 2012 at 10:06 am

      Yes, I just learned about it. It’s called Utee!

      Reply
  84. Colleen says

    August 28, 2011 at 7:12 pm

    That’s a wonderful idea! I absolutely love it! Thank you for sharing it with us!

    Reply
  85. Tamara @ Etcetorize says

    August 31, 2011 at 8:30 am

    Oooooh! I love these. I can’t wait to try this out.

    Reply
  86. Theophanie says

    August 31, 2011 at 10:46 am

    That is beautiful!
    P.S. Your hands aren’t any worse than mine.

    Reply
  87. Alexandria says

    September 10, 2011 at 6:08 pm

    I just made one out of my leftover turquoise rick rack and i Love how it turned out! here’s a pic –> http://alexandriajette.blogspot.com/2011/09/easy-crafting.html

    Reply
    • Nikkala says

      September 10, 2011 at 6:32 pm

      Ack! I love it!

      Reply
  88. Claire says

    September 14, 2011 at 1:34 pm

    we did something similar, but i’d like to try this one as well!

    http://inspiringpretty.com/2011/06/08/handmade-wednesday-fabric-rosettes/

    Reply
  89. sharon says

    October 19, 2011 at 9:32 am

    My son is getting married next month and the wedding has a “vintage” theme. We are having the rehearsal dinner at a beach house – I think I will make many of these in the wedding colors and scatter them on the tables etc. These are adorable!

    Reply
  90. carinissima says

    October 22, 2011 at 1:25 am

    Quelle belle idée, je pense que je vais m’en servir! Merci!

    Reply
  91. Picsou630 says

    October 29, 2011 at 6:42 am

    It’s a very good idea…the result is beautiful.
    Bravo et félicitations. Merci pour le tuto

    Reply
  92. cindy valente says

    November 7, 2011 at 5:29 pm

    I do love your rick rack rosettes. However, I would like to print out the directions and cannot figure out how w/out printing all the extra pages of comments. Can you help me w/ that? Thanks, Cindy.

    Reply
  93. janet wilson says

    November 8, 2011 at 6:10 pm

    Fascinating – love them and feek very intrigued to try making one :o)

    Thank you for the inspiration!!

    Reply
  94. Krista says

    November 9, 2011 at 1:41 pm

    I’ve been making theserosettes and attaching them to stretch lace and making them into bracelets for my daughters. They look so delicate on their cute little arms.

    Reply
  95. Bianca Moraes says

    November 16, 2011 at 9:48 am

    Wow! I love this! 😀

    The funny thing about it is: I’m from Brazil and saw this tutorial here first! That one you linked is in Brazil’s portuguese! I’m so proud of it! 😛

    Thank you for sharing! I’m going right now get my rick racks! 😀
    ;*

    Reply
  96. jane brant says

    November 20, 2011 at 11:25 am

    wow..Love your clear and concise directions. 5 stars for the authors and photographers!!

    Reply
  97. Ramya says

    January 1, 2012 at 9:18 pm

    Awesome!! can’t think of any other word to describe…Brilliant work…neat and beautiful…

    Reply
  98. Kim says

    January 9, 2012 at 3:25 pm

    this is a wonderful idea, can hardly wait to try it out…ty~

    Reply
  99. Deana says

    January 21, 2012 at 2:12 pm

    That is sew cute I just Stumbled upon you….and joined up..I’d like to invite you to CountryMommaCooks Link & Greet party going on now-Sunday….have a lovely weekend!

    Reply
  100. Alexsa says

    January 22, 2012 at 11:21 pm

    hello ladies, I loved this rosette idea, but I can’t braid my rick rack 🙁 I make a mess on it every time I try to.
    can you please help me. I really want to do it, I bought several rick rack packs and I don’t want them to get wasted.
    thanks 🙂

    Reply
  101. Tammie says

    January 31, 2012 at 10:45 am

    I love this tutorial. Thank you for taking your time to share this with us. I made a red rose ring and love it. I did share a picture of my finished project and a link to your blog post.

    http://www.justmaketime.com/2012/01/30/one-project-goal-down-eleven-more-to-go/

    Thanks again!

    Reply
  102. Rosabella says

    February 12, 2012 at 7:08 am

    great!!! I love it ♥

    Reply
  103. Alix of Bigbluebed says

    February 24, 2012 at 6:11 am

    This is a lovely tutorial and the flowers are so sweet. Thank you for sharing.

    Reply
  104. COUSON says

    February 24, 2012 at 9:29 am

    What a clover idea!Thanks alot!

    Reply
  105. sheila says

    March 23, 2012 at 3:41 pm

    This is great. I love it. I will definetly try to make some. Thanks a lot.

    Reply
  106. Vika says

    April 12, 2012 at 12:02 am

    Stupendous!
    I really like the result of the rick rack ^_^.
    I think I will make a headband with this rosettes.
    You inspire me. Thanks a lot.

    Reply
  107. Marsha says

    April 21, 2012 at 11:15 pm

    This is great! Luv it!! I think they would dress up a plain purse or tote bag or of course, on wreaths. I’ve been making felt flowers. The scalloped edges really make these look nice.

    Reply
  108. Tiana says

    June 7, 2012 at 7:31 am

    The rose is SUPERB! I might never make it as I have never seen that rick-rack in our shops, but I loved the idea.

    What I actually wanted to say was that you should never EVER apologize for what you are or what you have. Those hands you apologize for made this wonder! It is what they can do, not how they look like that really matters. And you should be proud of this!

    Reply
  109. Amanda says

    June 8, 2012 at 10:33 pm

    These are great! So easy to make…I’m making these as a part of an arrangement for my wedding decoration. Instead of going out and spending extra for a can of starch, I used hairspray that I had left over from years ago to stiffen the petals up and keep them open! Works great, I just put on a few extra layers in between dryings for extra stiffness.

    Reply
  110. Rose says

    July 7, 2012 at 12:09 pm

    I’ve made these rickrack roses for years but didn’t think to sew one edge to keep it together just glued as I rolled. This will be far messier! Thanks!

    Reply
  111. Tanja says

    July 19, 2012 at 11:58 am

    I’ve tried this last night… what should I say…
    Awsome!!!!! I Love this!
    Thank you so much for this idea!!!
    Many greetings from Germany (Frankfurt)

    Reply
  112. Gail says

    August 8, 2012 at 6:59 pm

    These are so beautiful…they actually look vintage. Can’t believe they are made so simply. You’re clever! Thanks for sharing this. Gail (BibleLoveNotes.com)

    Reply
  113. Faye Cox says

    August 9, 2012 at 7:33 am

    This is a beautiful idea! Thanks for sharing. It brought back memories of when I was a teanager and my brother and I used rickrack to gather one side and make earrings and even sold some. Back then you could buy the screw-on type earring backs and we would glue them on the backs of the rickrack. It would look like a cup and saucer. I cannot remember exactly how we made them but your idea is just great.

    Reply
  114. sara octaviano says

    September 29, 2012 at 9:21 am

    I am making these in variation of shades of pink to put on a diaper cake for a baby girl! Thank you for idea.

    Reply
  115. lindamarcella says

    November 11, 2012 at 2:28 pm

    thank you so much for sharing this. I have been looking for patterns to make accessories for my suit jackets and to make for my god child who wears very classic dresses but loves glittery shoes and hair bows. I can see this used either in her hair or as a shoe decoration. If you have any other suggestions kindly forward them.

    Reply
  116. Acutie says

    November 27, 2012 at 3:00 am

    I saw this and had to try it out. Not as perfect as yours but thanks for the inspiration 🙂 you can see the results here http://goo.gl/XcrmL

    Reply
  117. Andrea says

    February 4, 2013 at 9:03 pm

    I had vowed to have a flower free wedding. Until now. These are great! I’m going to do a bouquet, several rings, and several boutonnieres! Yay!

    Reply
  118. Areej says

    February 16, 2013 at 5:19 am

    Thanks for sharing .

    Reply
  119. DignA WILSON says

    April 21, 2013 at 6:15 pm

    i really love it..thanks for sharing..love you idea of the ring..saving this instructions for later…im going to do some for my grandgirls…..

    Reply
  120. Alison says

    May 23, 2014 at 2:27 am

    I was looking for inspiration on making fabric flowers, I am a florist anyway but wanted something unique as I couldn’t find tartan flowers! Now I know! Thank you for sharing :0)

    Reply
  121. Jan Murry says

    July 17, 2014 at 6:22 am

    Thanks so much – I’m envisioning a grouping of three to make a lovely brooch. Thanks for sharing!

    Reply
    • Maryellen Baughman says

      October 10, 2014 at 4:24 pm

      Would love to see how your brooch turned out…I don’t have a sewing machine, but am going to see what I can do about working without the rick rack …. maybe I’m dreaming! LOL!

      Reply

Trackbacks

  1. Fab Five | Real Mom Kitchen says:
    April 4, 2011 at 6:15 am

    […] of this weeks fab five is these cute rick rack rosettes from The Crafting Chicks.  I really need to figure out what is wrong with my sewing machine so I can make some of these! […]

    Reply
  2. The Surfing Insomniac | Just Something I Made says:
    April 5, 2011 at 6:10 am

    […] Sweet Rick Rack Rosettes.I think terrariums are so cute. I gotta make one. Or two.Starburst Dining Room Mirror…Brilliant.New on my inspiration list from two of my favorite peeps. Suzonne Stirling’s beautiful doily stenciled eggs. Stunning.I’m hooked on following Centsational Girl’s Alma Project.Reminiscing about the blogger’s weekend spent at this amazing beach house last month.Obsessing over the things I could do with the new Bitty Bags. […]

    Reply
  3. Footprints » Blog Archive » Try it! Tuesdays - Injecting Spring says:
    April 5, 2011 at 9:59 pm

    […] From the crafting chicks: […]

    Reply
  4. How Does Your Garden Grow « ASG Chicago says:
    April 13, 2011 at 7:07 am

    […] wonder if this flower was made in green, if it would look more like an artichoke? Crafty Chicks’ tutorial on their blog will show y0u how to make this vintage-looking […]

    Reply
  5. Rick Rack Roses &; Yet Another Giveaway | accordingtocarey.com says:
    April 28, 2011 at 2:02 am

    […] should!  There is even more sharing going on over there.),  you would have read my mention of the rick-rack roses tutorial over at The Crafting Chicks. photo courtesy of The Crafting […]

    Reply
  6. Dekorationen – Linkliste | Kostenlose-Schnittmuster.de says:
    June 2, 2011 at 2:45 pm

    […] Rosen aus Zackenlitze […]

    Reply
  7. A “Mini Me” Rose « says:
    June 12, 2011 at 1:42 pm

    […] The tut is here. […]

    Reply
  8. Revisiting Some Favorite Projects {and another visit to Studio 5} says:
    July 6, 2011 at 12:01 pm

    […] Nikkala’s Rick Rack Rosettes […]

    Reply
  9. Giving Handmade says:
    August 8, 2011 at 6:50 pm

    […] Rick Rack Rosettes […]

    Reply
  10. Ric Rac, Burlap, and Felt accessories in 15 minutes | How Does She... says:
    November 2, 2011 at 9:06 am

    […] rac rosettes. They are so fun and make the best chunky rings in every color you can come up with! Here’s the link ! Awesome tut Crafting Chicks! Here’s what we came up […]

    Reply
  11. Doing not Pinning | Head in the Trees says:
    November 5, 2011 at 9:55 pm

    […] was looking for something to do with some extra rick rack and came across this tutorial and decided to give it a […]

    Reply
  12. Top 10 Projects of 2011 says:
    January 1, 2012 at 8:34 pm

    […] 1. Rick Rack Rosettes […]

    Reply
  13. hair bows, clips and dummyclips by charbabyserendipity - Pearltrees says:
    January 15, 2012 at 4:42 pm

    […] To make your flower wearable glue it on a ring blank, a necklace, or on clips for little girl’s hair. Rick Rack Rosettes […]

    Reply
  14. Rick Rack Rosette and Pearl Necklace says:
    January 16, 2012 at 6:01 am

    […] gift ideas,how-to,jewelry This Christmas I made a ton of the Rick Rack Rosettes Nikkala posted last year.  I just loved them and they are so fun to […]

    Reply
  15. Friday Favorites–Flowers « Crafty Staci says:
    January 27, 2012 at 8:01 am

    […] around, but didn’t understand how they were made until right this very minute.  Thanks to The Crafting Chicks for excellent directions on their Rick Rack […]

    Reply
  16. One project goal down, eleven more to go | Just Make Time One project goal down, eleven more to go | Family and Crafting Fun says:
    February 20, 2012 at 5:53 pm

    […] Link to tutorial:  The Crafting Chicks  https://thecraftingchicks.com/2011/03/rick-rack-rosettes.html […]

    Reply
  17. DIY | Pearltrees says:
    February 28, 2012 at 2:22 pm

    […] Rick Rack Rosettes – StumbleUpon is the author of this post. Wanna know more about the Chicks? […]

    Reply
  18. hobby | Pearltrees says:
    March 4, 2012 at 4:50 am

    […] Rick Rack Rosettes is the author of this post. Wanna know more about the Chicks? Click here . 🙂 (Please excuse my hands, my hand model moved to Indiana, so I’m left using what I’ve got […]

    Reply
  19. ucreate post {ric rac} says:
    March 8, 2012 at 10:02 pm

    […] ric rac rosettes from the crafting chicks  ric rac flowers from craftiness is not optional ric rac rose ring from the ribbon retreat ric rac bunting from i {heart} naptime strawberries and ric rac garland from simple serendipities fabric party hat from craft blog ric rac birthday cake from living locurto ric rac dahlias from knick knacks and ric rac spring zig zag ric rac pillow from flamingo toes zig zag table runner from knitty bitties […]

    Reply
  20. Ric Rac Rose Roundup – Laylock Knitwear Design says:
    March 15, 2012 at 4:03 pm

    […] Two lengths of rick-rack twisted around each other and then rolled up. (here’s another tutorial) This is the technique I used for my roses. The only difficulty is […]

    Reply
  21. Inspirational Monday – Do it yourself (diy) Flower series – Ric Rac flowers | mypapercrafting says:
    March 26, 2012 at 12:53 am

    […] Credit Source: Ric Rac Rolled Flower […]

    Reply
  22. rock the tote: with all the trimmings (part 2) « moonthirty says:
    May 2, 2012 at 9:52 pm

    […] with this humble little garnish. Aside from edging, it’s frequently used as a flower stem, the flower itself, and here it’s even a cute caterpillar. I admit that I haven’t branched out with it […]

    Reply
  23. Toddler Dresses / Kate’s Science Behind It says:
    August 1, 2012 at 11:17 pm

    […] Glover picking something for his niece at Sundance 2012 Adam Busch getting his niece an HoM dress Toddler dresses are one of House of Minerva's hottest selling products. You're probably wondering w…se of Minerva's hottest selling products. You're probably wondering why I went from bags to Toddler […]

    Reply
  24. Rick Rack Rosette Ring...Really!! - Uncommon Designs... says:
    November 13, 2012 at 7:22 am

    […] Now that is quite a tongue twister! When I saw this tutorial over at The Crafting Chicks, I instantly fell in love!! Soooooo….I had to make one for […]

    Reply
  25. Snappy Bags {Gift Idea} says:
    November 21, 2012 at 8:25 pm

    […] Chair Makeover, Rick Rack Rosettes, Muslin Swaddle Blankets 1 Comment var addthis_config = { […]

    Reply
  26. D.I.Y Handmade Jewellery ! « Glitz'n'Glam says:
    February 21, 2013 at 12:09 pm

    […] really love this handmade Rosette Ring from The Crafting Chicks, it absolutly Lovely and very easy to make, so check it out: Click […]

    Reply
  27. rings - A girl and a glue gun says:
    February 22, 2013 at 10:26 pm

    […] rings ric rack rings source I know right. I also found this one…that I loved too… source so I made one… and while I was getting that out….I saw my little bag of odds and […]

    Reply
  28. DIY Flower Projects to Decorate Your Home for Spring — Creations by Kara says:
    April 5, 2013 at 8:05 am

    […] Ric Rac Rosettes from The Crafting Chicks Crepe Paper Ranunculas from Twigg Studios […]

    Reply
  29. 5 Ways to Make Jewelry From Notions and Sewing Supplies | Brandywine Jewelry Supply Blog says:
    May 15, 2013 at 10:04 am

    […] Original Source : https://thecraftingchicks.com/2011/03/rick-rack-rosettes.html […]

    Reply
  30. Epingles à cheveux | Moine Sauvage says:
    June 24, 2013 at 1:17 am

    […] Tutorial des fleurs en croquet sur le blog de the crafting chicks. […]

    Reply
  31. Kumaş Çiçek Modelleri ve Yapımı | Hobilendik.net says:
    July 8, 2013 at 4:10 am

    […] kaynak […]

    Reply
  32. WeAllSew For The Holidays: DIY Party Dress Accessories › WeAllSew says:
    December 27, 2013 at 7:40 am

    […] vintage look rosettes out of rick rack to make a necklace or ring. Get the Rick Rack Rosettes tutorial from The Crafting […]

    Reply
  33. Due Date + Procrastination = a Naked Baby?!?! ‹ Frances Suzanne says:
    April 2, 2014 at 11:59 am

    […] We decided to embellish two of them. On one of them, Emily {suzanne} made a sweet little mini ric rac flower, burning the ends of the ric rac to prevent fraying. She learned several valuable lessons during […]

    Reply
  34. How To Make 20 Different Fabric Flowers - The Crafty Blog Stalker says:
    May 23, 2014 at 10:41 am

    […] Dahlias   Satin and Tulle Flower   Perfect Flower   Fabric Flower   Ric Rac Rosettes   Organza Flower   Sweater Flowers   Summer Flowers   Poinsettia   […]

    Reply
  35. Top 32 Most Amazing DIY Gifts For Her |DIYManiac says:
    June 2, 2014 at 11:50 am

    […] Image via thecraftingchicks.com […]

    Reply
  36. Lo: Sequenza d’emozioni | Scrappando Carta & Ricordi says:
    March 1, 2015 at 12:20 pm

    […] a spighetta, intrecciata, cucita ed in fine arrotolata. Ed ecco qui le mie rose, vi lascio anche il link con tutorial […]

    Reply
  37. 20 Different Paper Flowers | Winni says:
    May 3, 2015 at 1:03 pm

    […] Flowers Classic Felt Flowers Dahlias Satin and Tulle Flower Perfect Flower Fabric Flower Ric Rac Rosettes Organza Flower Sweater Flowers Summer Flowers Poinsettia Sunflowers More Fabric Flowers […]

    Reply
  38. 10 MINUTE DIY SHABBY CHIC ENVELOPES says:
    May 15, 2015 at 3:13 pm

    […] Lady’s so this weeks ten minute project is of course these precious envelopes.  These Chic envelopes will indeed inspire you to write a letter to your loved one on that dewy rainy day next […]

    Reply
  39. 30 flowers to make using fabrics and trims – Tales of Home says:
    January 22, 2016 at 8:12 pm

    […] cute!  These little Rick Rack Rosettes from The Crafting Chicks are used to make a necklace and a […]

    Reply

Leave a Reply Cancel reply

Your email address will not be published. Required fields are marked *

This site uses Akismet to reduce spam. Learn how your comment data is processed.

Recent

Paper Plate Chick Craft for Kids

Triple Chocolate Bundt Cake

14 Acts of Kindness Printable

Halloween I Spy

Halloween Nail Gift Tag Printables

Best Homemade Playdough Recipe

Get access to our free crafting guide

We are a participant in the Amazon Services LLC Associates Program, an affiliate advertising program designed to provide a means for us to earn fees by linking to Amazon.com and affiliated sites.

© 2023 The Crafting Chicks. Website by WP Barista. Privacy Policy

44321 shares