I am super excited to introduce you all to our Guest Post for today, Heidi. I have been following Heidi’s blog for a while now and I just love the tips and tricks that she gives for decorating. She is a genius and uber talented! We are so happy to have her on our site sharing a fun tip! We hope you enjoy!
Hello Friends, my name is Heidi Parson, I’m a stay at home mom with a flair for Interior Design and D.I.Y projects! I have a passion for making the world around me beautiful! You can find me at Home By Heidi.
Today, I am super excited to share my secrets and tips on how to make your bed at home look like the display beds in designer store windows. Do you ever find yourself asking the question
“How in the HECK do you maintain a bed like that in REAL life?!?”
Well . . . you are in for a TREAT today!
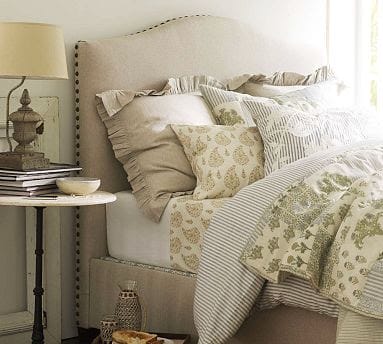
Let’s admire the first picture from Pottery Barn. Take a second to really soak it in..…ahhh!
Feel Relaxed??
That is exactly the feeling your master bedroom should bring you everyday!
So . . . let’s start breaking this bed making process down step-by-step.
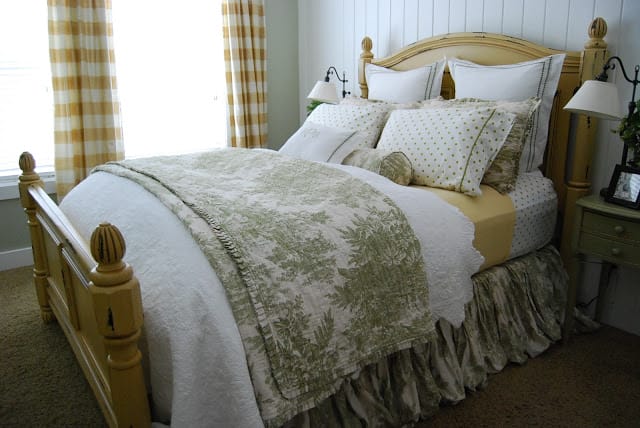
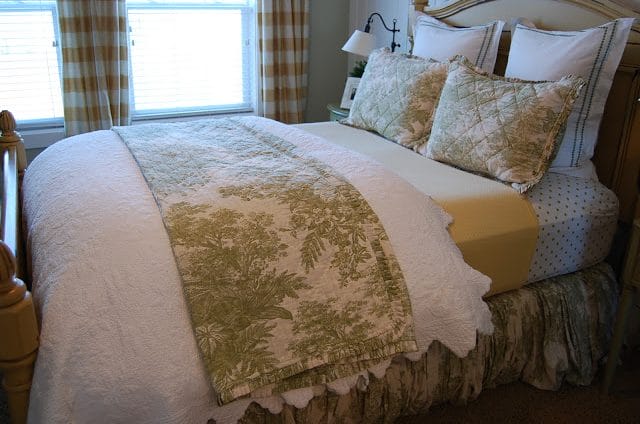
First things First . . . here is a Picture of my Master Bedroom
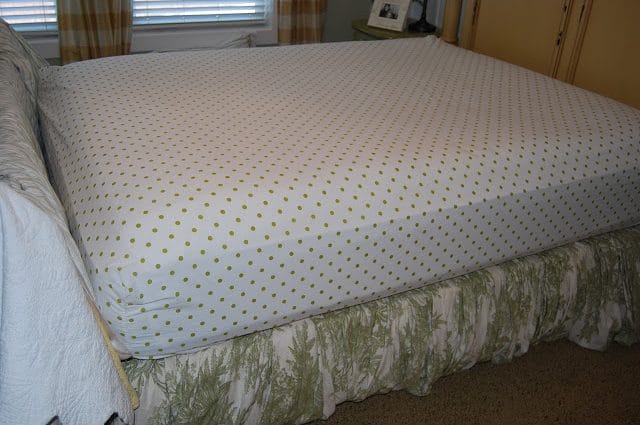
Step One: Get Ready
Throw everything to the end of the bed and take the time to freshen up the bottom sheet. I like to spray Febreze or yummy smelling spray on the sheet, so when I fall into bed at night ( Exhausted!)
my sheets smell FRESH and CLEAN.
(As much as I would LOVE fresh sheets everyday.. it just isn’t going to happen so..I like to pretend 🙂
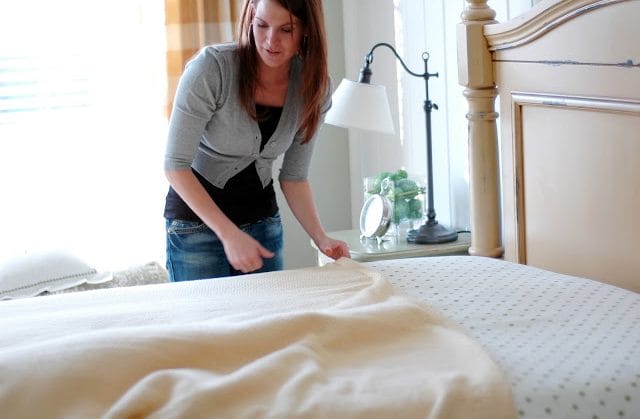
Step Two: The Top Sheet
If you are anything like me, I HATE top sheets and refuse to iron them so they can be used as a decorative piece of bedding.
So, I just “forget about it!” and fold the wrinkled mess at the end of my bed!
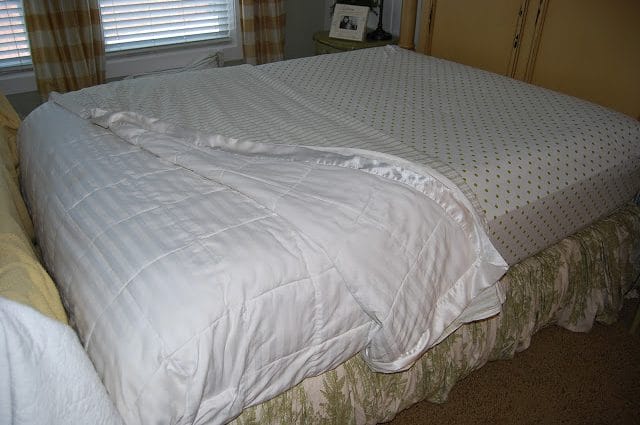
Step Three: Blanket Over the Top
During the winter, my hubby and I use a very comfy and thin duvet cover to sleep with. During the summer, it gets too hot so we take it off.
Tip: In these first few steps, you need to decide what is best for your own personal comfort.
From this point on, bed making is All decorative and not so much functional!
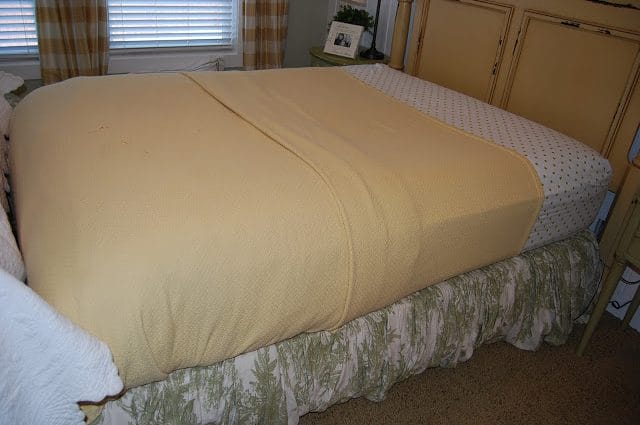
Step Four: The Decorative Blanket
You don’t HAVE to have a blanket, but for my bed, it added the element I needed to pull the colors all together. I got my blanket at Pottery Barn. It was a splurge, but when it gets cold at night, it’s always nice to have some extra layers.
Notice the fold in the middle of the blanket. This is on purpose; you want to be able to see the top of your sheets for decorating purposes. By folding the top blanket, it creates the perfect way of doing this.
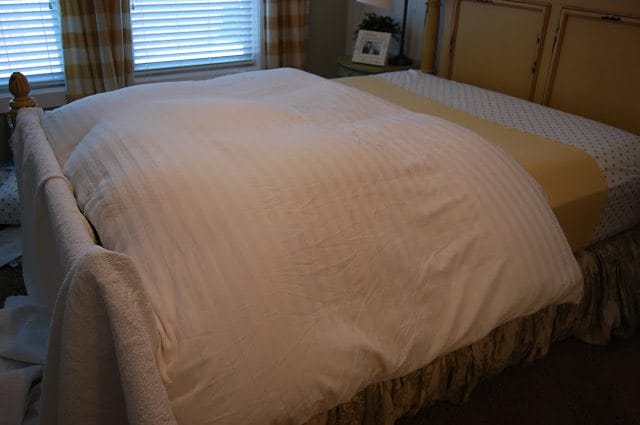
Step Five: The Big Fat Puffy Duvet
NEXT comes the MOST important part of the entire bed. The BIG FAT puffy duvet. “The Bigger the Better.” This duvet is not for use! It is the key to making the bed look like those in store displays. What you see in the picture is the duvet folded in half at the end of the bed. When I am getting into bed at night I just throw this fat duvet over the edge of the bed and leave it ’til morning!
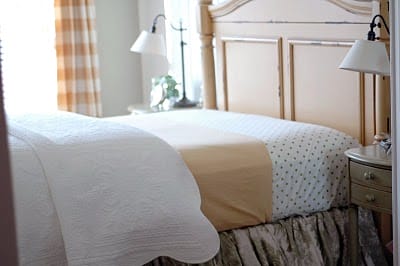
Step Six: Cover the “UGLY”
Next . . . the coverlet, quilt or whatever you want to use to cover all the “UGLY” underneath.
Here, I have used a white coverlet I bought at T.J. Maxx for only $39.00!!!
Notice the fold at the top of my coverlet.
Another one of my tricks to cover the duvet below and still leave plenty of room for all the pretty pillows!!!
I used a patterned quilt on the top of my coverlet.
I just folded it in half and laid it across the coverlet’s fold. WORKED out perfect!!
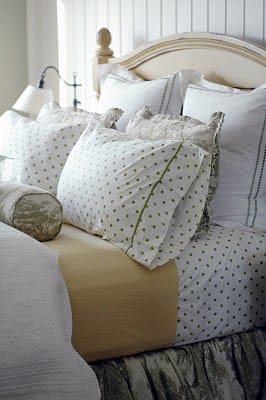
Step Seven: All the Pretty Pillows
Next Comes the EXCITING part, the placement of pillows!
On queen size, I always use 2 Euro Shams and 4 Standards with some sort of decorative pillows to match.
On Kings, I use 3 Euros 4 Kings and decorative pillows to match.
I also LOVE getting ideas from magazines as for new and exciting ways to place pillows.
Final Step: The Bed Skirt
Lastly, I am a HUGE sucker for bed skirts! I feel like it’s the finishing touch to every bed. Make sure to keep them “fluffy” and you’ll be all set to go!
Well, that’s it! Simple as Pie 🙂
Now it’s your turn to create the PERFECT BED!
With Spring right around the corner, why not add a little luxury to your space. I would love to see pictures of your creations! Please stop by Home by Heidi and send your pictures!
Thanks again to The Crafting Chicks for asking me to be a guest on their AMAZING blog!
This is an awesome, practical post! Your bed looks SO cozy and chic and I love your style. Thanks for the great tips and thanks for guest posting on our site!!
Heidi, thanks so much for decoding this! I always wondered how to make the perfect marshmallow soft bed. What is the name of the PB blanket that you used for your decorative blanket? I want to look for one. Thanks tons!
Julie,
The Blanket from PB is their Basic Essentials Blanket. I bought mine years ago when they had a lot of FUN colors. They change their blanket colors by season. Hope that helps!
How do you get the pillow corners to stay up? I have pottery barn euro and regular shams on my bed but they always look frumpy and the corners fall down! Your bed looks beautiful.
This is a little confusing for me. It seems like you have a total of seven layers on your bed, including the fitted sheet. O.o Do you? I think the biggest thing I was missing was folding the feather comforter in half, which I’m going to try right now.
 Hello Friends, my name is Heidi Parson, I’m a stay at home mom with a flair for Interior Design and D.I.Y projects! I have a passion for making the world around me beautiful! You can find me at Home By Heidi.


This is an awesome, practical post! Your bed looks SO cozy and chic and I love your style. Thanks for the great tips and thanks for guest posting on our site!!
Heidi, thanks so much for decoding this! I always wondered how to make the perfect marshmallow soft bed. What is the name of the PB blanket that you used for your decorative blanket? I want to look for one. Thanks tons!
Julie,
The Blanket from PB is their Basic Essentials Blanket. I bought mine years ago when they had a lot of FUN colors. They change their blanket colors by season. Hope that helps!
~Heidi
How do you get the pillow corners to stay up? I have pottery barn euro and regular shams on my bed but they always look frumpy and the corners fall down! Your bed looks beautiful.
This is a little confusing for me. It seems like you have a total of seven layers on your bed, including the fitted sheet. O.o Do you? I think the biggest thing I was missing was folding the feather comforter in half, which I’m going to try right now.
Where did you purchase the green patterned quilt, shams, bedskirt. You made a really pretty bed.
They were purchased at Pottery Barn years ago. This post was first shared back in 2011 so I’m not sure they would have it anymore.
I was wondering where you bought your lamps. They are beautiful. Thank you Kim
Hi Kim,
This post is from 2011. Heidi was a guest poster so we don’t have her any information on the lamps. I’m so sorry.