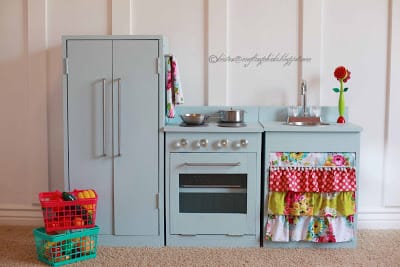
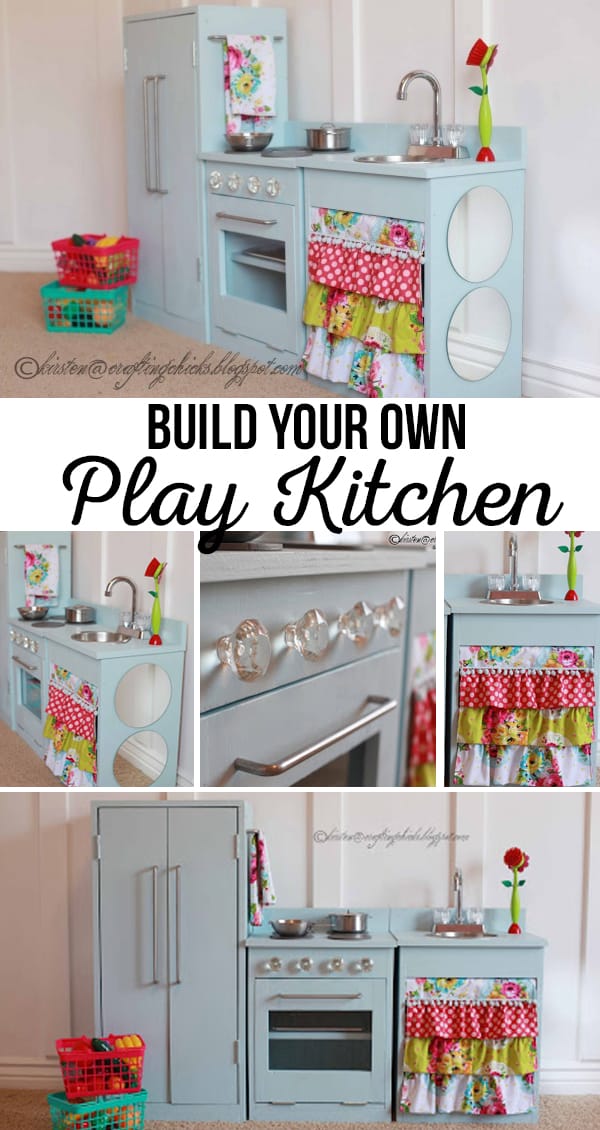
DIY Blue Play Kitchen
Ana from Knock Off Wood so generously featured the DIY Blue Play Kitchen I built, on her AMAZING site last Sunday. If you haven’t ever been there you MUST check it out. I could easily say that it changed my life a couple of months ago when Cousin Brooke introduced it to me. So her site is full of DETAILED and EASY building plans of all sorts of great furniture from places like Pottery Barn, Restoration Hardware, and West Elm. I didn’t know ANYTHING about wood or nail guns before I started this project a couple months ago. Even Better, she posts plans EVERY DAY! I don’t know how she does it, but thousands of people who visit her site daily would agree that she’s an inspiration.
 I have 4 kids 6 and under, and found the time to make this. I am telling you that not because I am supermom, but because it’s really doable. I had to work on it in really small snippets so this wasn’t a weekend project, but worked on it over about a month and a half.
I think the biggest thing I learned was that building is NOT hard, all you need is the right tools, and some dudes at Home Depot that are willing to spend an hour or so with you at the saw, which I did. I didn’t know ANYTHING about the different woods or power tools.
{PLANS}: You can find all of the plans on ana-white.com
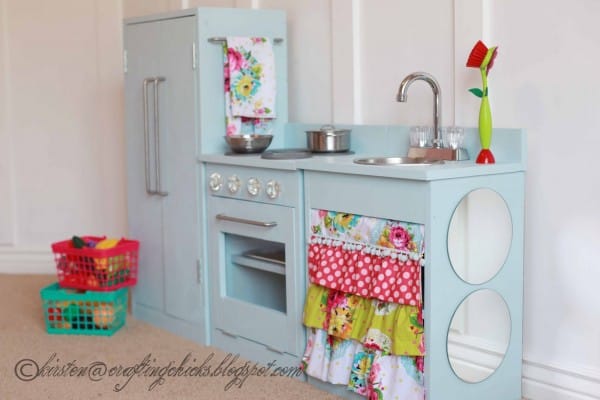
Stove Plans / Sink Plans / Fridge Plans
{MATERIALS}: I decided to use cabinet-grade hardwood plywood because it was on sale for $23.00 (a promo) for a 4’x8′ piece-so much cheaper than the pre cut pine boards, and I figured if I was going to the trouble, might as well make it super sturdy. I’m pretty sure we will be passing this down to the great great great grandkids. I’m also pretty sure if someone broke into my house, it would really do some damage if I chucked it at them.
When choosing your piece, make sure you don’t get one from the top of the pile because they are usually a little warped. Go 5 or 6 down. I ended up using a full 4’x8′ sheet of cabinet-grade hardwood plywood and then a small piece of another sheet, and took home the leftovers. I also used about a half a sheet of primed bead board ($19.00) for the back pieces. So the total for the wood used was about $40.00.
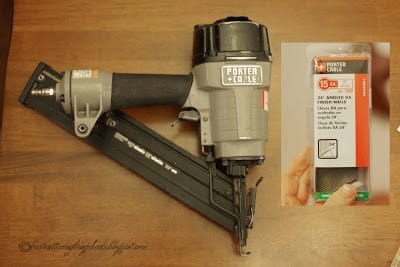 {TOOLS}: I went out and bought a nail gun off of Craigslist for $60, it was daring but paid off, it’s a beauty. Since it was used, I took it to the local building supply store and they put the ok on it. They also informed me that it’s SUPER important to put 5-6 drops of oil in your gun EACH time you use it. It was really surreal when I brought it home, I felt a little more powerful than I normally do. For you newbies, as I was just a couple months ago, I bought the 15 gauge, 2″ angled finish nails ($13.00-shown above) and used about 1/2 of them.
 {TOOLS} I also used a drill/screwdriver for the hardware and for the beginning of the sink hole and the faucet hole, and then widened that hole with my mom’s Bosch saber/jigsaw-super handy. By doing all my cuts at Home Depot, I got away without using a scroll saw or any other power tool! YEA! WARNING: Don’t try and drill a hole with the jigsaw, you might cut your hand off, not that I tried or anything.
{ASSEMBLY} Putting it together was really a cinch especially with a nail gun. I put each piece together in an hour or two. Although nailing the bead board to the back was kind of a beast. It was chipping a little bit, it worked, but I think screws might have been a better idea. If I was to do it over again, I would have labeled each board as it was cut at Home Depot, that would have saved me some time and remeasuring.
{SANDING & PAINT FINISH}: After the assembly, I sanded the whole thing down with an orbital sander, super handy but not necessary. I painted with a regular paint brush then sanded it down with an orbital sander again. I then ended up retouching and painting another layer with a wide sponge brush that gave it a nice smooth finish. I sanded that coat down with the finest grit sand paper for a nice finished look, then sprayed the whole thing with aerosol clear, satin protective finish.
 {ACCESSORIES}: If I’m being honest, I would have to say that the hardest part (and the part that took the longest) for me was picking out the paint color, and the right accessories because I can’t sleep at night until I get the best deal and the cutest crud. So here’s the information:
PAINT COLOR ($6.00): I had them color match from the cover of this book Handmade Home that was on the shelf at Lowe’s..it was just enough blue with just enough green. I chose one gallon of Valspar paint ($23.00) and used not even 1/4th of the can, and will use the rest on my laundry room.
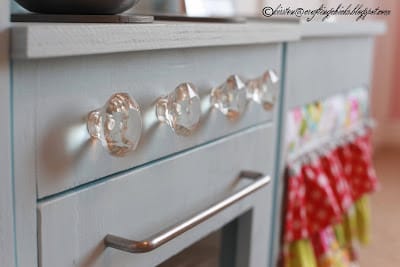
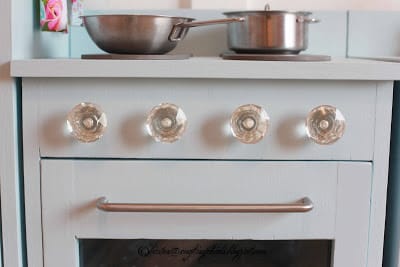
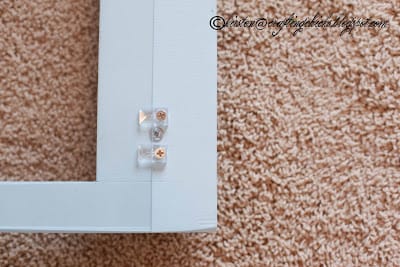
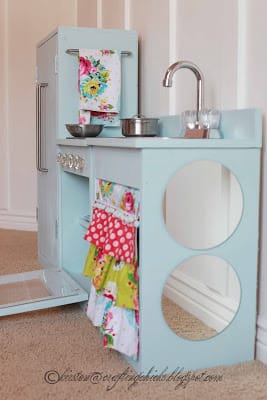
HARDWARE: The clear diamond oven knobs did not come from Anthropology but from Hobby Lobby for $2.50 each (50% off sale). In my searchings I learned that they were by far the cheapest for that type of knob. ($10.00 total)
The silver handles on the oven, the towel rack, and the fridge are 8″ and 12″ pulls from Ikea. I think they were $5.99 and $7.99 for each pair. ($14.00 total)
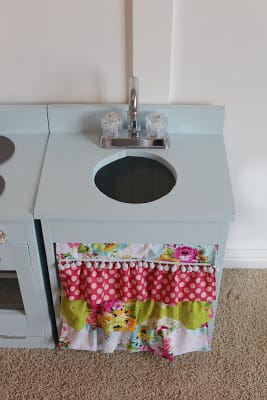
 THE FAUCET: I got this from ebay for $3.50…….plus SHIPPING, which ended up at ($13.50). If you search for bar faucets, and the brand Price Pfister, you will find some mini faucets that are perfect for play kitchens.
THE SINK: I got it at a second hand store for $1.00. It’s a stainless steel and I think it is a dog bowl, but the lip on the edge was perfect to hold it in there, you could also use a brownie pan or another size pan. My little Q really likes to take it in and out so I didn’t fasten it down so she could have her fun.
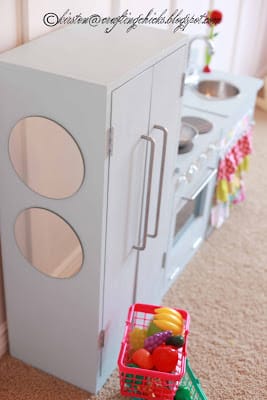
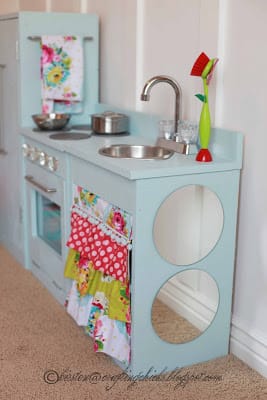 MIRRORS: Also from Ikea was the mirrors, two on each side. This just might be Q’s favorite part of the whole thing. They were also from Ikea and they were $4.99 for a four pack. They have these cool, spongy adhesive stickers, 4 for each mirror, that really seal it in place. Later I may add some hooks under those mirrors on the fridge for her necklaces, I think she would like that.
POTS AND PANS: IKEA, for the set of 4 it was ($10.00).
 PLEXIGLASS & FASTENERS: I bought this at Home Depot, and it was ($4.00) and it was an 11×14″ piece. I’m not going to lie, the oven door was tough. In fact, that was my least favorite part of the project. It was a balancing act getting the oven door to lay flat and my nails kept shooting out the side. I used a lot of wood putty on that, don’t look too closely. Those fasteners were ($2.00) and are for mirrors. I decided not to router the oven door and just put the plexiglass on the back, it worked well. Also, I ended up not needing a closure for the oven door because it rubs a little on one side and holds fine without one.
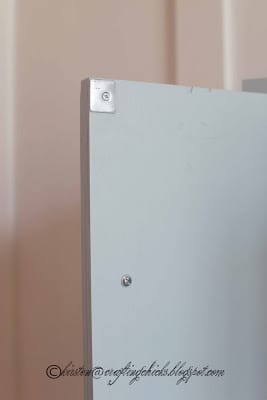
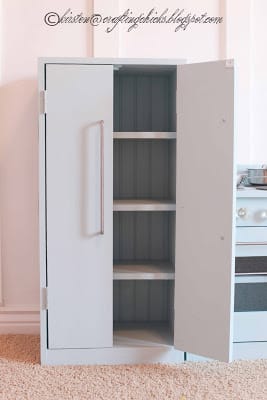
 HINGES: I used 2 pairs of 2 1/2″ hinges on the fridge and a pair of 2″ hinges on the oven. Each pair was about ($2.00).
 MAGNETS: I added a magnet/metal piece set ($.79 at Home Depot) so the fridge would close nicely. Each door has a metal piece and they both fasten to the same magnet.
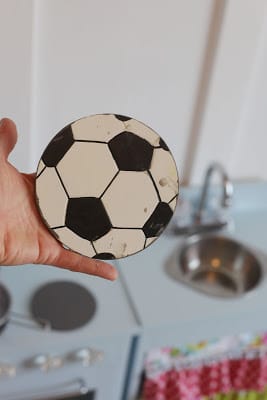
 STOVE BURNERS: On the flip side of those burners-three 5″soccer balls and a basketball painted gray, all from Roberts crafts ($.79 each). It’s the closest thing to burners I could find without cutting my own. They are glued on with E6000 glue.
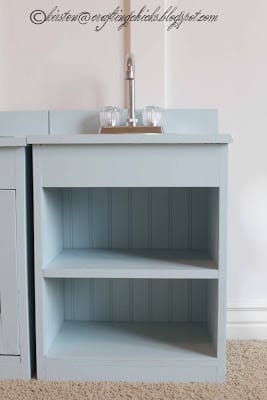
 Here’s the sink without the curtain and the tension rod. That front piece hides the bowl of the sink and the faucet hardware nicely.
 THE CURTAIN: This was a really fun part. The curtain is on a tension rod (that my hubby jimmy rigged to make smaller).
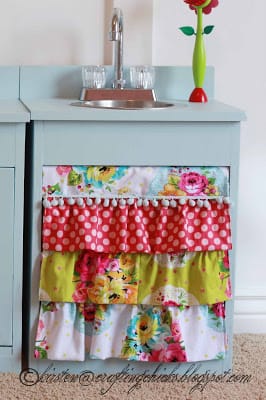 QUICK CURTAIN MINI TUTORIAL: I got these fabrics from my favorite place to go pick out material, Quilter’s Haven. All their fabrics are super up to date and the nicest lady that worked there let me bounce ideas off her and gave me great ruffle tips, seriously she was so nice.
In case you were wondering, and it’s not rocket science, but the ruffles are sewn to a heavier duty fabric so it hangs straight, and is then looped around the top. The dimensions of the fabric pieces (before any sewing) are as follows (if only I could whip up a diagram like Ana, that would really come in handy right about here):
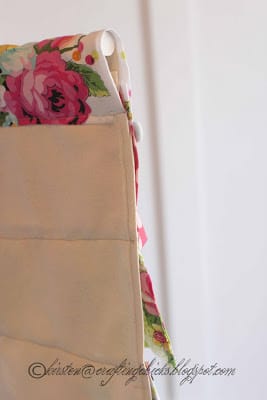
- Main Cream-colored piece: 15.5″ wide 17.5″ long with 1/2″ seam allowances. The circumference of the loop at the top is 4″ with 1/2″ seam allowance.
- The colorful fabric at the top was sewn on after the three ruffles, and about 1/2″ over the top of the pink ruffle.
- The dimensions of each ruffle before sewing: 10.5″x22″
- To sew each ruffle put fabric backside down and horizontal, and bring the bottom up so the colorful sides are together and sew with 1/4″ seam allowance, turn inside out, then sew again along top, the ends are still open and now you have a long tube.
- Fold the ends in and sew the ends closed.
- (now to prepare for gathering the fabric) Do two rows of basting stitch (long stitch) 1/4″ from the top and about 1/4″ apart and leave long tails of thread on each end.
- After you do this pull the thread lightly until the fabric gather evenly across the fabric
- Then pin the ruffle to the main piece, and sew a regular stitch between the two basting stitches.
- Pull the basting stitches out after it is properly sewn in place, leaving the main stitch, slick!
- The bottom of each ruffle hangs about 3/4″ over the ruffle beneath it. The fabric over the loop (white, green, blue colored) is sewn over the pink ruffle about 1/2″
- The blue pom pom row is sewn right where the top of the pink fabric and the colorful loop fabric join.
- The bottom ruffle hangs about and inch below the main piece of fabric.
- The edges and bottom of each ruffle hang free. Whew that was probably a little confusing, got it?

So for the grand total and it’s even on the more expensive end of making it yourself, but it’s still impressive for a completely custom job. And let’s be honest, these do-it yourself kitchens would beat the Pottery Barn kitchens in a fight any day:
- Paint: $6
- Wood: $40
- Knobs: $10
- Handles: $14
- Faucet: $13.50
- Hinges: $6
- Material and pom poms: $12.00
- Tension Rod: $3
- Stove top burners: $3.20
- Nails: $4.50
- Sand Paper & Glue: $10
- Flower Scrubber: free
- Mirrors: $5
Grand Total Is: $127.20
 And even more importantly, there’s a whole new wealth of knowledge nestled cozily in my head: Priceless!!
Thanks Ana for all of your hard work, you’ve really made a difference in the world.
Happy Crafting Ladies!
**Edited** You can find the dimensions for the fridge, sink, and stove on Ana’s site.


I want that backdrop!!
You are that amazing! Love the backdrop!
Love the backdrop…would love to win that one!!
You are awesome! What a fun project! Love the backdrop too! is there anything you can’t do? Keep it up!
Added you to my blog! alishaw.wordpress.com
Would LOVE to win;) Found you through Ana’s site – I am IN LOVE with that kitchen!! I’m gonna have to get one of those made…and soon!! GORGEOUS!!!
I became a follower in my google reader!
I would really like to win the backdrop, I am really in to photography!
I’m a follower, too! 🙂
Love the backdrop, and the kitchen!
the.k.krew at gmail dot com
I am a follower – and love your blog!
the.k.krew at gmail dot com
I am also a fan on FB.
the.k.krew at gmail dot com
I am a follower of this blog! Love the backdrop!
[email protected]
So pretty!
love the kitchen
What a great backdrop!
I’m a follower 🙂 Would love the backdrop
I’m a fan on FB 🙂
i would LOVE that backdrop
I became a follower !!
I put a link on my blog
wow, what a fun giveaway!!!
sarah8914 at gmail dot com
I found you on FB… Became a fan I love that backdrop!!!
I would love that backdrop! :)m I became a fan, joined the FB group and your link is on the side of my blog, http://www.jasonkelliwest.blogspot.com
Very pretty!
I am also a fan on facebook.
this backdrop would be perfect for the family pics we r bout to take 🙂 hope i win!
I love this backdrop! I want it!
[email protected]
I love your choice in backdrop! How fun it would be to win it!
I am a follower.
I am a fan on facebook
I have you link on my blog
i am soooo lovin’ on that little kitchen! and a bit jealous 😉
OH my goodness. I just had one of those lightbulbs above my head turn on… like in the cartoons… I never thought of using a pattern for a backdrop. A world of possibilities just opened up. Thank you for the idea! (and the chance to win it!)
add me to the list of people that would love that backdrop!!
Cute backdrop!
love it!
Very pretty backdrop! I’d love to win it. 🙂
I follow you on google reader!
Love both! I would love to win anything!!!
I also subscribe to your blog!
Wow…that is the cutest backdrop! LOVE it! I have visions of taking amazing pictures of my kids with that backdrop:)
I follow you!
The backdrop is beautiful…I did all the extras; FB, Blog follower and added button to my blog 😉 This is a giveaway I’d would absolutely love!
Lastly, I am fan of Crafting Chicks on FB
Very cute backdrop!!
I follow your blog too!
I love the backdrop! It is so cute!!
I added a button to my blog! You are the only one I have, lucky you!
I added your button to my blog. justcuzvinyl.blogspot.com
I added your button to my blog. You are the only button I have. Lucky!
My husband is really into photography. The backdrop would be a great gift for him!!!
I became a follower!
I love the backdrop
i already follow your blog
I would LOVE the backdrop. I love the design. I’m taking a photography class right now and my mind is rolling with fun ideas. This would for sure come in handy!
I’m a follower!
I love that backdrop!
Added your button to my blog
I am now a follower
Became a fan on facebook (I think)
What a cute backdrop!
Added you on my blog http://www.prisbreyplace.blogspot.com
I’m a follower
FB fan too
so so SO cute!
That backdrop is great! I would love to win it.
I subscribed to your blog.
linda at learyfam dot com
Darling backdrop and I love the kitchen! It is amazing!
I am a blog follower.
I need a REAL backdrop. How fun this would be!
I’m already a follower.
Just became a fan on facebook.
Would LOVE that backdrop!!!!
LOVE that backdrop – hoping I win!
I am a follower on Facebook
Linked your site on my blog!!
Already following! Love your blog!
Am now a fan on facebook 🙂
I check this blog everyday I love it so so much! Pick me! Pick me! I love love love the backdrop! 🙂
I am a follower!
I am also a fan on FB!
and I added your button to my personal blog! What can I say I LOVE this blog!!!
That backdrop is awesome would love it
I follow your blog
Pick me!! I love the back drop!
I follow your blog!
I follow you on facebook!!
Love the backdrop and play kitchen. Great job Kirsten!
I love this giveaway, and want it so darn bad!!
Such cute fabric and makes me wish summer were here already!
Thanks for the chance to win!
[email protected]
I follow your awesome blog!!
[email protected]
LOVE LOVE IT Kirsten! You are AMAZING!!
I would love the backdrop! Due in July!
facebook follower!
I am with you on facebook
following the blog!
I have your button
I would LOVE that backdrop! And the kitchen is gorgeous!!
I have you linked on my blog.
I am your loyal blog follower!
I’m a follower!
seriously cutest thing I have EVER seen!
Love the backdrop!
I am already a follower!
I am a facebook fan! Would love to win this!
Your kitchen is adorable and I want that backdrop. Gorgeous!
eric_danielle(at)netzero(dot)com
I follow your blog!
eric_danielle(at)netzero(dot)com
I am a fan on facebook.
eric_danielle(at)netzero(dot)com
Very Cute! I love it.
[email protected]
I already have you guys linked on my site:)
-jakeychuckyvilela.blogspot.com
I also am a follower on your site:)
[email protected]
I can see so many beautiful photos taken with that backdrop!
I am a follower
I am a fan of you fb page too
and did I mention I have your button on my blog too…
I would love to have the backdrop! I’ve been thinking about making the play kitchen for my daughter for christmas and after seeing yours I’m for sure going to….it is darling!!
I’m a fan on facebook.
Fun backdrop, Kirsten! Pick me! Pick Me!
Cute backdrop!
Follower!
I’d love the backdrop!!
Ooooo the backdrop is dreamy!
I’m a huge fan:) Love the backdrop kirsten:)
I’m a fan on facebook
I have a link on my blog!! and would love that backdrop
I hope I win this!! I would love to have that backdrop!!
maryw1981 at yahoo dot com
I’m a follower!!
maryw1981 at yahoo dot com
I really want this. If I don’t win I’ll just have to come over and borrow it 🙂 [email protected]
I love that fabric! Thanks for the chance to win!
I follow the blog!
I would totally LOVE this backdrop – so darn cute!!!
I am a follower!
Now I am with you on facebook 🙂
Way cool, as a photographer I would LOVE that backdrop, amazing color as well.
The backdrop is adorable! Kirsten you are so talented!
Pretty sure this is my new favorite blog! I love the kitchen and NEED the backdrop! Pick me?
Facebook fan
Button
Follower
Follower!
Facebook stalker 🙂
Got your button!
And just a regular old comment to tell you how much I love your sight… Found it YESTERDAY!!!
Super cute backdrop and FANTASTIC kitchen. My dad gave us his chop saw and my hubby has yet to let me use it. I guess I just need to be sneaky and pull it out one day while he is at work;)
I love that backdrop!
OH! That backdrop is great. I could really use something like that.
I’m a follower!
Super cute backdrop!!!
Love it ! so amazing!
LOVE the backdrop!
I’m a follower!
I have your button on my blog:
jcbrowerfamily.blogspot.com
I’m a fan on FB
I would like that backdrop
That backdrop would be awesome with my soon to be newborn pictures!
I am a follower
I am a FB fan
your button is on my blog
jeffandkristimiller at blogspot dot come
I would LOVE that backdrop!!!
I am a follower!!!!!
The pattern on the backdrop is beautiful!
I follow your blog!
Also I’m a fan on facebook.
And I’m a follower of this blog!!<3
I would love to win the back drop to take pics of my new grandchild to be born in October!!!!!!!
Pick me please! I would LOVE this!
Very CuTe backdrop!! So FuN!
I’m a follower of your awesome blog!
Your link is on my blog!! 🙂
PUH-LEASE pick me! And if you don’t, let me know how much you charge for that kitchen, because I NEED one!
I am speechless about that kitchen! I love it! I want to make that…maybe in a few years…and a few more $$.
I follow this blog!
I’m a fan on FB!
I have a link blog!
Love the back drop. Alish [email protected]
so cute!
I am a follower too!
I’m a fan on FB
So adorable! Oh please pick me!!!
Love the backdrop, LOVE the fabric!!!
love the backdrop! and the kitchen turned out fantastic!
Kirsten you are amazing. I love the kitchen, love the backdrop and love you!
that backdrop may be one of my color schemes ever! how fun!
lovely backdrop and lovely kitchen. good job!
i am also a follower.
and i am a fan on facebook …
and yes … i do have your button on my blog at http://www.mangostarblog.blogspot.com. i hope i win this thing. 😉
wow the kitchen is amazing! 🙂 thanks for the chance to win!
tnrutger at gmail dot com
i follow ur awesome blog!
I just bought my first digital SLR camera so I could take good pictures of my baby twin daughters. This backdrop would be perfect!!
I’m also a facebook fan!
I absolutely have to have that backdrop.
What a fun giveaway! I love how your kitchen turned out-so cute.
Oh man do I want that backdrop!! I love it. thanks for the giveaway!
I am a follower of your blog!
I am a fan on facebook!
I have your button on my blog!
I would love the beautiful backdrop. It is just gorgeous!
SO SO CUTE!!! I would love that.
The backdrop is so fun and amazing I would love it. Thanks for the giveaway.
I am a follower of your cute blog.
the backdrop is adorable…would be perfect to photograph my new baby girl arriving this summer! 🙂
Oh goodness. I just found your blog and I think that backdrop is stunning! I would use it so much. Gotta go look at what else you have!
Amberly
aideejaephotographydotblogspotdotcom
Oh the backdrop is awesome 🙂 I could and would use it!
OH MY! This would be a great birthday present- for myself! I LOVE it!
I have your button
I follow your blog
Oh pick me pick me!!!!
Oh yeah, you have a link on my blog! http://www.darranandjen.blogspot.com
Wow looks like we all want the backdrop! But I want it more LOL
I just found your blog and am in love!! And I think I NEEEEEED that backdrop!!
LOVE that backdrop!!
I became a follower too!! LOVE IT!
I love the backdrop!
great blog! I liked your facebook page so much I followed your blog. I would LOVE to win that backdrop!
I follower your blog
I put your button on my blog
I became a FB fan. I think at least. There wasn’t a “fan” button, but a “like” button and now I see all your posts so I’m pretty sure I did it right.
Such a cute backdrop!!
I would love the backdrop! Follower
Great backdrop!
Love the back drop! That kitchen is so cute, its next on the crafting to do list.
I could use a pretty backdrop like that!
And your button is on one of my blogs
http://www.carrotsticksandcupcakes.blogspot.com
Love the backdrop!!
Love the backdrop! My second dd would LOVE having her picture taken with that! Added to my blog & fan on facebook!
I am planning on building this kitchen for my daughter but I can’t find the plans for the stove or sink sections. . . do you have the dimensions so I could take a cut list to lowes/home depot?? Thanks so much!
I am in love with the kitchen and would love to head out to buy the supplies! Is there any way to get the dimensions used? My husband actually has all of the tools in the garage and secretly dreaming on a reason to use them all…this would be it! Thanks so much for sharing….
I think you will love building this kitchen. Give me a day to figure out the exact dimensions. If you want to search on ana-white.com, that’s another option. You MUST show me the outcome! Happy building!
Good luck,
Kirsten Wright
thecraftingchicks.com
i too am going to attempt to build the kitchen for my sweet 2 year old for christmas. any way i could get your dimensions for the kitchen pieces? thanks! anna, parker & gracie
[email protected]
For those asking for dimensions for the kitchen you can now find the links for them at the bottom of the post!
I fell in love with the blue color of your kitchen, went to Lowes to find the book you color-matched, and to my dismay, could not find it. Would you be willing to share the color combination from the top of the can?
I love this so much. I already read your blog but must have added you to my google reader after this post because I don’t remember it. Found you from Ana’s blog…what a beautiful kitchen. Thanks for the detailed post. I can-NOT believe you made it for $127. We’re making one for our daughter for next Christmas, I’m so excited.
Gorgeous!!! I fell in love at first sight. Seriously. Your kitchen was a huge inspiration in creating mine. Thank you!
http://shopbonnenouvelle.blogspot.com/2011/01/repurposed-dream-play-kitchen-abridged.html
This is such an amazing little play kitchen – I have loved it for a while now! Just featured it on my blog 🙂
http://christopherandanne.blogspot.com/2011/06/little-kitchen-update.html
hi kristen, i was wondering if you knew the designer who made the fabric (from the diy play kitchen). i’m in loooove with it
need help with hinges asap! don’t know what kind you used or how you mounted them. bought a couple diff. ones and can not get them to mound flush unless i mount them on outside of doors. i mean can not get doors to sit flush with fridge without hinges on outside. please help… thanks!
Very cute. Do you remember what your demensions of each cut? If so would you be willing to share?
238 is a lotta comments for this post…I’m gonna make it 239;)
Any chance you remember how your husband rigged the tension rod? The shortest I could find was 18 inches, and I’m just not sure how to get it to fit in there.
Thanks so much!
The have really short tension rods at bed, bath and beyond. I just bought mine and it adjusts from 11″ to 18″. It comes in a pack of two.
Hi. I love your kitchen so much that I’m in the process of making one for my daughter. My question is regarding the faucet. I have found two affordable options, but they are drastically different in height. How tall is your faucet? I love the look of the one you found. Thanks again for posting this beautiful kitchen!
I’m curious to find out what blog system you have been using? I’m experiencing some minor security issues with my latest website and I’d like to find something more risk-free. Do you have any suggestions?
I have had this kitchen on my pinterest from the moment I first found it. Love everything about it from the paint color to the fabric…would fit perfect in our home. 6 years ago we lost the little girl of our dreams, Cynthia Elle, after carrying her full term. Three years ago God blessed us with another baby girl, Kyleigh Joy! We are so excited and so enjoying all of the fun girl stuff! (: I would love to find out if you know of someone who might be interested in building another kitchen just like this one…and selling it to us…would be so amazing!!! (:
Kristen
How do i get the measurements for the pieces of wood for the kitchen? Thank you!
Hello, I am starting the building of this play kitchen for my daughter. I am so excited! I am getting hung up on the hinges though. There are so many out there. I have been to Home Depot and couldn’t find ones that would work for as cheap as you got yours. I was wondering if you could help me with this. Also I love love love your fabric and didn’t know if you knew the name of it. Thanks so much for your help! I have been truly inspired by you!
Good morning.
Stumbled across your post. Great idea and it looks adorable! Sadly the link you provided for Ana’s post is giving me a 404 error. 🙁
Oh no, we’ll get that fixed. You can find the plans for the pieces you want here: http://www.ana-white.com/category/plans/project-type/play-kitchen-collection