• Skip to primary navigation
  • Skip to main content
  • Skip to primary sidebar
  • Skip to footer

The Crafting Chicks

Ideas and Inspiration to Create Your Life.

  • Home
  • Meet the Chicks
  • Advertising/PR
  • Contact
  • Blog
  • Printables
  • Recipes
  • Holidays
  • Life
  • Sewing
  • More

digital scrapbooking, gift ideas, Home, Home Decor, Mother's & Father's Day

DIY Silhouettes for Mother’s Day

by Nikkala · on April 22, 2010 · 28 Comments ·

9785 shares
  • Share
  • Tweet
Children Silhouette Tutorial

Last year for Mother’s Day we gave the grandmas silhouettes of our boys. It is a timeless gift that grandmas love! I plan to continue this tradition every year and they can swap out the new head for the old and watch the changes as the boys grow. I also hung some in our room, because once the silhouettes are complete there are countless ways to use them. And they are really simple to do! I’ve seen tutorials using Illustrator, but I am pen tool challenged so I used Photoshop. These DIY Silhouettes for Mother’s Day are the perfect gift!

Silhouette Tutorial for Photoshop

First, you need a profile photo of your child. A solid wall would work best, but sometimes you’ve got to do what you have to. Here he is sitting in his bumbo as the older brother entertains him.
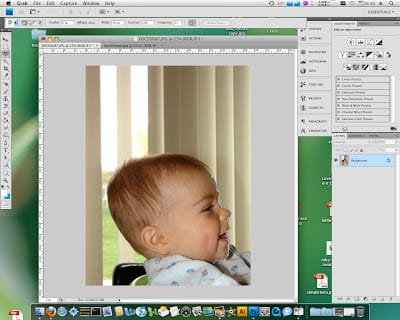
How to create a silhouette in Photoshop

I’m using Photoshop CS4 here, but other versions should work just as well–all you need is the magnetic lasso tool.

Select the magnetic lasso tool and start selecting the child’s face. Pay special attention to detail and be sure to click to make the lasso stick. Smiles, eyelashes and hair add the greatest detail to the silhouette.
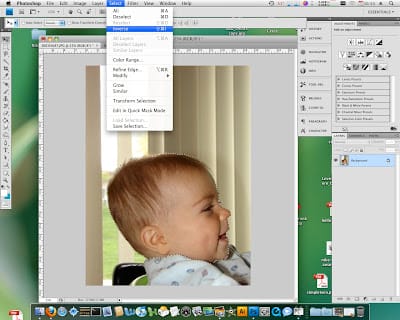
Silhouette Tutorial

After you have it like you want it (it may take a few tries), select the inverse.
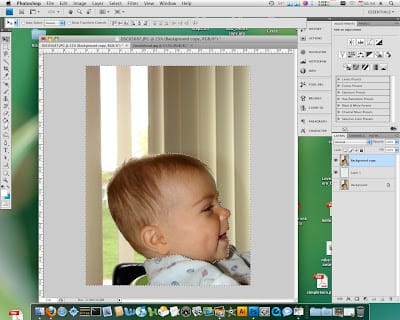
SIlhouette Tutorial

You’ll notice at this point I add a blank layer, moved my photo up a layer and shut off the original–but having a white background will work the same!
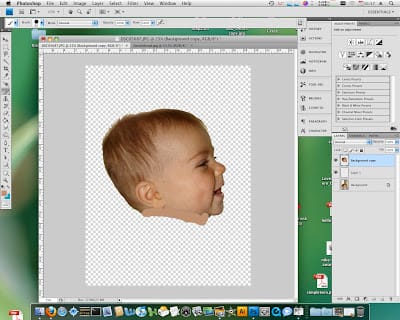
Silhouette Tutorial

Press delete and watch a floating head appear. Ctrl + D (Command + D for the Mac users) to deselect. I used the eraser to clean up any stray debris remaining and the brush tool to add a little more neck. Remember it is going to be black and white–meaning everything that isn’t white will be black.
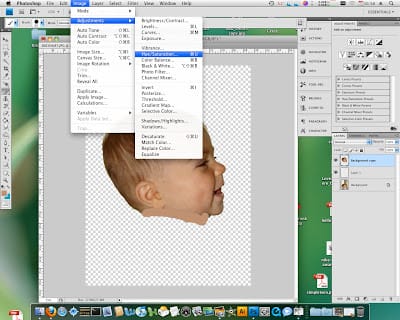
Photoshop Silhouette Tutorial

We are almost done. We just need to turn the little guy black. Image > Adjustments > Hue/Saturation
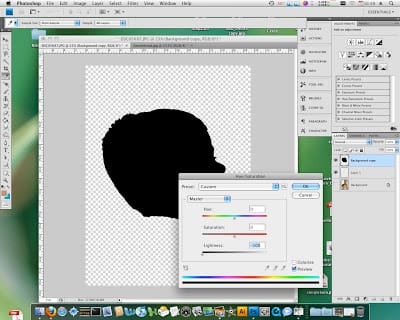
Silhouette Tutorial

Move the lightness slider all the way to the left and the image will turn black! That’s all there is to it.
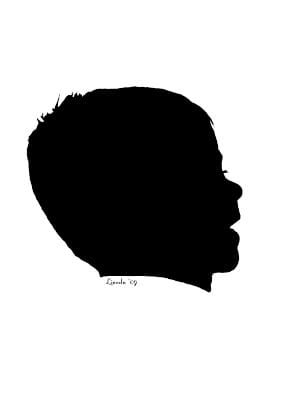
 
How-to create Silhouettes in Photoshop

I added his name and the year to the bottom just for kicks. It will be fun to see how he has changed in the last year! And I still can’t get over those eyelashes!
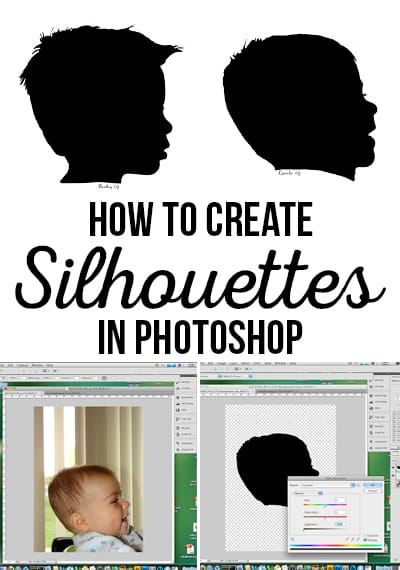
How to make a Silhouette in Photoshop

About Nikkala

is the author of this post. Want to know more about the Chicks? Click here. :)

Comments

  1. Jamie says

    April 22, 2010 at 9:06 pm

    LOVE LOVE LOVE this tutorial Nikkala-going to try it!

    Reply
  2. Kirsten says

    April 22, 2010 at 9:13 pm

    I have wanted to do that forever!!! Thanks for the reminder and the know how! THose are WAY cute.

    Reply
  3. Mary says

    April 22, 2010 at 9:52 pm

    What a cute idea! I don’t have Photoshop, but I’m pretty sure I can get it to work in GIMP. Thanks for the post!

    Reply
  4. Sheila Irish says

    April 22, 2010 at 9:54 pm

    Thank you Nikkala for sharing this wonderful tutorial! I want to try this using my Grandchildren’s pictures.

    Reply
  5. Andrea says

    April 22, 2010 at 10:17 pm

    Thank you so much! I made some for grandparents for Christmas 2008 but did it the “old fashioned” way by printing a picture and then cutting it out along with black paper. This looks much easier;)

    Reply
  6. enSTYLEpedia says

    April 22, 2010 at 11:10 pm

    this is a great grandma gift!!

    Reply
  7. Stacy says

    April 23, 2010 at 2:39 am

    I have been wanting to do this for ever! Thanks for the tutorial! Now I don’t have to figure it out on my own…

    Reply
  8. [email protected] says

    April 23, 2010 at 3:26 am

    Wow, this is great! Thanks so much for the tutorial. I’ll be linking in my Mother’s Day Roundup.

    Reply
  9. Batman's Mom says

    April 23, 2010 at 3:42 am

    I’ve been looking for a silhouette tut for a while now. Thank you sooo much!

    Reply
  10. Amy says

    April 23, 2010 at 9:31 am

    This is very cool – thank you for the awesome tutorial!

    Reply
  11. Shay says

    April 23, 2010 at 2:10 pm

    That is AWESOME! I love this idea. Just hope I can get my 3 kids done and mailed off before Mother’s Day! Thank you!

    Reply
  12. Ashlee @ I'm Topsy Turvy says

    April 25, 2010 at 8:44 pm

    I am in love with silhouettes too! I recently did some painted ones for my wall and just last week created some pendants for necklaces and earrings, I wear them every day now! Next up? A charm bracelet for my mom for mother day with all the grandkids silhouettes on it!!

    Reply
  13. Brooke says

    April 25, 2010 at 9:15 pm

    Fabulous tutorial, Nikkala!

    Reply
  14. latter-daymom says

    April 26, 2010 at 4:35 pm

    I have done silhouettes in years past, but trying to get a child to sit still long enough to get an outline drawn on paper on the wall is next to impossible. This technique is so simple and easy!!! Thank you so much, I want to do one of my grandson for my daughter.

    Reply
  15. traci says

    April 29, 2010 at 1:11 am

    Thanks for the tutorial. I have always wanted to do this and even took photos of my kids to do it last year and never got it done. Now I am ready to try again.

    Reply
  16. Jeremy and Heidi says

    May 8, 2010 at 9:43 pm

    Just made some for my MIL! Thanks for the idea–perfect for procrastinators like me (but it definitely doesn’t look like a last minute project!)

    Reply
  17. latter-daymom says

    May 13, 2010 at 2:03 am

    I ended up just printing the photo and using it as the pattern to cut out the silouette because I don’t have photo shop. I just rubber cemented the photo and black paper together on the waste edges. My only regret is I didn’t do two at one time so I could have one. It turned out darling and my daughter said she loved it.

    Reply
  18. Jan says

    January 19, 2013 at 6:39 pm

    Can you adjust the size, such as make it smaller?

    Reply
    • Nikkala says

      May 20, 2013 at 10:27 am

      absolutely!

      Reply

Trackbacks

  1. Framed Silhouettes says:
    July 8, 2010 at 4:20 pm

    […] knew I wanted the silhouettes of our boys hanging in our bedroom, but didn’t want life size prints of their heads nor did I […]

    Reply
  2. {DIY} Welcome Becky With The Crafting Chicks! — Dandy Giveaway says:
    November 4, 2010 at 2:04 am

    […] Create Your Own Silhouette Tutorial […]

    Reply
  3. {Top 12 “Crafting Chicks” Crafts from 2010} says:
    January 14, 2011 at 6:02 am

    […] How to Make Silhouettes in Photoshop. […]

    Reply
  4. DIY Wall Art: Personalized Silhouettes {free download} says:
    April 25, 2011 at 6:02 am

    […] There are a lot of tutorials out there on how to create your own silhouette in Photoshop, including Crafting Chicks Nikkala’s awesome one, so I’m not going to post step by step directions. I am just sharing what I did with the […]

    Reply
  5. Fun Ideas Using Silhouettes says:
    June 27, 2011 at 9:48 pm

    […] There are lots of great silhouette tutorials online, my friend (and fellow Crafting Chick) Nikkala wrote a post about it awhile back if you want to check it out: Silhouettes. […]

    Reply
  6. 10 Handmade Mother’s Day Gifts says:
    April 16, 2013 at 6:01 am

    […]  Silhouette Tutorial & Silhouette Wall […]

    Reply
  7. Father’s Day Tie says:
    May 16, 2013 at 3:26 pm

    […] the lines while I cut out their cute little heads and wording out of iron vinyl on my Silhouette. (Their silhouettes were already, since that’s what we give Grandma for Mother’s Day.) Once the paint was dry we ironed the silhouettes on and added the teeny little bow to baby […]

    Reply
  8. Addie’s Fourth Birthday Party | Simple As That says:
    April 24, 2014 at 11:58 am

    […] For the gift wrapping I created some fun paper flowers, and to personalize the gift bag I used this tutorial to create a silhouette of Addie. I then printed it on cardstock and glued it to the […]

    Reply
  9. Best Diy Crafts Ideas : How-to create Silhouettes in Photoshop for Mother's Day via The Crafting Chi… | DIY Loop | Leading DIY & Craft inspiration Magazine & Database says:
    December 20, 2017 at 5:33 pm

    […] -Read More – […]

    Reply

Leave a Reply Cancel reply

Your email address will not be published. Required fields are marked *

This site uses Akismet to reduce spam. Learn how your comment data is processed.

Recent

14 Acts of Kindness Printable

Halloween I Spy

Halloween Nail Gift Tag Printables

Best Homemade Playdough Recipe

All About My Mom Free Printable

Creative Easter Egg Decorating

Get access to our free crafting guide

We are a participant in the Amazon Services LLC Associates Program, an affiliate advertising program designed to provide a means for us to earn fees by linking to Amazon.com and affiliated sites.

© 2023 The Crafting Chicks. Website by WP Barista. Privacy Policy

9785 shares