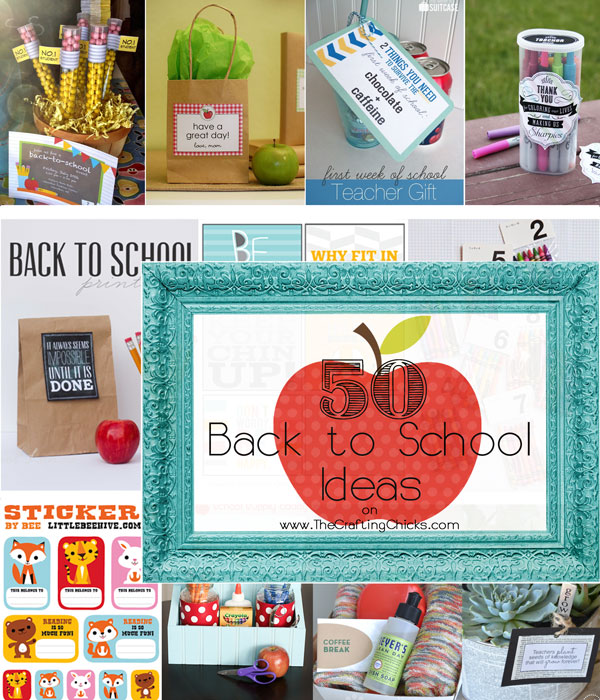
Felt Flower Pillow

These felt flower pillows have been all over the place lately–they were demoed at our Super Saturday, I’ve seen them on a few blogs, and even spotted one sitting on my cousin’s couch! When my sisters decided to exchange handmade gifts for Christmas, I knew this is what I’d be making! And just because I’ve seem them doesn’t mean you have-so here’s a tutorial just for you!
All you need is a little felt and a glue gun. Our local JoAnn’s had wool felt before Christmas for much, much less than quilt stores sell it for. When I asked about a different color an employee told me to just be happy they had what they did. She said it is a rare thing they carry and had been 2 years since they’d had it in stock.
Deciding to just be happy I bought more than I thought I’d need, just in case.

The petals are half circles in 3 different sizes. I traced common, but yet random objects to get my variety of sizes. A glass, a canning lid, and the top of a baby bottle provided my templates. Once you’ve found the sizes you want , start tracing it onto the felt. You’ll need approximately 30 petals of each size–for a total of 90 petals. This was for a 16″ x 16″ pillow so adjust accordingly.

Here are my petals and my 16″ squares of fabric.

I sewed around the edges, leaving an opening at the bottom to stuff it through. If you’d rather use a pillow form, you can make an envelope pillow back like Jamie showed last week. I did some each way, but in the end decided that since felt won’t hold up well in the wash, and I used hot glue, and the pillows cost less than $5 each to make it was pointless in making a removable cover. Instead this is a disposable pillow. If you don’t have access to a sewing machine you could use fabric glue, or even hot glue if you are feeling brave.
 Turn the square right side out and get ready to make some magic!
 Before gluing the petals down I, did a run through on each pillow to make sure I had enough petals. Start with the outside edge and overlap the petals forming a circle, and then continue in a spiral pattern til the flower is full. This step isn’t necessary, but it is fun.
When you are sure you have enough petals and you can’t wait any longer–take all the petals off and start over. This time run a bead of hot glue along the straight edge of the petal and glue it down. The petals will be able to move since only the bottom edge is attached.
This is really a fool proof craft. If you see a bare spot, simply insert another petal by lifting the top petals up and sticking a new one in until you like how is looks. Just keep the hot glue from showing and now one will ever guess how simple they are.
If you want a fuller looking flower, pucker the petals by slightly pinching the edges of the petal together once you’ve placed it on the pillow and before the glue cools. I really like how it looks, but didn’t get a picture of that pillow.
 For the center of the flower, cut 4 circles. I used a glass for my pattern, but you can use whatever you used for your largest petal. Then fold each circle in half.
 And then in half again and glue at the point. Repeat on all four circles and then glue in the middle of the pillow.

That’s it! Now it is time to either stuff with batting, or insert a pillow form. Once you’ve stuffed, sew up that opening and you’re done!
For a 16″ x16″ pillow I used a little over a 1/2 yard of wool felt and noticed the acrylic felt comes wider, so 1/2 yard of acrylic felt should be plenty.
 After making 4 of these I’m still amazed that it is hot glued together and I love the feminine touch it adds to my house of boys.
You might also like:
Make a Spring Bunny Pillow from Tatertots and Jello


What a great project! Sure makes me wish I had stocked up on felt BEFORE getting snowed in 🙂
Love it!!!!
Thanks for the tutorial- glad to know it’s easier than it looks!
My box of Christmas goodies I mailed to myself arrived yesterday. I can’t wait to bust out my pillow and stuff it! Maybe it will be my reward if I put Christmas decorations away!
Chop, chop! Just add the green pillow and it will blend in with the Christmas decor!
Looks like a great project for the no sewers out there. And it’s great that it stays together and looks good.
Very cute!! Thanks for sharing the tutorial.
Thank you sooooo much for the tutorial! I heart these pillows!
So cute!!! Can you follow up by teaching me how to make one of the cute silk ruffled pillows??
I’m sorry but those red felt pieces look just like pepperonis! I think I’ll make mine in blue. Great project!
I’ve seen them in green, red, yellow and grey–they were all fantastic and I bet a blue one would be beautiful too!
I think up close the circles look a little like pepperoni, but on the pillow I don’t see it. It looks great all together. Besides, if that was all Jo-Ann’s had, I guess you take what you can. Heck, I’d even buy a mustard colored felt if the price was right.
They kind of do. I’ve seen the pillow done in yellow, red, green and grey and they all were fabulous–I bet blue would be beautiful too!
NIK, that is the cutest project, it’s SO beautiful in red. Those really are stunning!!!
Thanks Kirsten!
The pillow is lovely, at last something I can do with all the felt left over from Christmas, thanks for sharing
My bedroom is calling out for a couple of these. Oh boy, one more project before the baby gets here! Super fun Nik!
I LOVE THIS!!!!!!!!!! I have to make one!
Talk about gorgeous! Amazing that this is a DIY kind of project. Darling.
This project was love at first sight! Just finished my first one 🙂 Thanks for the great tutorial, I posted my results on my blog http://brittneysbudgetcrafts.blogspot.com/ feel free to check it out 🙂
Brittney-I love your pillow! Good to see it looks good in a lighter color too!
I love this…I am going out to get felt TOMORROW! I hope I can find some burnt orange or maybe a maroonish color if not I’ll go with red…
Mind if I show this on my new blog? I am featuring a bunch of “want to do” projects for the month…www.warmfuzzypurpleandgold.blogspot.com
I will give credit and link back to you =)
Ooh, I really wanted a burnt orange, but had no luck finding it –if you find it let me know where!
Feel free to link back!
That turned out great! I saw a barrel shaped lampshade last week where they made the same kind of felt flower on it (all white) and I wanted to do something similar for my daughter’s room, so this will be a great help.
Would you mind sharing where you got the zebra print pillow? I’ve been looking all over for one.
Kristy, I found the zebra print fabric in the home fabric section (at least I think that’s where it was) at JoAnn’s and made the pillow.
What a fun project! I can’t wait to try it out! This will be my next throw pillow makeover project, I just finished one I wrote about on my blog. Thanks for much for sharing your creative ideas!
http://the-shiny-side.blogspot.com/2011/06/rescue-of-throw-pillow.html
Simply Beautiful !
I love this work.
Vou fazer uma linda almofada dessa PRA mim, é maravilhosa.
Job well done. It looks simple enough for a kid! This is a great project for me to work on.
Hi!
Your ebautiful DIY is on my blog!
http://fioridiflowerland.blogspot.com/2012/03/un-po-di-colore-per-la-tua-casa-touch.html
Thak you so much!
Sara
After you have added the flower, have you tried washing the pillow cover? How does it hold up? Not machine washable?