Rag Rug
This post contains affiliate links.

I have long loved these rag rugs, but once I see the price tag I move away from them quickly.
I finally decided to make one!
Here’s what you’ll need if you want to make your own Rag Rug:
4 yards of some plain coordination fabric (I think it would be fun to get 2yds of one color and 2yrds of another)
needle and white thread
sewing machine
and scissors
Begin by cutting your 4 yards of fabric into 2.5″ long strips. Yes this is a lot of cutting but if you have the rollie pollie you are saving a bit of cutting. 🙂

Take three of your fabric strips, layer them on top of each other and sew a stitch across the top.
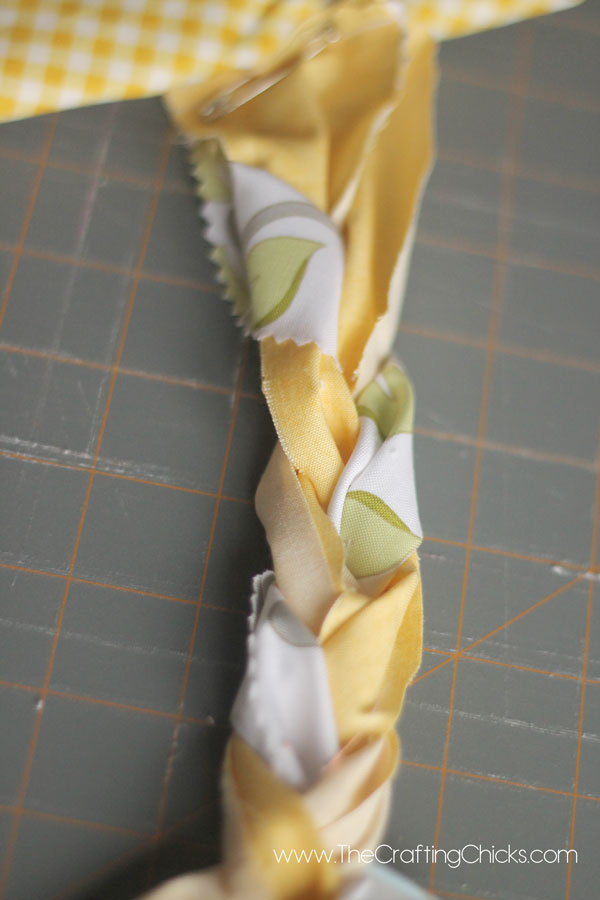
Are you ready to get your braid on? Take your sewn strips and tack them down on something with at safety pin. Begin loosely braiding your strips together.

Once you are at the end of your fabric you will need to add another strip of fabric to continue on. To do this you will need to:
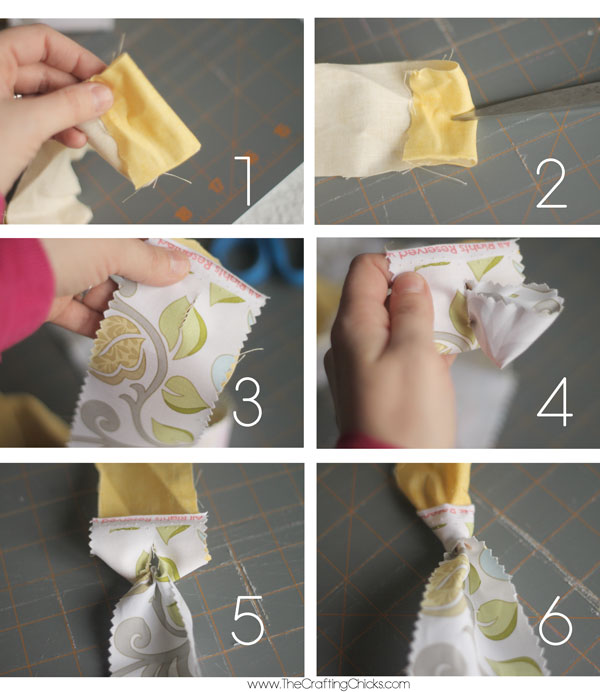
- Fold over the bottom 1.5″ of each of the strips.
- Snip a small vertical line into each piece of fabric.
- Take the three pieces of fabric you’d like to attach, and snip the same hole into those strips.
- Layer the attachment piece to one of the braided pieces, lining up the hole.
- Take the bottom of the new piece and slide it through both holes from behind.
- This will create a knot.
Repeat with each piece of fabric and then continue braiding.
You will continue to attach each remaining strip of fabric this way until you are finished. Sew the ends together like you did the beginning.
Now to sew the rug together.
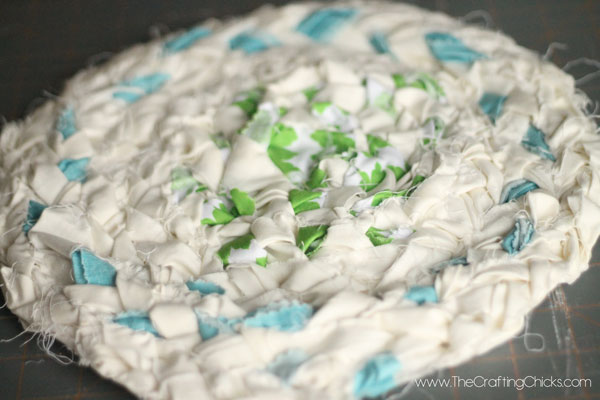
Grab your needle and thread (heavy duty thread is probably the best option for this). Begin by coiling your braids together, a little at a time, and hand stitching them to each other. I found it was easiest to make sure that my braids were laying flat. They do seem to twist a bit so just fix it as you go.
Make sure you place your rug on a flat surface otherwise it will start to curl up leaving you with more of a bowl than a rug.
Once at the end, make sure you tuck your end under and into the rug so it is hidden.
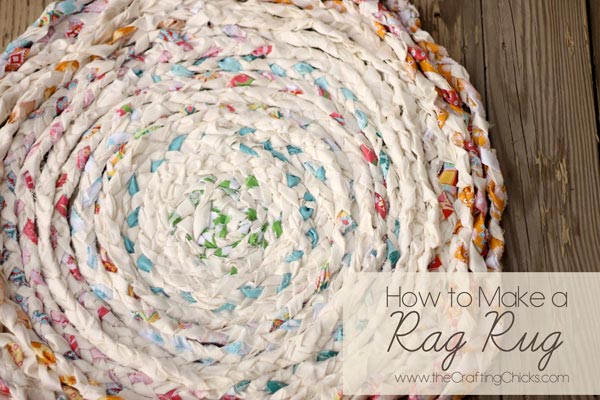
So there you have it. A fun rag rug. Now don’t you feel domestic? I sure did once I was done!
For more sewing fun check out these projects:

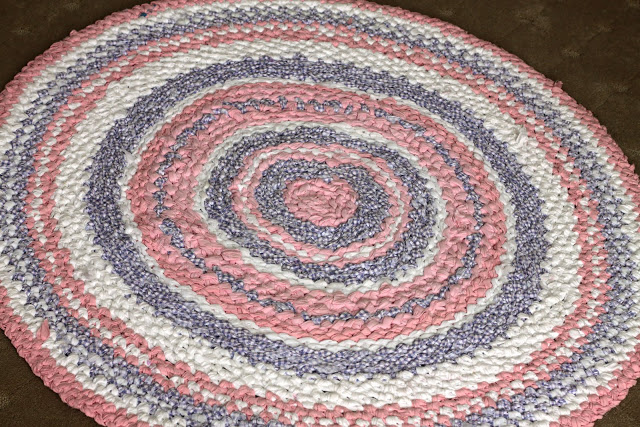


Such a cute rug!
I have made tons of these rugs in my life. I don’t buy fabric tho, I go to Goodwill and buy cotton clothing and sheets. Yard sells are a good place also. This is a bit more time consuming however way cheaper and reusing the old to make new!! I cut them in stripes and fasten them like you do to each other. However I don’t sew mine together, as I braid, I coil them, then slip one of the 3 pieces into the braid next to it.
Kris, great idea. I was thinking there might be a sturdier way to keep the coils together…thanks for the tip! I’m moving, and I think I’m going to try something like this with some old shirts or something for some of the floors in there. They could use a little “umph”, if you know what I mean. 🙂
Hi kris,
Great idea on the coiling. Do y have a video or photos to share? Tough for me to sew with arthritis in hands. Would like to try your method.
Thanks,
Margie
I used old t-shirts.
What’s a “rollie pollie” of Riley Blake Fabric? Riley Blake Fabric?? IDK what that is either! Sorry, I got the “dumbs”
Riley Blake is a brand of fabric. They make beautiful fabrics. A rollie pollie is fabric from a coordinating line that are cut into 2.5″ strips so you do less cutting.
The rolls of precut 2 1/2″ strips of fabric (usually 40 pieces per roll) are actually called Jelly Rolls. 🙂
Some fabric manufactures call them jelly rolls, but Riley Blake, who made the fabric I used, calls them rollie pollies. I wanted to use their term in case someone wanted to purchase the fabric from Riley Blake.
Hoffman was the FIRST to make 2.5 inch strip packs named Bali Pops. Only 1 company calls them Jelly Rolls.
About how big is the rug when you used the 4 yards of fabric? I am using old t-shirts, like some of the ladies mentioned. I am sure I have at least 4 yards of fabric. I could braid up more, but don’t really want to if the rug will be big enough with just the 4 yards. Thanks for the tutorial. I am so excited to see how mine turns out.
It’s about 3′.
Is it easier to use cotton fabric or tee-shirt material. Thanks, Nancy
My grandmother used to make these rugs out of old denim or old polyester material. They wear BEAUTIFULLY and are very sturdy. Last for years!
My mother once used old panty hose and tights from her 4 daughters. The rugs lasted many years.
Since Facebook is notorious for not letting page owners know when I tag them, I thought I would stop by myself and let you know I featured this post and my readers loved it! https://www.facebook.com/CraftsbyAmanda/photos/pb.323548680216.-2207520000.1395952982./10153979818135217/?type=3&theaterter
Thank you so much for letting me know! I’m so glad that your readers are liking this post!
I watched my grandmother make rag rugs all through my childhood. This seemed to be 1 of two hobbies she had. The other was hand sewing quilts. Both were literally made from rags, old clothes, old sheets, whatever she could get her hands on. However, she would rip her material into the width she wanted to use. She didn’t not the pieces together or sew them together. She would lay the new strip on top of the one she needed to replace and there by lengthen it with a new color/design. She started with her material flat, one layer, and folded both sides half way toward the middle of the strip so they would meet and then fold it again in half. In this way, she hid and protected the rough edges and when she added a new strip, the overlapping strips were long enough that when she braided them, they didn’t come apart until the material literally frayed from wear. She braided these things so tight you couldn’t pull any two strips apart where they were joined if you had 2 strong men tugging on them. I get to retire this year. I can’t sew but I can try a rug. I will gather my kids and grandkids old clothing and make a memory rug.
i have a vague memory of my grandmother doing this as well. i also remember the rug’s sturdiness and that it was not sewn together. How i wish that i had a video of her making one of her rugs!
My grandmother made these rugs out of material and old plastic bread bags .my momhad a few of them that were over fourty years old….imagine if that rug could talk? 🙂
I love this vintage inspired ideas! I have to get busy making one myself.
this is going to be a fun winter project for me, thanks
I make similar rugs from old sheets or fabric. My grandmother tore the 1-2″ strips, then slip stitched together in a big ball and crocheted with a very large crochet hook, is very easy and extremely durable.
My grandmother crocheted rag rugs, when I was a child. She used a great big old wooden crochet hook, She would have all us kids cut up old clothes into strips and sew the ends together, and roll it into a big ball. When we got the size ball she thought would make a good sized rug, she would have us start on another. I learned how to crochet when I was 8 years old and have been doing it since.
i just crochet mine together. It doesn’t end up being quite as tight a weave but still functional
I wish you could do a video of the steps of how to make the rug
I make wool rugs in the same way and actually the braiding and stitching the coils together goes back to the mi-19th century, much older than crochet, which was just starting to be used more after the American Civil War. I buy my 100% wool from the Goodwill and Salvation Army.
I have three different flannel sheet sets that I’m going to braid for gifts this Christmas. I’m planning to make placemats and coasters using the technique. Do you think I should cut the strips to be thinner than 2.5 inches?
I would probably cut them thinner. You’ll have to send us a picture once you are done. That sounds like lots of fun.
I love this and can’t wait to try it but how do you clean them? Can you vacuum them or wash them? Are them slippery?